


MySQL数据库基本管理
MySQL数据库基本管理
一、SQL概述
1.1 什么是SQL?
SQL:结构化查询语言(Structured Query Language)简称SQL,是一种特殊目的的编程语言,是一种数据库查询和程序设计语言,用于存取数据以及查询、更新和管理关系数据库系统;同时也是数据库脚本文件的扩展名。
从上可以看出我们数据库相关工作职位大概两种:DBD和DBA
dba是数据库管理员:database administrator dbd是数据库开发人员:database developer
1.2 SQL语句结构
结构化查询语言包含6个部分:
1.2.1 数据查询语言(DQL:Data Query Language)
其语句,也称为“数据检索[语句]”,用以从表中获得数据,确定数据怎样在应用程序给出。保留字SELECT是DQL(也是所有SQL)用得最多的动词,其他DQL常用的保留字有WHERE,ORDER BY,GROUP BY和HAVING。这些DQL保留字常与其他类型的SQL语句一起使用。
1.2.2 数据操作语言(DML:Data Manipulation Language)
其语句包括动词INSERT,UPDATE和DELETE。它们分别用于添加,修改和删除表中的行。也称为动作查询语言。
1.2.3 事务处理语言(TPL)
跟shell有点类似 由多条sql语句组成的整体
它的语句能确保被DML语句影响的表的所有行及时得以更新。TPL语句包括BEGIN TRANSACTION,COMMIT和ROLLBACK。
1.2.4 数据控制语言(DCL)
它的语句通过GRANT或REVOKE获得许可,确定单个用户和用户组对数据库对象的访问。某些RDBMS可用GRANT或REVOKE控制对表单个列的访问。
1.2.5 数据定义语言(DDL)
其语句包括动词CREATE和DROP。在数据库中创建新表或删除表(CREAT TABLE 或 DROP TABLE);为表加入索引等。DDL包括许多与人数据库目录中获得数据有关的保留字。它也是动作查询的一部分。
1.2.6 指针控制语言(CCL)
它的语句,像DECLARE CURSOR,FETCH INTO和UPDATE WHERE CURRENT用于对一个或多个表单独行的操作。
1.3 数据库的查询过程
查询过程的步骤如下:
1.客户端向服务器发送请求

    借用于MYSQL的协议将客户端的请求发送到服务器端。MYSQL协议是一种半双工协议,即可以发送也可以接收数据。但不能同时发送和接受数据。

2.查询缓存

    检查查询结果在缓存是否存在,如果在缓存就存在那么直接将缓存的数据发送给客户端即可,如果缓存中不存在我们需要的结果数据,那么到第三个步骤。

    如果判断缓存中是否有我们需要的结果集的数据,是通过哈希查询来确定,是一种精确的哈希方法,并区别分大小写。

3.解析与优化查询

    MYSQL会将我们的语句变成一个解析树,生成解析树会去检查语义、语法是否错误,判断表的信息是否正确等。

    查询优化器是对我们的SQL语句进行优化最后变成一个查询执行计划。

通常优化的内容的包括以下部分:

        --->对连接表进行重新排序
        --->将外链接变成内链接进行查询
        --->代数等价法则,即关系运算符的处理
        --->优化聚合函数: count()、min()、max()
        --->计算和减少常量表达式
        --->覆盖索引
        --->子查询优化,将多个子查询转换为独立查询
        --->尽早终结,是指执行的查询语句不要写的过长
        --->优化in集合,优化in集合中的关系谓词
4.生成执行计划

    将语句优化好的,会重新生成一个解析树,再将这个解析树生成一个可执行的计划。

5.查询引擎

    对API函数对引擎进行操作,通过引擎到数据库中取数据。再将数据发送到客户端。

    MYSQL数据库支持第三开发的引擎。
1.4 书写规则
- 数据库中,SQL语句大小写不敏感
- SQL语句可单行或多行书写
- 在SQL语句中,关键字不能跨多行或缩写
- 为了提高可读性,一般关键字大写,其他小写
- 空格和缩进使程序易读
二、数据库管理
2.1 查看数据库
mysql>  show databases;
+--------------------+
| Database           |
+--------------------+
| information_schema |
| mysql              |
| performance_schema |
| sys                |
| tomcat             |
+--------------------+
5 rows in set (0.00 sec)
注:

1:information_schema这数据库保存了MySQL服务器所有数据库的信息。如数据库名,数据库的表,表栏的数据类型不访问权限等。

2:performance_schema 这是MySQL5.5新增的一个性能优化的引擎:命名PERFORMANCE_SCHEMA

主要用于收集数据库服务器性能参数。MySQL用户是不能创建存储引擎为PERFORMANCE_SCHEMA的表

3:mysql库是系统库,里面保存有账户信息,权限信息等。

4:mysql5.7增加了sys 系统数据库,通过这个库可以快速的了解系统的元数据信息

元数据是关于数据信息的数据,如数据库名或表名,列的数据类型,或访问权限等。
以行的形式查看数据库
mysql>  show databases \G;
*************************** 1. row ***************************
Database: information_schema
*************************** 2. row ***************************
Database: mysql
*************************** 3. row ***************************
Database: performance_schema
*************************** 4. row ***************************
Database: sys
*************************** 5. row ***************************
Database: tomcat
5 rows in set (0.00 sec)

ERROR:
No query specified
在登录数据库的时候查看:
[root@localhost ~]# mysqlshow -uroot -p123456
mysqlshow: [Warning] Using a password on the command line interface can be insecure.
+--------------------+
|     Databases      |
+--------------------+
| information_schema |
| mysql              |
| performance_schema |
| sys                |
| tomcat             |
+--------------------+
2.2 创建数据库
2.2.1 语法
create database 数据库名;
创建数据库注意事项:
1) 在文件系统中,MySQL的数据存储区将以目录方式表示MySQL数据库。因此,上面命令中的数据库名字必须与操作系统的约束的目录名字一致。例如不允许文件和目录名中有*,/,:,**,?,”,<,>,|这些符号,在MySQL数据库名字中这些字母会被自动删除。<遵从目录的约束>

2) 数据库的名字不能超过64个字符,包含特殊字符的名字或者是全部由数字或保留字组成的名字必须用单引号``包起来。

3) 数据库不能重名。
2.2.2 创建数据库
mysql> create database HA;
Query OK, 1 row affected (0.00 sec)

mysql> create database `HA-test`;
Query OK, 1 row affected (0.00 sec)

mysql> show databases;
+--------------------+
| Database           |
+--------------------+
| information_schema |
| HA                 |
| HA-test            |
| mysql              |
| performance_schema |
| sys                |
| tomcat             |
+--------------------+
7 rows in set (0.01 sec)
2.2.3 查看数据库的存放位置
[root@server01 ~]# ls /var/lib/mysql(yum安装方式)
2.2.4 选择要操作的数据库
使用USE语句将会选择一个数据库成为当前数据库。后面的操作默认都在被选择的数据库中操作。
mysql> use HA-test;

Database changed
2.3 常用select命令
使用select命令查看mysql数据库系统信息
select now();-- 打印当前的日期和时间

select curdate();---- 打印当前的日期

select curtime();-- 打印当前的时间

select database();-- 打印当前数据库

select version();-- 打印MySQL版本

select user();-- 打印当前用户
查看系统信息
show variables;   #查看系统变量

show global variables;   #查看全局变量

show global variables like '%version%';   #查看变量参数中带有version的

show variables like '%storage_engine%';  #变量参数中带有带有storage_engine的
like模糊搜索还可用户where字句,例如
select * from students where stname like '%l%1%2%3%';
除了like 还有not like
show engines;查看支持哪些存储引擎
查看系统运行状态信息
show status;

show global status like 'Thread%';
示例:查看自己所处的数据库位置及默认所在的位置
mysql> select database();
+------------+
| database() |
+------------+
| HA-test    |
+------------+
1 row in set (0.00 sec)

mysql>
默认登录执行:
mysql> select database();
+------------+
| database() |
+------------+
| NULL       |
+------------+
1 row in set (0.00 sec)

mysql>
Null意味着没有选择数据库
Null在数据库中表示不知道的数据,主要有3种意思:
1)知道数据存在,但不知道具体值
2)不知道数据是否存在
3)数据不存在
2.4 在命令行选择默认的数据库
[root@localhost mysql]# mysql -uroot -p123456 HA
mysql: [Warning] Using a password on the command line interface can be insecure.
Welcome to the MySQL monitor.  Commands end with ; or \g.
Your MySQL connection id is 13
Server version: 5.7.36 MySQL Community Server (GPL)

Copyright (c) 2000, 2021, Oracle and/or its affiliates.

Oracle is a registered trademark of Oracle Corporation and/or its
affiliates. Other names may be trademarks of their respective
owners.

Type 'help;' or '\h' for help. Type '\c' to clear the current input statement.

mysql> select database();
+------------+
| database() |
+------------+
| HA         |
+------------+
1 row in set (0.00 sec)

mysql>
2.5 删除数据库
方法1:删除数据库
mysql> drop database `HA-test`;
Query OK, 0 rows affected (0.04 sec)

mysql>
删除没有任何提示,要慎重操作
方法2:直接到数据库存放目录移出就行
[root@localhost mysql]# ls
HA/          HA@002dtest/
[root@localhost mysql]# mv HA /tmp/    ##mv移走
[root@localhost mysql]# ls
auto.cnf    client-cert.pem  ib_buffer_pool  ib_logfile1  mysql.sock          private_key.pem  server-key.pem
ca-key.pem  client-key.pem   ibdata1         ibtmp1       mysql.sock.lock     public_key.pem   sys
ca.pem      HA@002dtest      ib_logfile0     mysql        performance_schema  server-cert.pem  tomcat
[root@localhost mysql]#
mysql> show databases;
+--------------------+
| Database           |
+--------------------+
| information_schema |
| HA-test            |
| mysql              |
| performance_schema |
| sys                |
| tomcat             |
+--------------------+
6 rows in set (0.00 sec)

mysql>
使用IF EXISTS 子句以避免删除不存在的数据库时出现的MySQL错误信息
mysql> drop database if exists `HA-test`;
Query OK, 0 rows affected (0.00 sec)

mysql>
IF EXISTS:如果存在
同理我们创建数据库时也可以使用
mysql> create database if not exists `HA-test`;
Query OK, 1 row affected (0.00 sec)

mysql>
三、表操作
什么是表?表是用来干嘛的?表又叫二维表(有行和列) ,用来存储数据, 表具有固定的列数和任意的行数,在数学上称为“关系”。 二维表是同类实体的各种属性的集合,每个实体对应于表中的一行,在关系中称为一条记录 表中的列表示属性,称为Field,相当于通常记录中的一个数据项,也叫列、字段。
3.1 创建表
3.1.1 语法
create table 表名 (字段名 类型, 字段名 类型, 字段名 类型);
mysql> create table student(id int(20),name char(40),age int);
Query OK, 0 rows affected (0.01 sec)
3.2 查看表相关信息
3.2.1 查看表信息
mysql> use tomcat;        ##切换数据库
Reading table information for completion of table and column names
You can turn off this feature to get a quicker startup with -A

Database changed
mysql> show tables;     ##查看数据库表
+------------------+
| Tables_in_tomcat |
+------------------+
| student          |
| tt               |
| u1               |
+------------------+
3 rows in set (0.01 sec)
3.2.2 查看表的结构
mysql> desc student;
+-------+----------+------+-----+---------+-------+
| Field | Type     | Null | Key | Default | Extra |
+-------+----------+------+-----+---------+-------+
| id    | int(20)  | YES  |     | NULL    |       |
| name  | char(40) | YES  |     | NULL    |       |
| age   | int(11)  | YES  |     | NULL    |       |
+-------+----------+------+-----+---------+-------+
3 rows in set (0.00 sec)

mysql>
mysql> explain mysql.user;

mysql> show columns from mysql.user;

mysql> show fields from mysql.user;

mysql> show columns from mysql.user like '%user';
以上4种会一种常用的就行
3.2.3 查看创建表执行了哪些命令
mysql> show create table student \G;
*************************** 1. row ***************************
       Table: student
Create Table: CREATE TABLE `student` (
  `id` int(20) DEFAULT NULL,
  `name` char(40) DEFAULT NULL,
  `age` int(11) DEFAULT NULL
) ENGINE=InnoDB DEFAULT CHARSET=latin1
1 row in set (0.01 sec)
3.2.4 修改默认的存储引擎和字符集
mysql> create table student2(id int(20),name char(40),age int)ENGINE=MyISAM DEFAULT CHARSET=utf8;
Query OK, 0 rows affected (0.00 sec)

mysql>
mysql> show create table student2 \G;
*************************** 1. row ***************************
       Table: student2
Create Table: CREATE TABLE `student2` (
  `id` int(20) DEFAULT NULL,
  `name` char(40) DEFAULT NULL,
  `age` int(11) DEFAULT NULL
) ENGINE=MyISAM DEFAULT CHARSET=utf8
1 row in set (0.00 sec)
这两个是默认存储引擎和默认字符集
3.3 删除表
语法: drop table TABLE_NAME;
mysql> drop table student2;
Query OK, 0 rows affected (0.00 sec)

mysql>
3.4禁止预读表信息
没有禁止前的提示(当我们打开数据库,即use dbname时,要预读数据库信息,当使用-A参数时,就不预读数据库信息。当数据库的表非常大的时候,如果预读表信息会非常卡顿)
mysql> use performance_schema;
Reading table information for completion of table and column names
You can turn off this feature to get a quicker startup with -A

Database changed
登录的时候加上-A参数
mysql -uroot –p123456 -A
3.5 修改表名称
语法:alter table 表名 rename 新表名
mysql> alter table student rename students;  ##将student表命名成students
Query OK, 0 rows affected (0.00 sec)

mysql>
3.6 修改表中的字段类型
语法:alter table 表名 modify 要修改的字段名 要修改的类型 ;
mysql> desc students;
+-------+----------+------+-----+---------+-------+
| Field | Type     | Null | Key | Default | Extra |
+-------+----------+------+-----+---------+-------+
| id    | int(20)  | YES  |     | NULL    |       |
| name  | char(40) | YES  |     | NULL    |       |
| age   | int(11)  | YES  |     | NULL    |       |
+-------+----------+------+-----+---------+-------+
3 rows in set (0.00 sec)
mysql> alter table students modify id int(10);
mysql> desc students;
+-------+----------+------+-----+---------+-------+
| Field | Type     | Null | Key | Default | Extra |
+-------+----------+------+-----+---------+-------+
| id    | int(10)  | YES  |     | NULL    |       |
| name  | char(40) | YES  |     | NULL    |       |
| age   | int(11)  | YES  |     | NULL    |       |
+-------+----------+------+-----+---------+-------+
3 rows in set (0.00 sec)

mysql>
3.7 修改表中的字段类型和字段名称
语法:alter table 表名 change 原字段名 新字段名 新字段类型;
mysql> desc students;
+-------+----------+------+-----+---------+-------+
| Field | Type     | Null | Key | Default | Extra |
+-------+----------+------+-----+---------+-------+
| id    | int(10)  | YES  |     | NULL    |       |
| name  | char(40) | YES  |     | NULL    |       |
| age   | int(11)  | YES  |     | NULL    |       |
+-------+----------+------+-----+---------+-------+
3 rows in set (0.00 sec)

mysql> alter table students change name stname char(20);   ##修改字段名
Query OK, 0 rows affected (0.02 sec)
Records: 0  Duplicates: 0  Warnings: 0

mysql> desc students;
+--------+----------+------+-----+---------+-------+
| Field  | Type     | Null | Key | Default | Extra |
+--------+----------+------+-----+---------+-------+
| id     | int(10)  | YES  |     | NULL    |       |
| stname | char(20) | YES  |     | NULL    |       |
| age    | int(11)  | YES  |     | NULL    |       |
+--------+----------+------+-----+---------+-------+
3 rows in set (0.00 sec)

mysql>
注:CHANGE 和MODIFY的区别:
CHANGE对列进行重命名和更改列的类型,需给定旧的列名称和新的列名称、当前的类型。
MODIFY 可以改变列的类型,此时不需要重命名(不需给定新的列名称)
3.8 在表中添加字段
语法:alter table 表名 add 字段名 字段类型;
mysql>  alter table students add sex enum('M','W');
Query OK, 0 rows affected (0.02 sec)
Records: 0  Duplicates: 0  Warnings: 0
mysql> desc students;
+--------+---------------+------+-----+---------+-------+
| Field  | Type          | Null | Key | Default | Extra |
+--------+---------------+------+-----+---------+-------+
| id     | int(10)       | YES  |     | NULL    |       |
| stname | char(20)      | YES  |     | NULL    |       |
| age    | int(11)       | YES  |     | NULL    |       |
| sex    | enum('M','W') | YES  |     | NULL    |       |
+--------+---------------+------+-----+---------+-------+
4 rows in set (0.00 sec)

mysql>
3.9 指定位置添加字段
3.9.1 在第一列添加一个字段
mysql> alter table students add uid int(10) first;
Query OK, 0 rows affected (0.01 sec)
Records: 0  Duplicates: 0  Warnings: 0

mysql> desc students;
+--------+---------------+------+-----+---------+-------+
| Field  | Type          | Null | Key | Default | Extra |
+--------+---------------+------+-----+---------+-------+
| uid    | int(10)       | YES  |     | NULL    |       |
| id     | int(10)       | YES  |     | NULL    |       |
| stname | char(20)      | YES  |     | NULL    |       |
| age    | int(11)       | YES  |     | NULL    |       |
| sex    | enum('M','W') | YES  |     | NULL    |       |
+--------+---------------+------+-----+---------+-------+
5 rows in set (0.00 sec)

mysql>
3.9.2 在age后面添加一个address字段
mysql>  alter table students add address char(40) after age;
Query OK, 0 rows affected (0.01 sec)
Records: 0  Duplicates: 0  Warnings: 0

mysql> desc students;
+---------+---------------+------+-----+---------+-------+
| Field   | Type          | Null | Key | Default | Extra |
+---------+---------------+------+-----+---------+-------+
| uid     | int(10)       | YES  |     | NULL    |       |
| id      | int(10)       | YES  |     | NULL    |       |
| stname  | char(20)      | YES  |     | NULL    |       |
| age     | int(11)       | YES  |     | NULL    |       |
| address | char(40)      | YES  |     | NULL    |       |
| sex     | enum('M','W') | YES  |     | NULL    |       |
+---------+---------------+------+-----+---------+-------+
6 rows in set (0.00 sec)

mysql>
3.10 删除表中字段(列)
语法:alter table 表名 drop 字段名 ;
mysql> alter table students drop address;
Query OK, 0 rows affected (0.01 sec)
Records: 0  Duplicates: 0  Warnings: 0

mysql> desc students;
+--------+---------------+------+-----+---------+-------+
| Field  | Type          | Null | Key | Default | Extra |
+--------+---------------+------+-----+---------+-------+
| uid    | int(10)       | YES  |     | NULL    |       |
| id     | int(10)       | YES  |     | NULL    |       |
| stname | char(20)      | YES  |     | NULL    |       |
| age    | int(11)       | YES  |     | NULL    |       |
| sex    | enum('M','W') | YES  |     | NULL    |       |
+--------+---------------+------+-----+---------+-------+
5 rows in set (0.00 sec)

mysql>
四、数据插入管理
4.1 插入字段
语法:insert into 表名 values (字段值1,字段值2,字段值3);
mysql> create table student(id int,name varchar(128),age int);
Query OK, 0 rows affected (0.01 sec)

mysql> insert into student values(1,'zhangs',21);
Query OK, 1 row affected (0.00 sec)

mysql>
4.2 插入记录时要对应相对的类型
mysql> insert into student values(2,'lis',24),(3,'wange',26);
Query OK, 2 rows affected (0.00 sec)
Records: 2  Duplicates: 0  Warnings: 0
4.3 同时插入多条,使用","分开
mysql> insert into student(id,name)values(4,'hangl');  ##指定字段插入
Query OK, 1 row affected (0.00 sec)

mysql>
4.4 查询表中记录
语法:select * from 表名称;
mysql> select * from student;
+------+--------+------+
| id   | name   | age  |
+------+--------+------+
|    1 | zhangs |   21 |
|    2 | lis    |   24 |
|    3 | wange  |   26 |
|    4 | hangl  | NULL |
+------+--------+------+
4 rows in set (0.01 sec)

mysql>
当字段比较多的时候我们也可以使用*G
mysql> select * from student \G
*************************** 1. row ***************************
  id: 1
name: zhangs
 age: 21
*************************** 2. row ***************************
  id: 2
name: lis
 age: 24
*************************** 3. row ***************************
  id: 3
name: wange
 age: 26
*************************** 4. row ***************************
  id: 4
name: hangl
 age: NULL
4 rows in set (0.00 sec)
只查询表中某个字段的内容:
mysql> select name from student;
+--------+
| name   |
+--------+
| zhangs |
| lis    |
| wange  |
| hangl  |
+--------+
4 rows in set (0.01 sec)
查询表中多个字段的内容
mysql> select id,name from student;
+------+--------+
| id   | name   |
+------+--------+
|    1 | zhangs |
|    2 | lis    |
|    3 | wange  |
|    4 | hangl  |
+------+--------+
4 rows in set (0.00 sec)

mysql>
4.5 查看别的数据库的表或者不在本数据库的表
语法:SELECT * 字段 FROM 数据库名.表名;
mysql> select * from HA.u1;
+------+----------+
| id   | name     |
+------+----------+
|    1 | zhangsan |
|    2 | lisi     |
+------+----------+
2 rows in set (0.00 sec)

mysql>
这样等效于先use 数据库,然后查看
五、删除记录管理
5.1 删除指定的行
mysql> delete from students where id=3;  #删除id=3的行
Query OK, 0 rows affected (0.01 sec)

mysql>
5.2 删除为空的行
mysql> delete from students where age is null;   #删除age是空的行
Query OK, 0 rows affected (0.00 sec)

mysql>
5.3 更新记录
mysql> update students set sex='M' where id=2;  #更新id=2的sex位‘M’
Query OK, 0 rows affected (0.00 sec)
Rows matched: 0  Changed: 0  Warnings: 0

mysql>
mysql> update students set id=2;   #将所有的都更新为2
Query OK, 0 rows affected (0.00 sec)
Rows matched: 0  Changed: 0  Warnings: 0

mysql>
mysql> update students set stname='zhangsan',age=21 where uid=1;
Query OK, 0 rows affected (0.00 sec)
Rows matched: 0  Changed: 0  Warnings: 0
同时更新多个字段时候用,号隔开
六、SQL基础条件查询语句
语法:select 字段名1,字段名2 from 表名 [where 条件];
6.1 查询students表中多个字段
mysql> select name,age from student;
+--------+------+
| name   | age  |
+--------+------+
| zhangs |   21 |
| lis    |   24 |
| wange  |   26 |
| hangl  | NULL |
+--------+------+
4 rows in set (0.00 sec)

mysql>
6.2 去重复查询:distinct
mysql> select * from student;
+------+--------+------+
| id   | name   | age  |
+------+--------+------+
|    1 | zhangs |   21 |
|    2 | lis    |   24 |
|    3 | wange  |   26 |
|    4 | hangl  | NULL |
|    5 | wuyi   |   24 |
|    6 | wuyi   |   24 |
+------+--------+------+
6 rows in set (0.00 sec)

mysql> select distinct name from student;
+--------+
| name   |
+--------+
| zhangs |
| lis    |
| wange  |
| hangl  |
| wuyi   |
+--------+
5 rows in set (0.00 sec)

mysql>
6.3 使用and和or进行多条件查询
or和and 同时存在时,先算and的两边值,逻辑与再执行
mysql> select * from student;
+------+--------+------+
| id   | name   | age  |
+------+--------+------+
|    1 | zhangs |   21 |
|    2 | lis    |   24 |
|    3 | wange  |   26 |
|    4 | hangl  | NULL |
|    5 | wuyi   |   24 |
|    6 | wuyi   |   24 |
|    7 | ermao  |   34 |
+------+--------+------+
7 rows in set (0.00 sec)

mysql> select id,name,age from student where id>3 and age>25;
+------+-------+------+
| id   | name  | age  |
+------+-------+------+
|    7 | ermao |   34 |
+------+-------+------+
1 row in set (0.00 sec)
mysql> select id,name,age from student where id>3 or age>25;
+------+-------+------+
| id   | name  | age  |
+------+-------+------+
|    3 | wange |   26 |
|    4 | hangl | NULL |
|    5 | wuyi  |   24 |
|    6 | wuyi  |   24 |
|    7 | ermao |   34 |
+------+-------+------+
5 rows in set (0.00 sec)

mysql>
注意and和or都是用的时候的逻辑关系
6.4 设置MySQL区分大小写查询
Mysql查询默认是不区分大小写的
mysql> select name from student where name='wange';
+-------+
| name  |
+-------+
| wange |
| wange |
| WANGE |
+-------+
3 rows in set (0.00 sec)

mysql>
解决方案
mysql> select name from student where binary name='WANGE';
+-------+
| name  |
+-------+
| WANGE |
+-------+
1 row in set (0.00 sec)

mysql>
BINARY是类型转换运算符,它用来强制它后面的字符串为一个二进制字符串,可以理解为在字符串比较的时候区分大小写。
6.5 MySQL查询排序
语法:select distinct 字段1,字段2 from 表名 order by 字段名;
6.5.1 默认为升序
mysql> select distinct id from student order by id asc;
+------+
| id   |
+------+
|    1 |
|    2 |
|    3 |
|    4 |
|    5 |
|    6 |
|    7 |
|    8 |
+------+
8 rows in set (0.00 sec)
6.5.2 降序
mysql> select distinct id from student order by id desc;
+------+
| id   |
+------+
|    8 |
|    7 |
|    6 |
|    5 |
|    4 |
|    3 |
|    2 |
|    1 |
+------+
8 rows in set (0.00 sec)
七、MySQL 用户管理
7.1 相关数据库和表
元数据数据库:mysql
系统授权表:db, host, user,columns_priv, tables_priv, procs_priv, proxies_priv
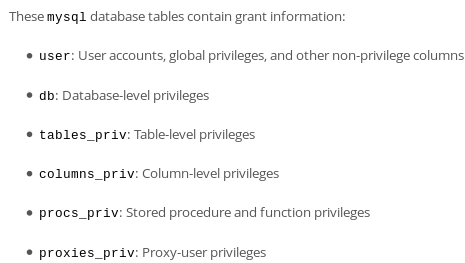
user :全局授权
db :库级授权
tables_priv :表级授权
columns_priv: 列级授权
procs_priv: 存储与函数授权
proxies_priv: 代理授权
7.2 MySQL权限表
- mysql.user Global level(全局) 用户字段 权限字段 安全字段 资源控制字段
- mysql.db Database level(库) 用户字段 权限字段
- mysql.tables_priv Table level(表)
- mysql.columns_priv Column level(列)
7.3 MySQL用户管理
- 登录和退出MySQL
示例:
mysql -h192.168.5.240 -P 3306 -u root -p123 mysql -e 'select user,host from user'
-h	指定主机名                   【默认为localhost】
-P	MySQL服务器端口              【默认3306】
-u	指定用户名                   【默认root】
-p	指定登录密码                 【默认为空密码】
此处mysql为指定登录的数据库
-e	接SQL语句(非交互访问)
7.4 用户帐号
'USERNAME'@'HOST'
'@'HOST': 主机名: user1@'web1.ops.org'
IP地址或Network
 通配符: %
 示例:test@172.16.%.%
      user2@'192.168.1.%'
7.5 创建用户:CREATE USER
方法一:
CREATE USER 'USERNAME'@'HOST' [IDENTIFIED BY 'password'];
create user 用户名@'主机192.168.1.131' IDENTIFIED BY '密码';

方法二:
GRANT语句创建(建议使用这一种方法!~)
grant  权限 on  库名.表名 to 用户@'主机' IDENTIFIED BY '授权密码(随便写)'
mysql>GRANT ALL ON *.* TO 'user3'@’localhost’ IDENTIFIED BY ‘123456’;
						  'up1806'@'192.168.1.%'
mysql>FLUSH PRIVILEGES;(更新)或者重启一下服务器
      flush privileges;
新建用户的默认权限:USAGE,USAGE是一种告诉MySQL的帐户存在,而不赋予该帐户任何真正的特权的方式。
范例:
mysql> select user,host,authentication_string from mysql.user;
+---------------+-----------+-------------------------------------------+
| user          | host      | authentication_string                     |
+---------------+-----------+-------------------------------------------+
| root          | localhost |                                           |
| mysql.session | localhost | *THISISNOTAVALIDPASSWORDTHATCANBEUSEDHERE |
| mysql.sys     | localhost | *THISISNOTAVALIDPASSWORDTHATCANBEUSEDHERE |
+---------------+-----------+-------------------------------------------+
3 rows in set (0.00 sec)

mysql> create user 'test'@'192.168.3.%';
Query OK, 0 rows affected (0.00 sec)

mysql> select user,host,authentication_string from mysql.user;
+---------------+-------------+-------------------------------------------+
| user          | host        | authentication_string                     |
+---------------+-------------+-------------------------------------------+
| root          | localhost   |                                           |
| mysql.session | localhost   | *THISISNOTAVALIDPASSWORDTHATCANBEUSEDHERE |
| mysql.sys     | localhost   | *THISISNOTAVALIDPASSWORDTHATCANBEUSEDHERE |
| test          | 192.168.3.% |                                           |
+---------------+-------------+-------------------------------------------+
4 rows in set (0.01 sec)

[root@Rocky8 ~]# mysql -utest -h 192.168.3.19

mysql> create user 'demo'@'192.168.3.%' identified by '1';
Query OK, 0 rows affected (0.00 sec)

mysql> select user,host,authentication_string from mysql.user;
+---------------+-------------+-------------------------------------------+
| user          | host        | authentication_string                     |
+---------------+-------------+-------------------------------------------+
| root          | localhost   |                                           |
| mysql.session | localhost   | *THISISNOTAVALIDPASSWORDTHATCANBEUSEDHERE |
| mysql.sys     | localhost   | *THISISNOTAVALIDPASSWORDTHATCANBEUSEDHERE |
| test          | 192.168.3.% |                                           |
| demo          | 192.168.3.% | *E6CC90B878B948C35E92B003C792C46C58C4AF40 |
+---------------+-------------+-------------------------------------------+
5 rows in set (0.00 sec)

[root@Rocky8 ~]# mysql -udemo -h 192.168.3.19 -p1
7.6 用户重命名:RENAME USER
语法:RENAME USER old_user_name TO new_user_name;
范例:
mysql> select user,host,authentication_string from mysql.user;
+---------------+-------------+-------------------------------------------+
| user          | host        | authentication_string                     |
+---------------+-------------+-------------------------------------------+
| root          | localhost   |                                           |
| mysql.session | localhost   | *THISISNOTAVALIDPASSWORDTHATCANBEUSEDHERE |
| mysql.sys     | localhost   | *THISISNOTAVALIDPASSWORDTHATCANBEUSEDHERE |
| test          | 192.168.3.% |                                           |
| demo          | 192.168.3.% | *E6CC90B878B948C35E92B003C792C46C58C4AF40 |
+---------------+-------------+-------------------------------------------+
5 rows in set (0.00 sec)

mysql> RENAME USER 'test'@'192.168.3.%' TO 'test1'@'192.168.3.%';
Query OK, 0 rows affected (0.00 sec)

mysql> select user,host,authentication_string from mysql.user;
+---------------+-------------+-------------------------------------------+
| user          | host        | authentication_string                     |
+---------------+-------------+-------------------------------------------+
| root          | localhost   |                                           |
| mysql.session | localhost   | *THISISNOTAVALIDPASSWORDTHATCANBEUSEDHERE |
| mysql.sys     | localhost   | *THISISNOTAVALIDPASSWORDTHATCANBEUSEDHERE |
| test1         | 192.168.3.% |                                           |
| demo          | 192.168.3.% | *E6CC90B878B948C35E92B003C792C46C58C4AF40 |
+---------------+-------------+-------------------------------------------+
5 rows in set (0.00 sec)
7.7 删除用户
DROP USER 'USERNAME'@'HOST';
范例:删除默认的空用户
DROP USER ''@'localhost';
mysql> DROP USER 'test1'@'192.168.3.%';
Query OK, 0 rows affected (0.00 sec)

mysql> select user,host,authentication_string from mysql.user;
+---------------+-------------+-------------------------------------------+
| user          | host        | authentication_string                     |
+---------------+-------------+-------------------------------------------+
| root          | localhost   |                                           |
| mysql.session | localhost   | *THISISNOTAVALIDPASSWORDTHATCANBEUSEDHERE |
| mysql.sys     | localhost   | *THISISNOTAVALIDPASSWORDTHATCANBEUSEDHERE |
| demo          | 192.168.3.% | *E6CC90B878B948C35E92B003C792C46C58C4AF40 |
+---------------+-------------+-------------------------------------------+
4 rows in set (0.00 sec)
7.8 修改密码
注意:
- 新版mysql中用户密码可以保存在mysql.user表的authentication_string字段中
- 如果mysql.user表的authentication_string和password字段都保存密码,authentication_string优先生效
#方法1
#MySQL 8 版本不支持此方法
SET PASSWORD FOR 'user'@'host' = PASSWORD('1');

#范例
mysql> select version();
+------------+
| version()  |
+------------+
| 5.7.29-log |
+------------+
1 row in set (0.00 sec)

mysql> select user,host,authentication_string from mysql.user;
+---------------+-------------+-------------------------------------------+
| user          | host        | authentication_string                     |
+---------------+-------------+-------------------------------------------+
| root          | localhost   |                                           |
| mysql.session | localhost   | *THISISNOTAVALIDPASSWORDTHATCANBEUSEDHERE |
| mysql.sys     | localhost   | *THISISNOTAVALIDPASSWORDTHATCANBEUSEDHERE |
| demo          | 192.168.3.% | *E6CC90B878B948C35E92B003C792C46C58C4AF40 |
+---------------+-------------+-------------------------------------------+
4 rows in set (0.00 sec)

mysql> SET PASSWORD FOR 'demo'@'192.168.3.%' = PASSWORD('123456');
Query OK, 0 rows affected, 1 warning (0.00 sec)

#登录测试
[root@Rocky8 ~]# mysql -udemo -h 192.168.3.19 -p123456

#MySQL 8 版本修改密码
alter user test@'%' IDENTIFIED BY '123456';

#方法2
UPDATE mysql.user SET password=PASSWORD('password') WHERE demo;

#mariadb 10.3
update mysql.user set authentication_string=password('1') where user='test';
#此方法需要执行下面指令才能生效:
FLUSH PRIVILEGES;
7.9 忘记管理员密码的解决办法
-
启动mysqld进程时,为其使用如下选项:
--skip-grant-tables --skip-networking -
使用UPDATE命令修改管理员密码
-
关闭mysqld进程,移除上述两个选项,重启mysqld
范例:破解root密码
[root@centos8 ~]#vim /etc/my.cnf
[mysqld]
skip-grant-tables
skip-networking  #MySQL8.0不需要

[root@centos8 ~]#systemctl restart mariadb
[root@centos8 ~]#mysql

#mariadb 新版
MariaDB [(none)]> update mysql.user set authentication_string=password('ubuntu') where user='root';

#MySQL8.0
mysql> update mysql.user set authentication_string='' where user='root' and host='localhost';

#mariadb 旧版
MariaDB [(none)]> update mysql.user set password=password('ubuntu') where user='root';
[root@centos8 ~]#systemctl restart mariadb

[root@centos8 ~]#vim /etc/my.cnf
[mysqld]
#skip-grant-tables
#skip-networking

[root@centos8 ~]#systemctl restart mariadb
[root@centos8 ~]#mysql -uroot -pubuntu
八、权限管理
8.1 授权:GRANT
#语法格式:
grant 权限列表 on 库名.表名 to '用户名'@'客户端主机' [identified by '密码' with option参数];
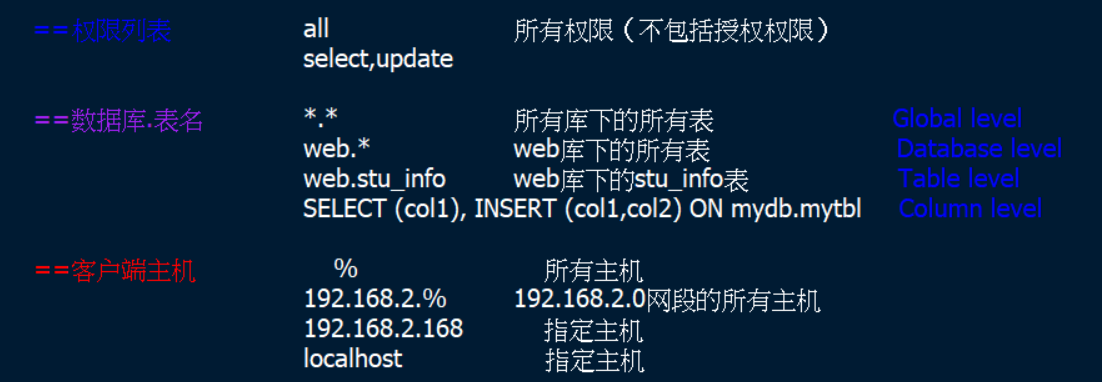
with_option参数(选择性掌握)
    GRANT OPTION:						  授权选项
    MAX_QUERIES_PER_HOUR: 			      定义每小时允许执行的查询数
    MAX_UPDATES_PER_HOUR:			      定义每小时允许执行的更新数
    MAX_CONNECTIONS_PER_HOUR:             定义每小时可以建立的连接数
    MAX_USER_CONNECTIONS:			      定义单个用户同时可以建立的连接数
参考:https://dev.mysql.com/doc/refman/5.7/en/grant.html
范例:
GRANT ALL ON *.* TO admin1@'%' IDENTIFIED BY '(123)';
GRANT ALL ON *.* TO admin2@'%' IDENTIFIED BY '(123)' WITH GRANT OPTION;(赋予授权权限)
GRANT ALL ON bbs.* TO admin3@'%' IDENTIFIED BY '(123)';
GRANT ALL ON bbs.* TO admin3@'192.168.122.220' IDENTIFIED BY '(123)';(最常用,并且安全)
GRANT ALL ON bbs.user TO admin4@'%' IDENTIFIED BY '(123)';
GRANT SELECT(col1),INSERT(col2,col3) ON bbs.user TO admin5@'%' IDENTIFIED BY '(123)';
GRANT SELECT (col1), INSERT (col1,col2) ON mydb.mytbl TO 'someuser'@'somehost';
GRANT ALL ON wordpress.* TO wordpress@'192.168.8.%' IDENTIFIED BY '1';
GRANT ALL PRIVILEGES ON *.* TO 'root'@'192.168.8.%' IDENTIFIED BY '1' WITH GRANT OPTION;
范例:
[root@Rocky8 ~]# mysql -uroot -p1 < hellodb_innodb.sql
mysql: [Warning] Using a password on the command line interface can be insecure.
mysql> create user 'demo'@'192.168.3.%' identified by '1';
Query OK, 0 rows affected (0.00 sec)
mysql> select user,host,authentication_string from mysql.user;
+---------------+-------------+-------------------------------------------+
| user | host | authentication_string |
+---------------+-------------+-------------------------------------------+
| root | localhost | *E6CC90B878B948C35E92B003C792C46C58C4AF40 |
| mysql.session | localhost | *THISISNOTAVALIDPASSWORDTHATCANBEUSEDHERE |
| mysql.sys | localhost | *THISISNOTAVALIDPASSWORDTHATCANBEUSEDHERE |
| demo | 192.168.3.% | *E6CC90B878B948C35E92B003C792C46C58C4AF40 |
+---------------+-------------+-------------------------------------------+
4 rows in set (0.00 sec)
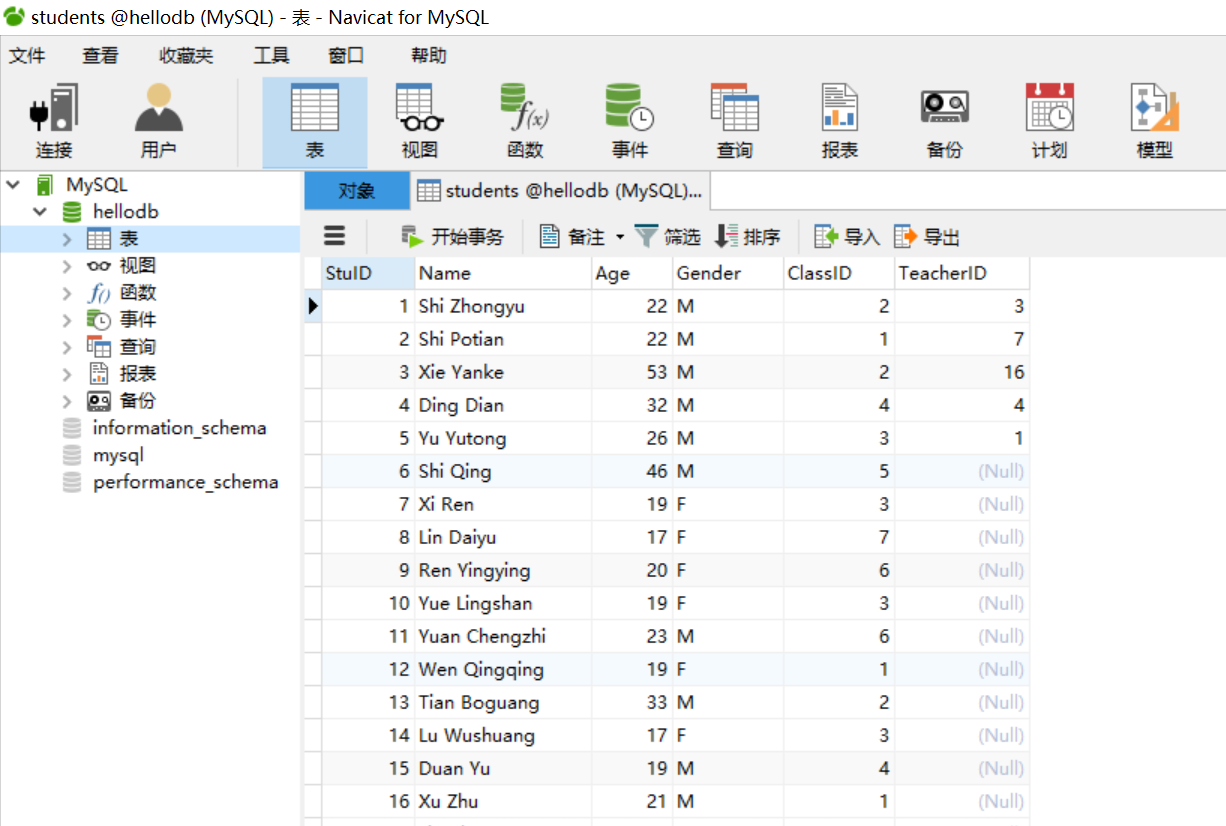
mysql> GRANT SELECT (Name) ON hellodb.students TO 'demo'@'192.168.3.%';
Query OK, 0 rows affected (0.01 sec)
#登录测试
[root@Rocky8 ~]# mysql -udemo -p1 -h 192.168.3.19
mysql> use hellodb;
mysql> show tables;
+-------------------+
| Tables_in_hellodb |
+-------------------+
| students |
+-------------------+
1 row in set (0.00 sec)
mysql> select * from students;
ERROR 1143 (42000): SELECT command denied to user 'demo'@'Rocky8' for column 'StuID' in table 'students'
mysql> select Name from students;
8.2 回收(取消)授权:REVOKE
#语法
REVOKE 权限列表 ON 数据库名 FROM 用户名@'客户端主机'
参考:https://dev.mysql.com/doc/refman/5.7/en/revoke.html
范例:
#查看权限
SHOW GRANTS\G
SHOW GRANTS FOR 用户名@'登陆IP'\G
REVOKE DELETE ON *.* FROM 'testuser'@'172.16.0.%';
REVOKE DELETE ON *.* FROM admin1@'%';			          //回收部分权限
REVOKE ALL PRIVILEGES ON *.*  FROM admin2@'%';  		  //回收所有权限
REVOKE ALL PRIVILEGES,GRANT OPTION ON *.* FROM 'admin2'@'%';
范例:收回权限
mysql> show grants for 'demo'@'192.168.3.%' ;
+---------------------------------------------------------------------+
| Grants for demo@192.168.3.%                                         |
+---------------------------------------------------------------------+
| GRANT USAGE ON *.* TO 'demo'@'192.168.3.%'                          |
| GRANT SELECT (Name) ON `hellodb`.`students` TO 'demo'@'192.168.3.%' |
+---------------------------------------------------------------------+
2 rows in set (0.00 sec)

#收回删除权限
mysql> revoke delete on hellodb.students from 'demo'@'192.168.3.%';
Query OK, 0 rows affected (0.00 sec)

#收回查看权限
mysql> revoke select on hellodb.students from 'demo'@'192.168.3.%';
注意:MariaDB服务进程启动时会读取mysql库中所有授权表至内存
(1) GRANT或REVOKE等执行权限操作会保存于系统表中,MariaDB的服务进程通常会自动重读授权表,使之生效

(2) 对于不能够或不能及时重读授权表的命令,可手动让MariaDB的服务进程重读授权表:mysql>  FLUSH PRIVILEGES;
九、MySQL的图形化的远程管理工具
在MySQL数据库中创建用户并授权后,可以使用相关图形化工具进行远程的管理。
常见的图形化管理工具:
- Navicat
- SQLyog
9.1 Navicat 工具
9.2 SQLyog 工具
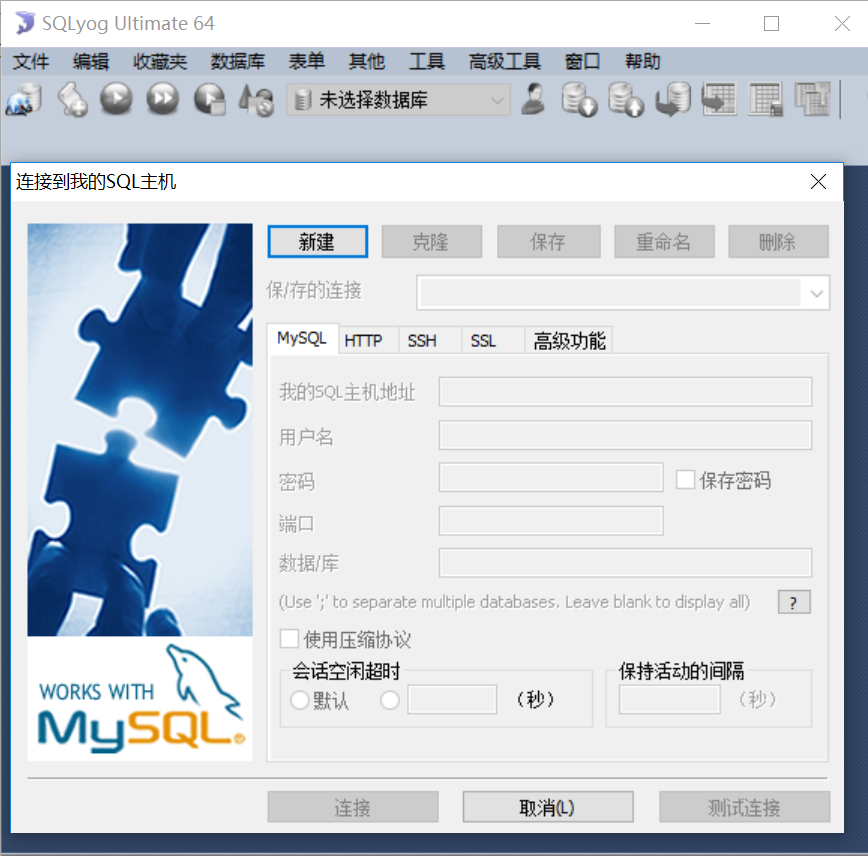
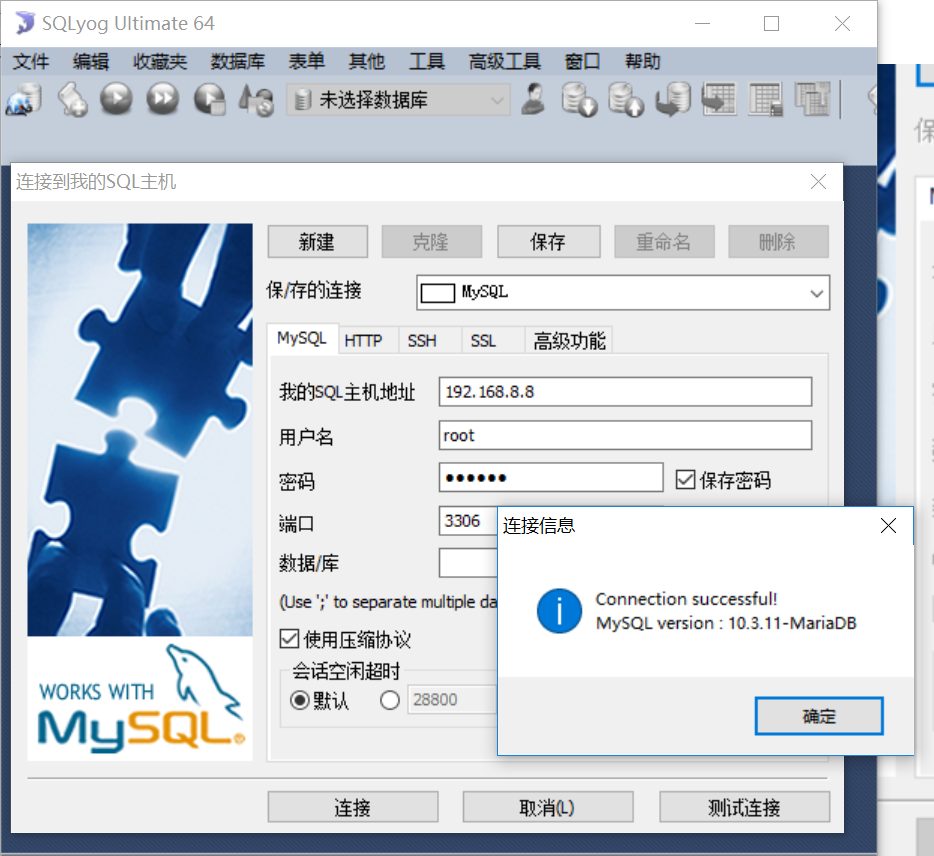
范例:
#先创建用户并授权
GRANT ALL PRIVILEGES ON *.* TO 'root'@'192.168.8.%' IDENTIFIED BY '1' WITH GRANT OPTION;
十、关于MySQL命令帮助
10.1 help
mysql> help show;    #会告诉我们很多使用方法和信息

mysql> help select;

注意:

1)第一次通过# grep "password" /var/log/mysqld.log 命令获取MySQL的临时密码

2)用该密码登录到服务端后,必须马上修改密码,不然操作查询时报错误

3)刚开始设置的密码必须符合长度,且必须含有数字,小写或大写字母,特殊字符。
如果想设置简单密码,如下操作:
方法一:首先,修改validate_password_policy参数的值

mysql> set global validate_password_policy=0;  #定义复杂度

mysql> set global validate_password_length=1;  #定义长度 默认是8

mysql>set password for 'root'@'localhost'=password('123456');

mysql> flush privileges;

方法二:在/etc/my.cnf 可关闭密码强度审计插件,重启mysql服务

validate-password=ON/OFF/FORCE/FORCE_PLUS_PERMANENT: 决定是否使用该插件(及强制/永久强制使用)。
十一、MySQL备份恢复
11.1 为何要备份
在生产环境中我们数据库可能会遭遇各种各样的不测从而导致数据丢失, 大概分为以下几种.
硬件故障
软件故障
自然灾害
黑客攻击
误操作 (占比最大)
须知在生产环境中,服务器的硬件坏了可以维修或者换新,软件崩溃可以修复或重新安装, 但是如果数据没了那可就毁了,生产环境中最重要的应该就是数据了。所以, 为了在数据丢失之后能够恢复数据, 我们就需要定期的备份数据。
11.2 MySQL备份的类型
11.2.1 热备、冷备、温备
按照备份时对数据库的影响范围分为:Hot backup(热备) Cold Backup(冷备)Warm Backup(温备)
1)冷备:停库、停服务来备份
即当数据库进行备份时, 数据库不能进行读写操作, 即数据库要下线

2)温备:不停库、不停服务来备份,会(锁表)阻止用户的写入
即当数据库进行备份时, 数据库的读操作可以执行, 但是不能执行写操作

3)热备(建议):不停库、不停服务来备份,也不会(锁表)阻止用户的写入
即当数据库进行备份时, 数据库的读写操作均不是受影响
MySQL中进行不同类型的备份还要考虑存储引擎是否支持
| 存储引擎类型 | 热备 | 温备 | 冷备 |
|---|---|---|---|
| MyISAM | 热备 × | 温备 √ | 冷备 √ |
| InnoDB | 热备 √ | 温备 √ | 冷备 √ |
11.2.2 物理与逻辑备份
按照备份的内容分,可以分为两种
1、物理备份:直接将底层物理文件备份
2、逻辑备份:通过特定的工具从数据库中导出sql语句或者数据,可能会丢失数据精度
11.2.3 全量、差异、增量备份
按照每次备份的数据量,可以分为
1)全量备份/完全备份(Full Backup):备份整个数据集( 即整个数据库 )
2)部分备份:备份部分数据集(例如: 只备份一个表的变化)
3)而部分备份又分为:差异备份和增量备份两种

1、差异备份(Differential Backup)

每次备份时,都是基于第一次完全备份的内容,只备份有差异的数据(新增的、修改的、删除的),例如

第一次备份:完全备份 第二次备份:以当前时间节点的数据为基础,备份与第一次备份内容的差异 第三次备份:以当前时间节点的数据为基础,备份与第一次备份内容的差异 第四次备份:以当前时间节点的数据为基础,备份与第一次备份内容的差异 第五次备份:以当前时间节点的数据为基础,备份与第一次备份内容的差异

2、增量备份(Incremental Backup )

每次备份时,都是基于上一次备份的内容(注意是上一次,而不是第一次),只备份有差异的数据(新增的、修改的、删除的),所以增量备份的结果是一条链,例如

第一次备份:完全备份 第二次备份:以当前时间节点的数据为基础,备份与第一次备份内容的差异 第三次备份:以当前时间节点的数据为基础,备份与第二次备份内容的差异 第四次备份:以当前时间节点的数据为基础,备份与第三次备份内容的差异 第五次备份:以当前时间节点的数据为基础,备份与第四次备份内容的差异
11.2.4 逻辑备份工具mysqldump
使用的时候MySQL当要导入或者导出数据量大的库的时候,用PHPMYADMIN甚至MySQL Administrator这些工具都会力不从心,这时只能使用MySQL所提供的命令行工具mysqldump进行备份恢复。数据量大的时候不推荐使用,可支持MyISAM,InnoDB
注意:mysql冷备,热拷贝,mysqldump均无法实现对数据的增量备份,只有xtrabackup支持增量备份
11.2.4.1 导出数据和表结构
语法:mysqldump -u用户名 -p密码 数据库名 > 数据库名.sql
范例:
[root@localhost ~]# mysqldump -uroot -p123456 tomcat>tomcat.sql
mysqldump: [Warning] Using a password on the command line interface can be insecure.
[root@localhost ~]# ls
anaconda-ks.cfg      tomcat.sql
[root@localhost ~]# vim tomcat.sql
[root@localhost ~]# ll
total 157848
-rw-------. 1 root root      1505 Oct  7 20:21 anaconda-ks.cfg
-rw-r--r--  1 root root      3863 Nov 18 21:08 tomcat.sql
[root@localhost ~]#

[root@localhost ~]# mysqldump -uroot -p123456 -A >all.sql  ##导出所有的数据库数据
[root@localhost ~]# ll
total 158712
-rw-r--r--  1 root root    880526 Nov 18 21:22 all.sql
-rw-r--r--  1 root root      2872 Nov 18 21:10 tomcat2.sql
-rw-r--r--  1 root root      2872 Nov 18 21:10 tomcat.sql

参数-A代表所有,等同于—all-databases
11.2.4.2 只导出表结构
语法:mysqldump -u用户名 -p密码 -d 数据库名 > 数据库名.sql
[root@localhost ~]# mysqldump -uroot -p123456 -d tomcat>tomcat2.sql
mysqldump: [Warning] Using a password on the command line interface can be insecure.
[root@localhost ~]# ls
anaconda-ks.cfg              tomcat.sql   tomcat2.sql
[root@localhost ~]# ll
total 157852
-rw-------. 1 root root      1505 Oct  7 20:21 anaconda-ks.cfg
-rw-r--r--  1 root root      2872 Nov 18 21:10 tomcat2.sql
-rw-r--r--  1 root root      2872 Nov 18 21:10 tomcat.sql
11.2.4.3 只导出数据
[root@localhost ~]# mysqldump -uroot -p123456 -t tomcat >student.sql
mysqldump: [Warning] Using a password on the command line interface can be insecure.

##只导出tomcat这个库的数据
11.2.5 导入数据
11.2.5.1 导入所有数据库
mysql> show databases;
+--------------------+
| Database           |
+--------------------+
| information_schema |
| mysql              |
| performance_schema |
| sys                |
+--------------------+
4 rows in set (0.00 sec)

[root@localhost ~]# mysql -uroot -p123456 <all.sql  ##导入数据
mysql: [Warning] Using a password on the command line interface can be insecure.

mysql> show databases;
+--------------------+
| Database           |
+--------------------+
| information_schema |
| HA                 |
| HA-test            |
| mysql              |
| performance_schema |
| sys                |
| tomcat             |
+--------------------+
7 rows in set (0.00 sec)

mysql>
11.2.5.2 使用source导入表结构
mysql> create database tomcat;  ##先提前创建这个库
Query OK, 1 row affected (0.00 sec)

mysql> use tomcat
Database changed
mysql> source /root/tomcat2.sql
Query OK, 0 rows affected (0.01 sec)

Query OK, 0 rows affected (0.00 sec)

Query OK, 0 rows affected (0.00 sec)

Query OK, 0 rows affected (0.00 sec)
11.2.5.3 导入表数据
mysql> source /root/student.sql
Query OK, 0 rows affected (0.00 sec)

Query OK, 0 rows affected (0.00 sec)

Query OK, 0 rows affected (0.00 sec)

Query OK, 0 rows affected (0.00 sec)

Query OK, 0 rows affected (0.00 sec)

Query OK, 0 rows affected (0.00 sec)

Query OK, 0 rows affected (0.00 sec)

mysql> select * from student;
+------+--------+------+
| id   | name   | age  |
+------+--------+------+
|    1 | zhangs |   21 |
|    2 | lis    |   24 |
|    3 | wange  |   26 |
|    4 | hangl  | NULL |
|    5 | wuyi   |   24 |
|    6 | wuyi   |   24 |
|    7 | ermao  |   34 |
|    8 | wange  |   23 |
|    8 | WANGE  |   23 |
+------+--------+------+
9 rows in set (0.00 sec)
11.2.6 Navicat 备份工具
11.2.6.1 连接数据库
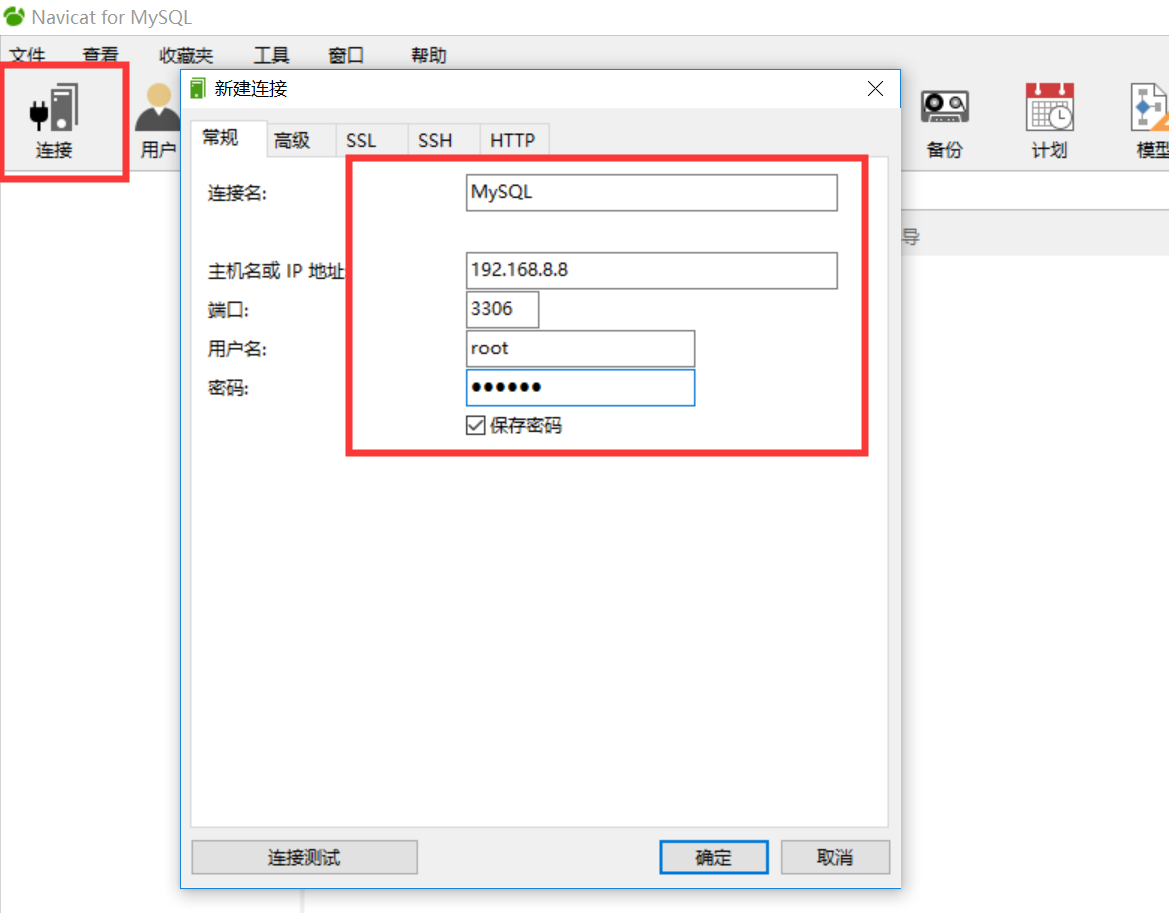
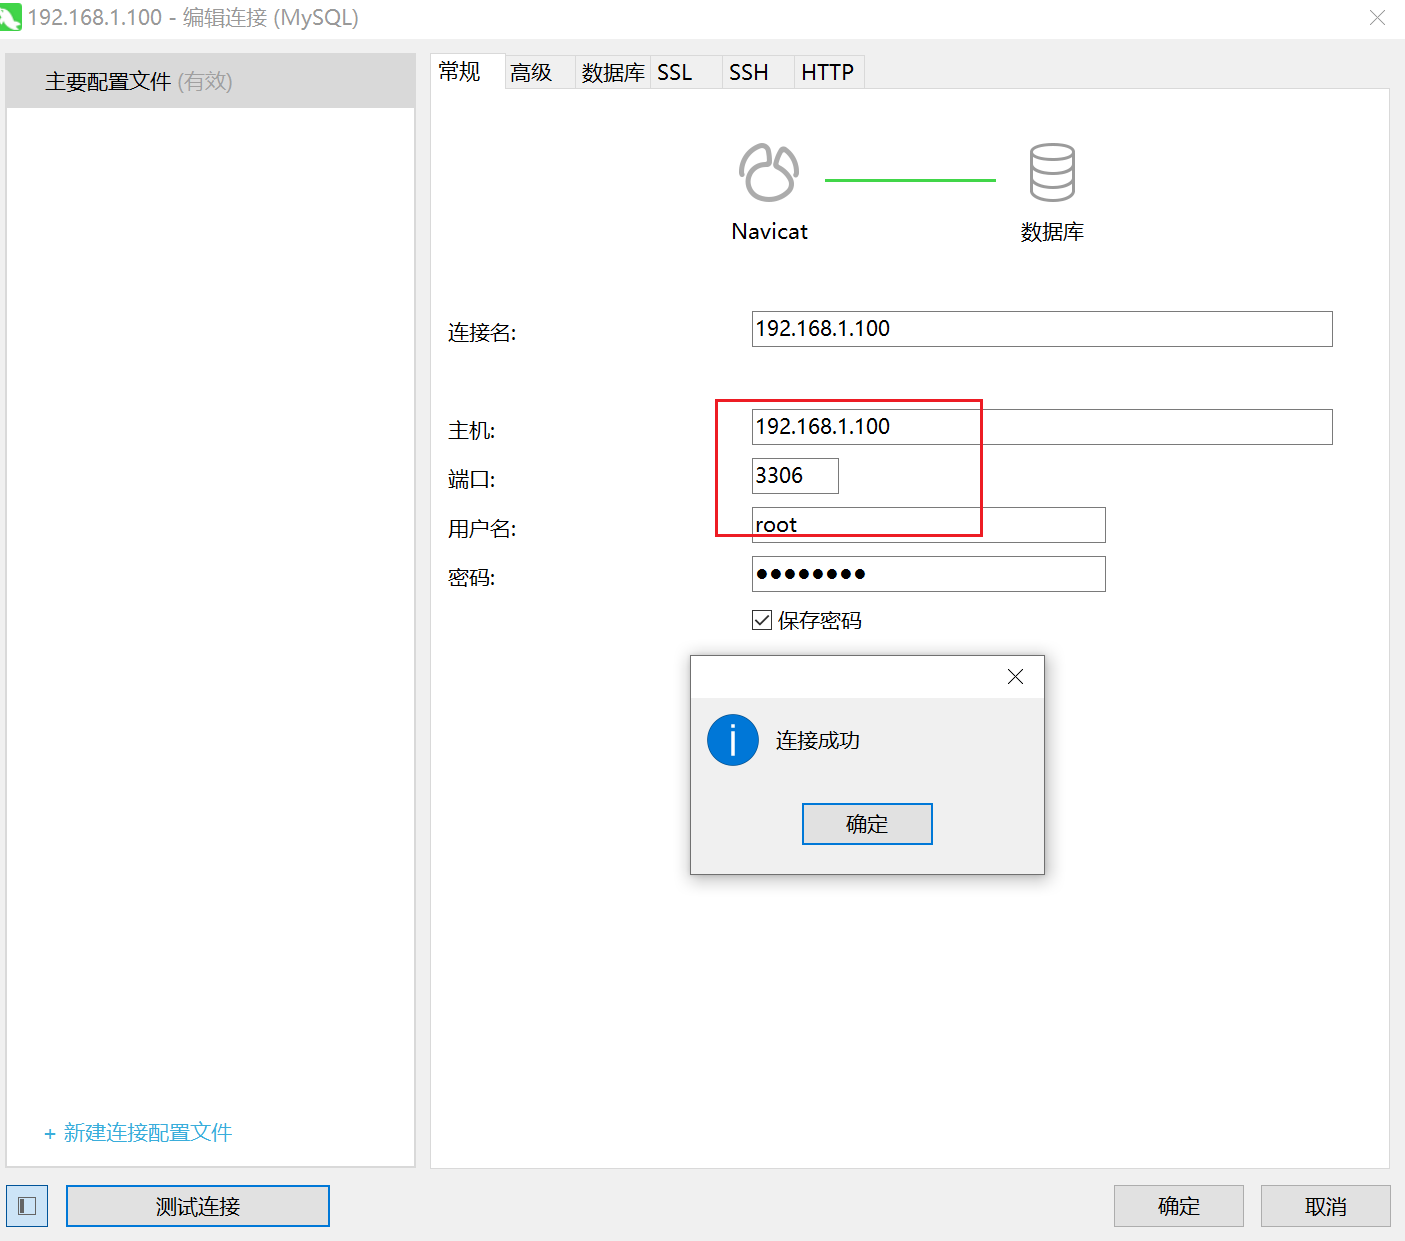
设置连接数据库的IP地址,用户名和密码,点击测试连接,如果成功则说明用户名和密码没有问题,反正如果提示异常则需要考虑2个问题:
1)用户名和密码错误
2)数据库拒绝远程连接,则需要登录数据库进行授权,授权命令如下:
mysql> grant all privileges on *.* to root@"%" identified by "123456";
Query OK, 0 rows affected, 1 warning (0.00 sec)

mysql> flush privileges;
Query OK, 0 rows affected (0.01 sec)
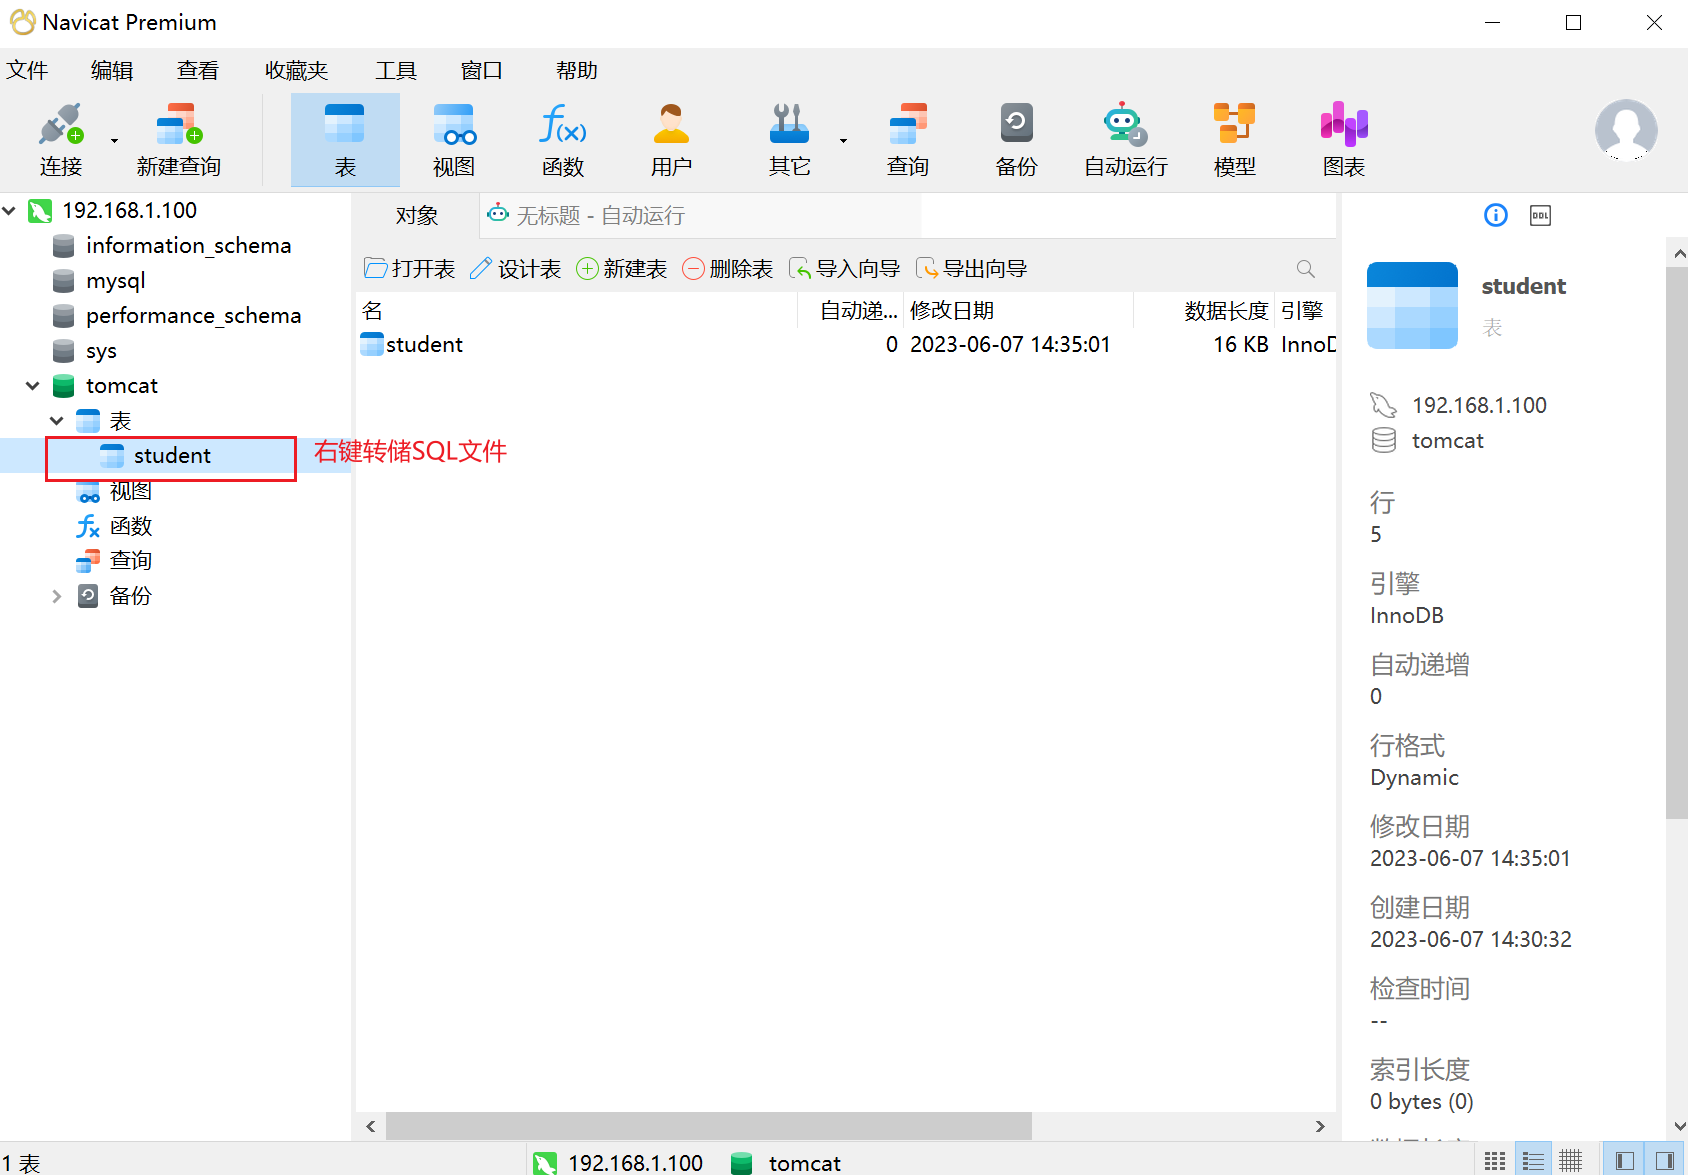
11.2.6.2 备份数据库
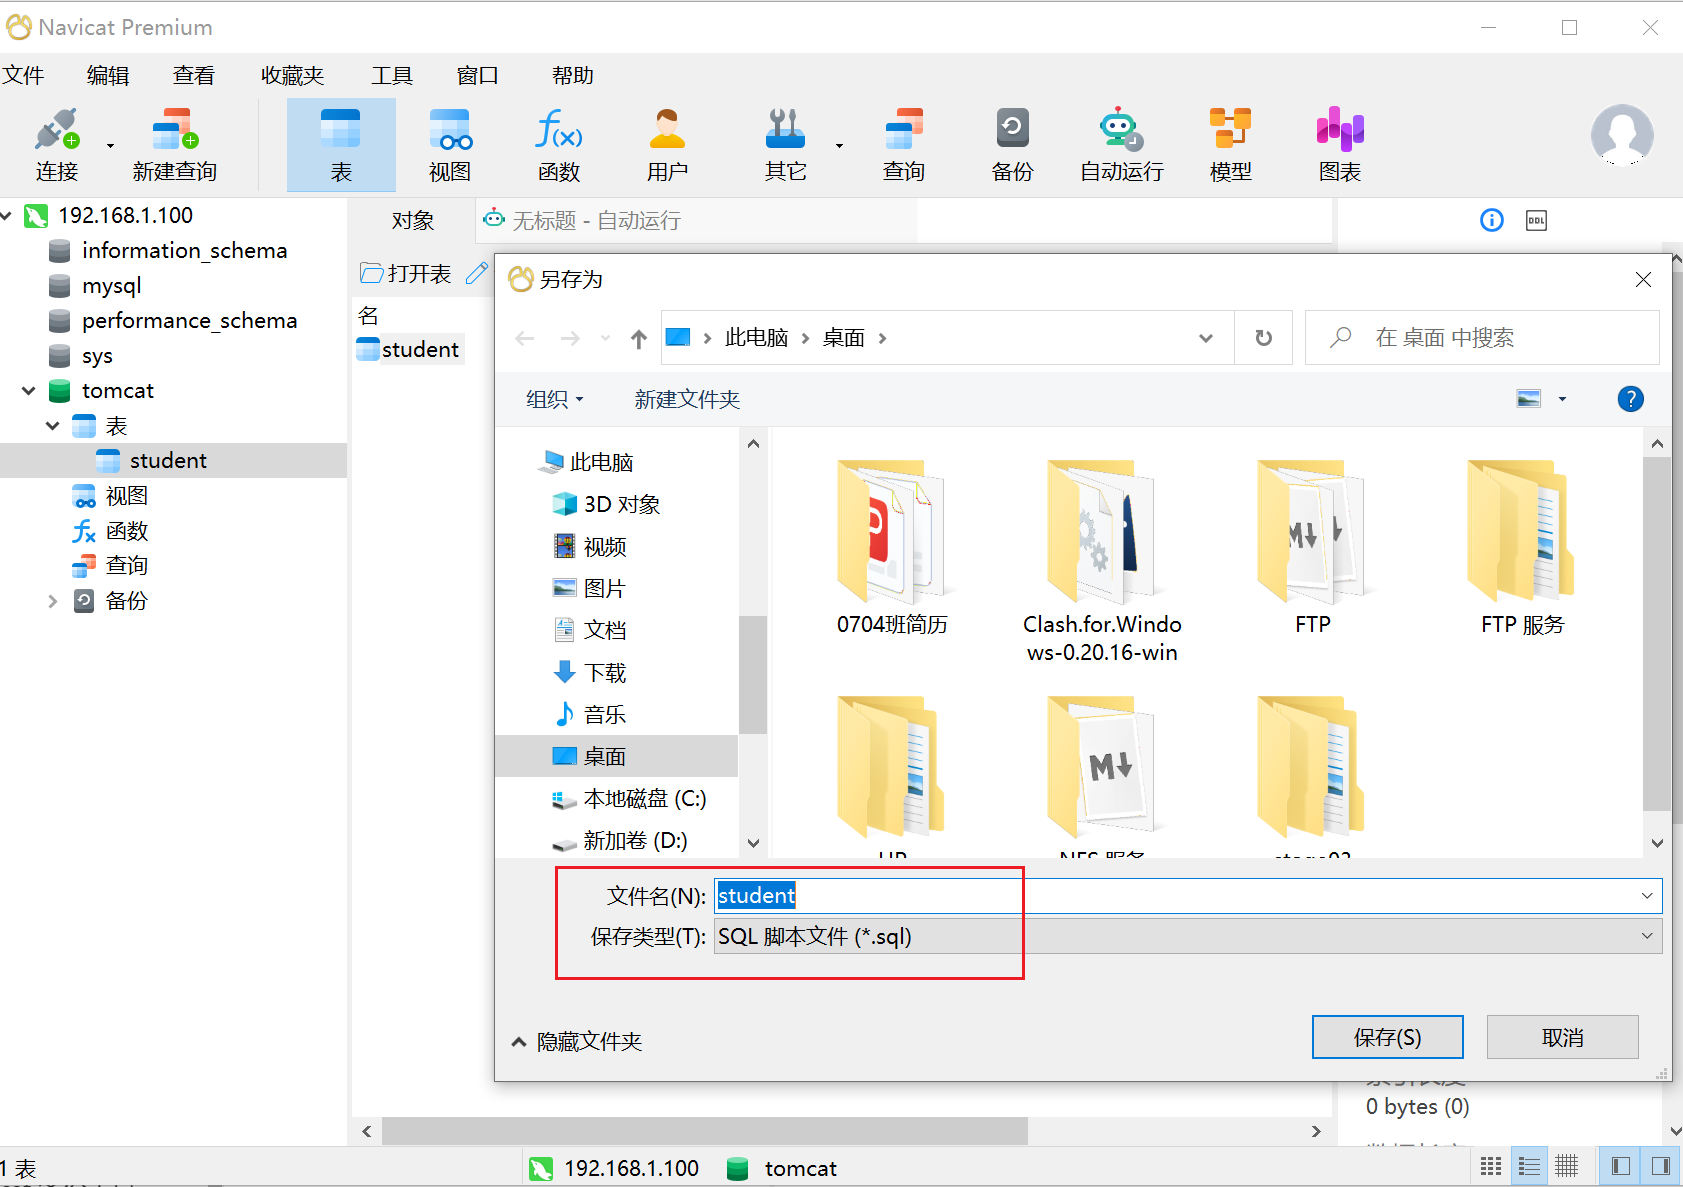
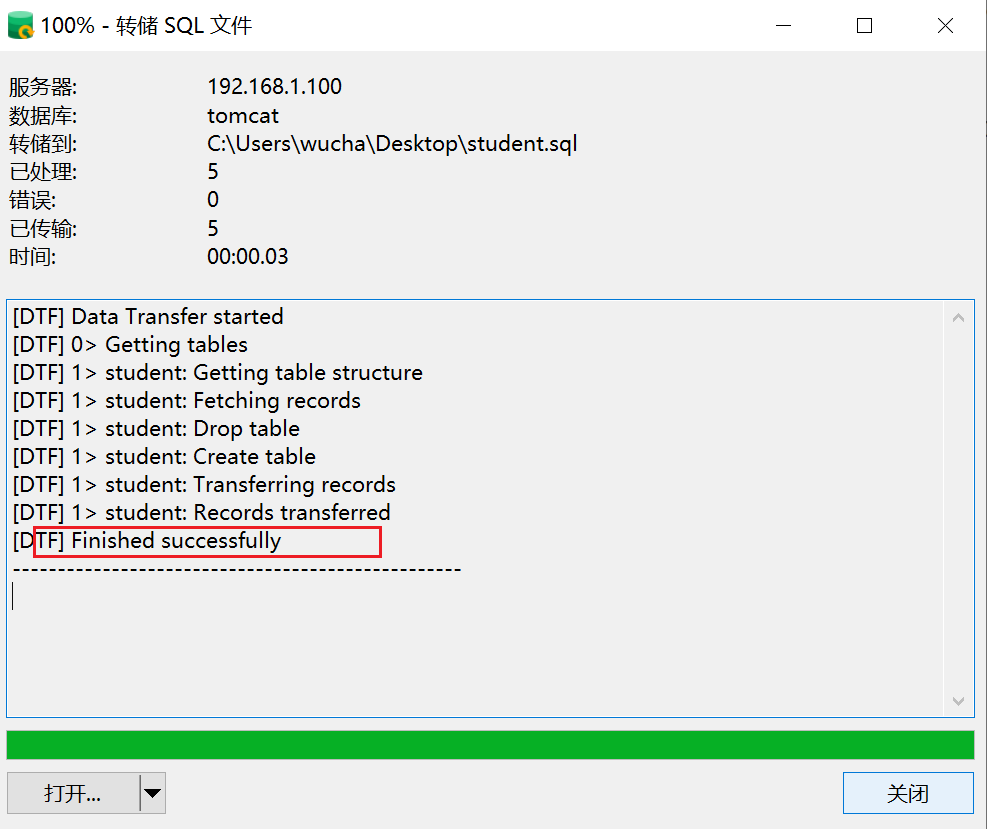
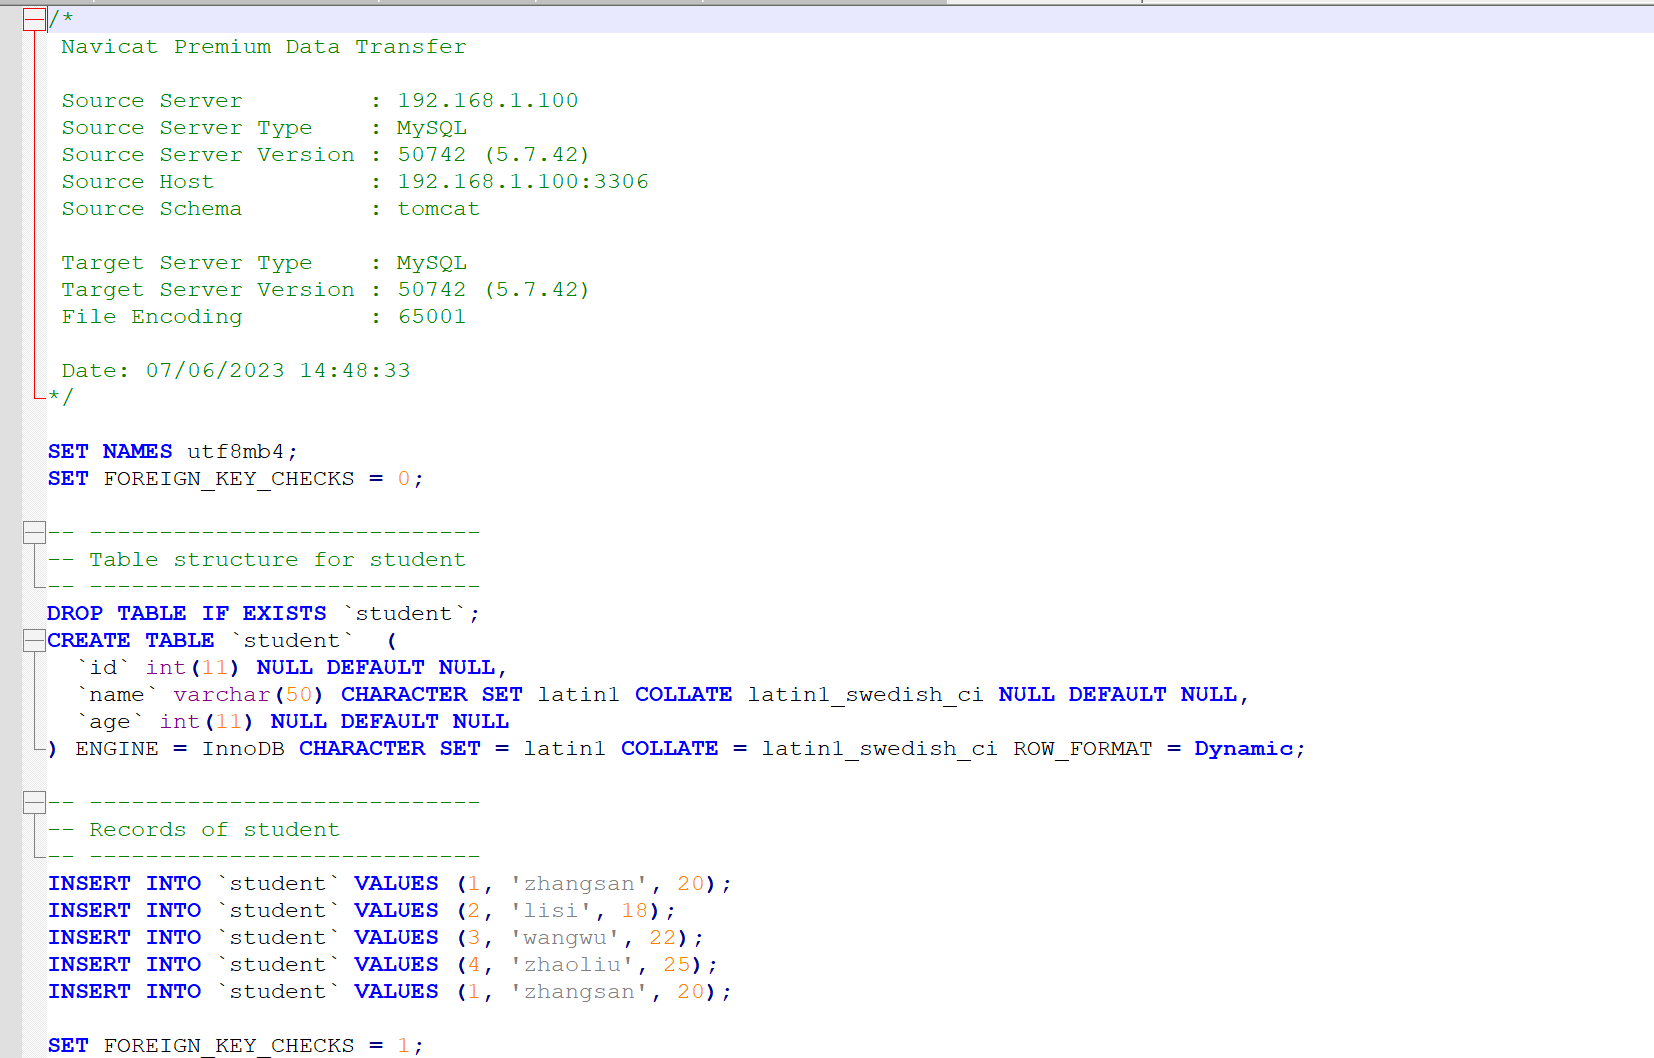
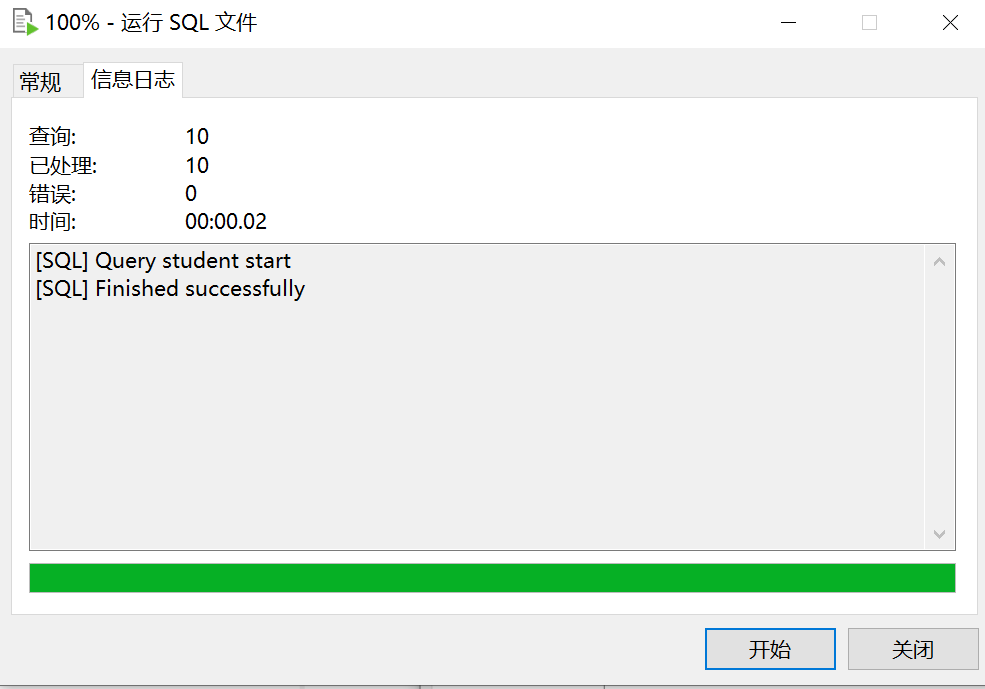
备份tomcat库下的student的表,右键属性--->转储SQL文件----->结构和数据
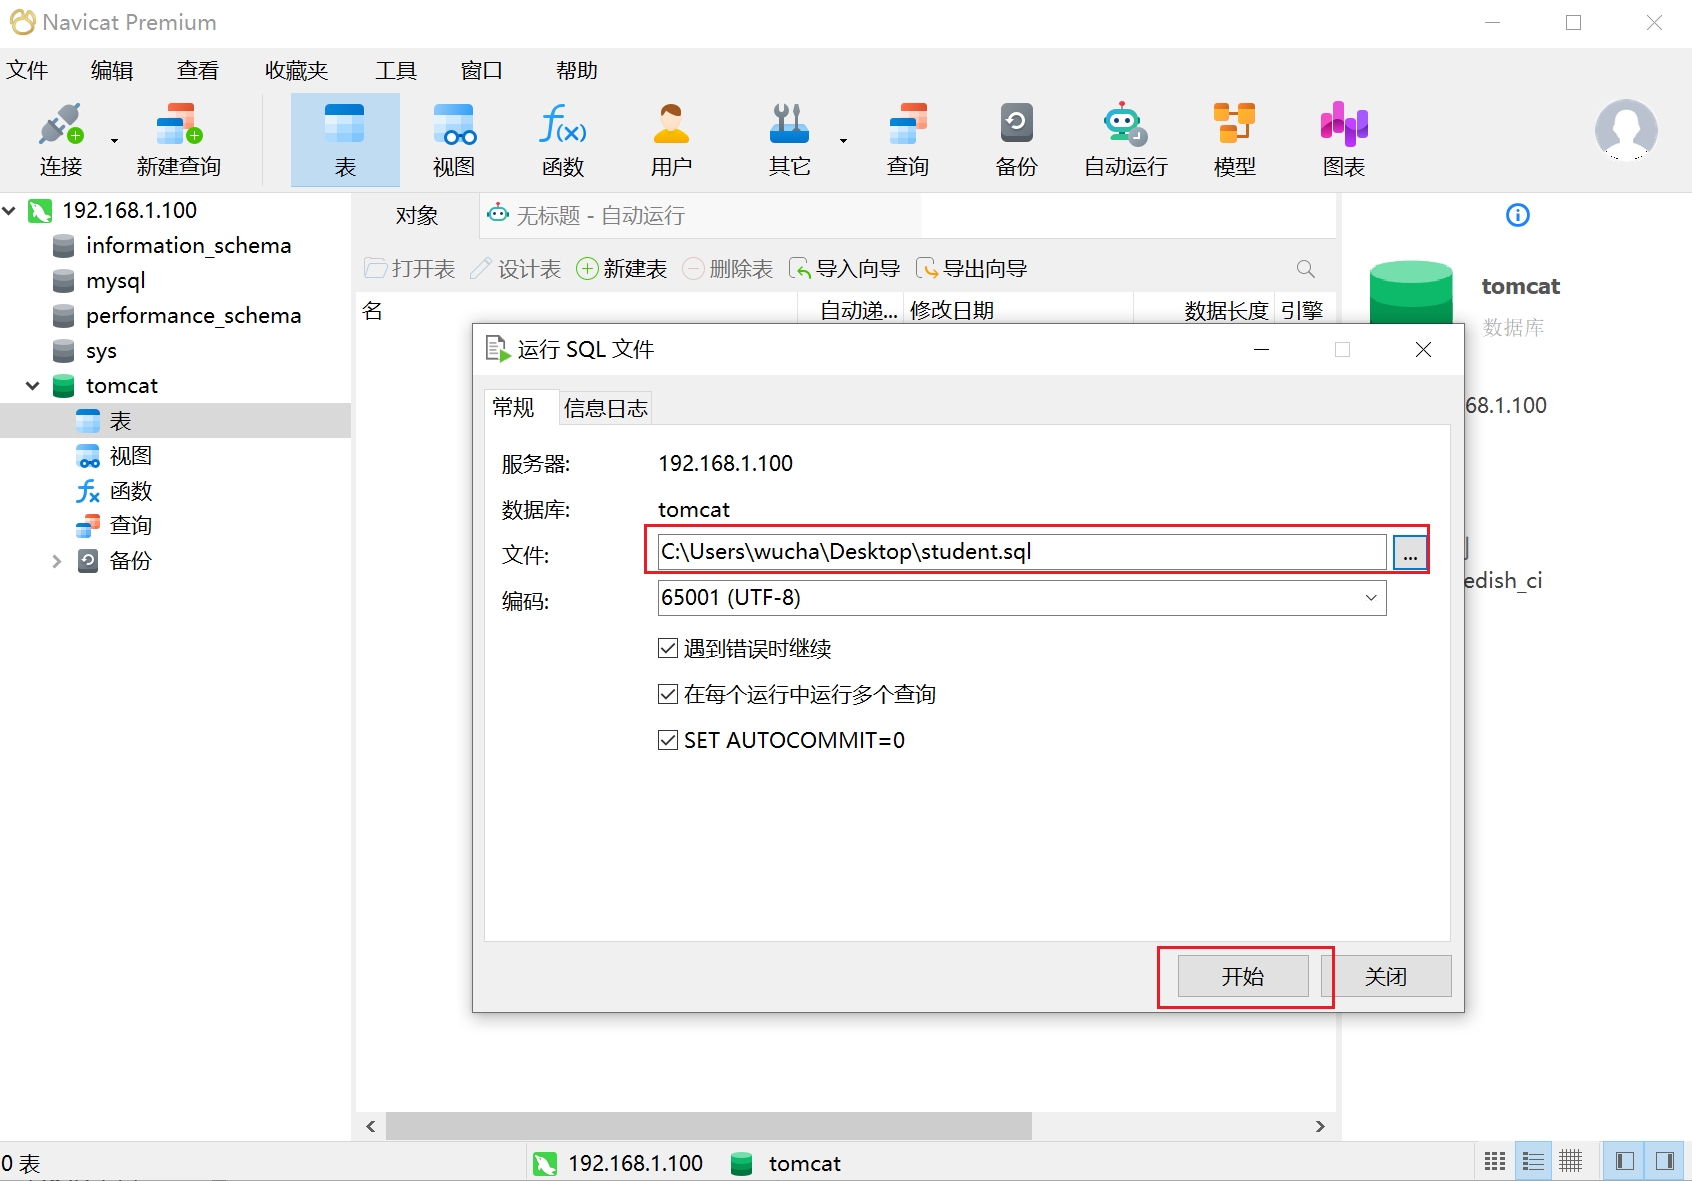
11.2.6.3 恢复数据
备份之前将原来的student表删除,再进行导入数据

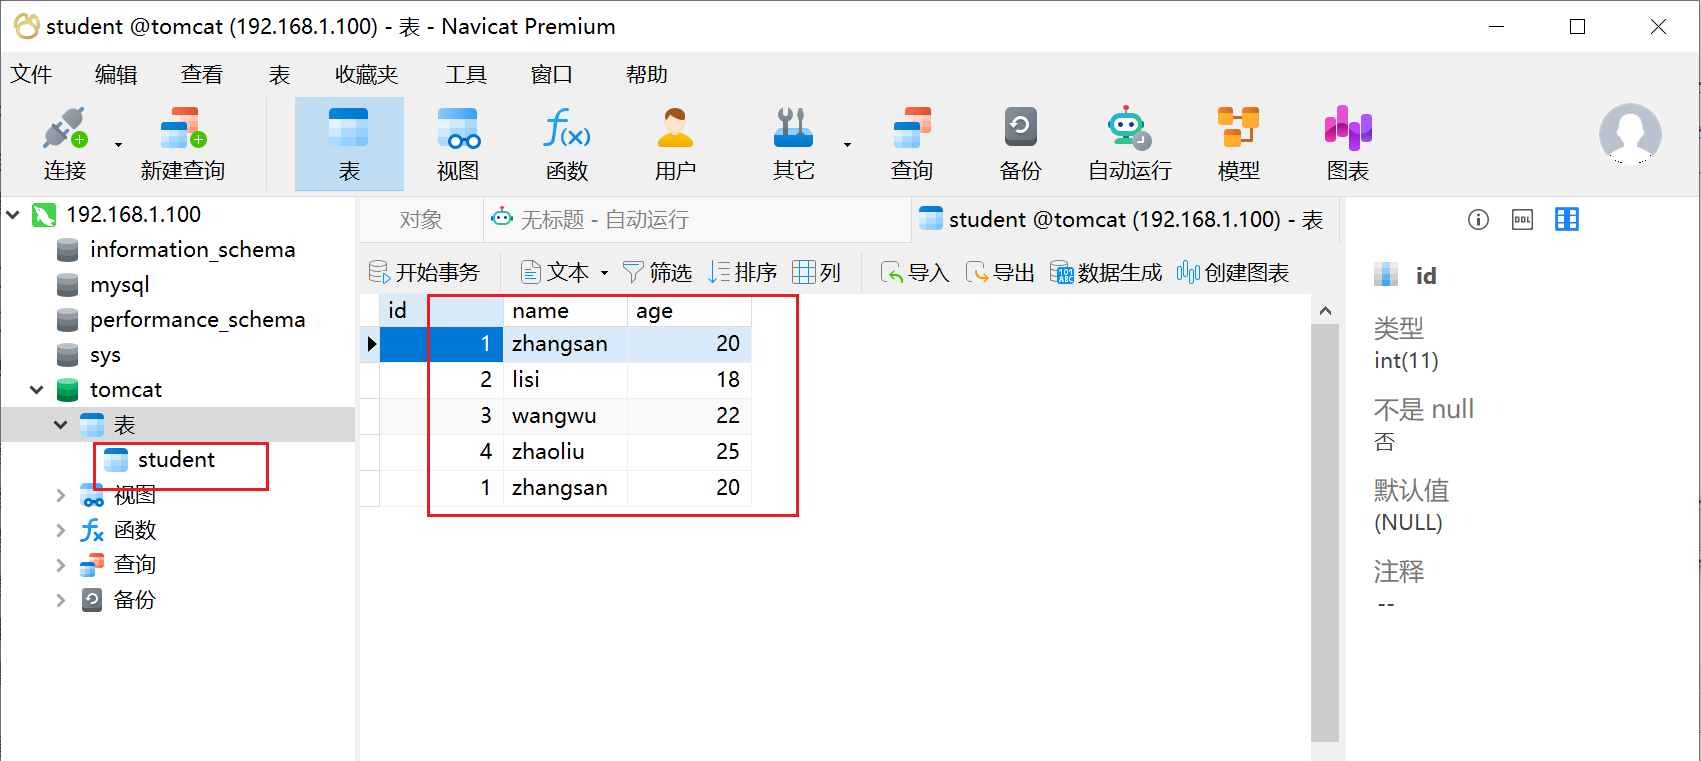
数据恢复!
11.3 实战:使用xtrabackup实现增量备份
11.3.1 xtrabackup的特点
(1)备份速度快,物理备份可靠

(2)备份过程不会打断正在执行的事务(无需锁表)

(3)能够基于压缩等功能节约磁盘空间和流量

(4)自动备份校验

(5)还原速度快

(6)可以流传将备份传输到另外一台机器上

(7)在不增加服务器负载的情况备份数据
11.3.2 xtrabackup的安装
11.3.2.1 安装xtrabackup
[root@master tools]# wget https://www.percona.com/downloads/XtraBackup/Percona-XtraBackup-2.4.9/binary/redhat/7/x86_64/percona-xtrabackup-24-2.4.9-1.el7.x86_64.rpm

[root@master tools]# yum install -y percona-xtrabackup-24-2.4.9-1.el7.x86_64.rpm

[root@master ~]# rpm -qa |grep xtrabackup
percona-xtrabackup-24-2.4.9-1.el7.x86_64
说明:
Xtrabackup中主要包含两个工具:
xtrabackup:是用于热备innodb,xtradb表中数据的工具,不能备份其他类型的表,也不能备份数据表结构;
innobackupex:是将xtrabackup进行封装的perl脚本,提供了备份myisam表的能力。
常用选项:
   --host     指定主机
   --user     指定用户名
   --password    指定密码
   --port     指定端口
   --databases     指定数据库
   --incremental    创建增量备份
   --incremental-basedir   指定包含完全备份的目录
   --incremental-dir      指定包含增量备份的目录
   --apply-log        对备份进行预处理操作
     一般情况下,在备份完成后,数据尚且不能用于恢复操作,因为备份的数据中可能会包含尚未提交的事务或已经提交但尚未同步至数据文件中的事务。因此,此时数据文件仍处理不一致状态。“准备”的主要作用正是通过回滚未提交的事务及同步已经提交的事务至数据文件也使得数据文件处于一致性状态。
   --redo-only      不回滚未提交事务
   --copy-back     恢复备份目录
使用innobackupex备份时,其会调用xtrabackup备份所有的InnoDB表,复制所有关于表结构定义的相关文件(.frm)、以及MyISAM、MERGE、CSV和ARCHIVE表的相关文件,同时还会备份触发器和数据库配置信息相关的文件,这些文件会被保存到一个以时间命名的目录当中。在备份的同时,innobackupex还会在备份目录中创建如下文件
(1)xtrabackup_checkpoints -- 备份类型(如完全或增量)、备份状态(如是否已经为prepared状态)和LSN(日志序列号)范围信息:

每个InnoDB页(通常为16k大小)
都会包含一个日志序列号,即LSN,LSN是整个数据库系统的系统版本号,每个页面相关的LSN能够表明此页面最近是如何发生改变的。

(2)xtrabackup_binlog_info  --  mysql服务器当前正在使用的二进制日志文件及备份这一刻位置二进制日志时间的位置。

(3)xtrabackup_binlog_pos_innodb  --  二进制日志文件及用于InnoDB或XtraDB表的二进制日志文件的当前position。

(4)xtrabackup_binary  --  备份中用到的xtrabackup的可执行文件;

(5)backup-my.cnf  --  备份命令用到的配置选项信息:

在使用innobackupex进行备份时,还可以使用--no-timestamp选项来阻止命令自动创建一个以时间命名的目录:如此一来,innobackupex命令将会创建一个BACKUP-DIR目录来存储备份数据。
注意:备份时需启动MySQL,恢复时需关闭MySQL,清空mysql数据目录且不能重新初始化,恢复数据后应该立即进行一次完全备份
11.3.3 全量备份数据
11.3.3.1 备份步骤
1)先在需要备份服务器上备份需要的数据
2)将数据拷贝到其他服务器进行恢复
11.3.3.2 全量备份
[root@localhost ~]# innobackupex --user=root --password=123456 --host=127.0.0.1 /backups/   #在master上进行全库备份
211118 21:46:39 innobackupex: Starting the backup operation

IMPORTANT: Please check that the backup run completes successfully.
           At the end of a successful backup run innobackupex
           prints "completed OK!".

211118 21:46:39  version_check Connecting to MySQL server with DSN 'dbi:mysql:;mysql_read_default_group=xtrabackup;host=127.0.0.1' as 'root'  (using password: YES).
211118 21:46:39  version_check Connected to MySQL server
211118 21:46:39  version_check Executing a version check against the server...
211118 21:46:39  version_check Done.
211118 21:46:39 Connecting to MySQL server host: 127.0.0.1, user: root, password: set, port: not set, socket: not set
Using server version 5.7.36
innobackupex version 2.4.9 based on MySQL server 5.7.13 Linux (x86_64) (revision id: a467167cdd4)
.....省略.....
211118 21:46:40 Executing UNLOCK TABLES
211118 21:46:40 All tables unlocked
211118 21:46:40 [00] Copying ib_buffer_pool to /backups/2021-11-18_21-46-39/ib_buffer_pool
211118 21:46:40 [00]        ...done
211118 21:46:40 Backup created in directory '/backups/2021-11-18_21-46-39/'
211118 21:46:40 [00] Writing /backups/2021-11-18_21-46-39/backup-my.cnf
211118 21:46:40 [00]        ...done
211118 21:46:40 [00] Writing /backups/2021-11-18_21-46-39/xtrabackup_info
211118 21:46:40 [00]        ...done
xtrabackup: Transaction log of lsn (6045068) to (6045077) was copied.
211118 21:46:41 completed OK!
#--user=root 指定备份用户
#--password=123456  指定备份用户密码
#--host  指定主机
#/backups  指定备份目录
11.3.3.3 查看备份
[root@localhost /]# cd backups/
[root@localhost backups]# cd 2021-11-18_21-46-39/
[root@localhost 2021-11-18_21-46-39]# ll
total 12336
-rw-r----- 1 root root      424 Nov 18 21:46 backup-my.cnf  #备份用到的配置选项信息文件
drwxr-x--- 2 root root       48 Nov 18 21:46 HA
drwxr-x--- 2 root root       20 Nov 18 21:46 HA@002dtest
-rw-r----- 1 root root      436 Nov 18 21:46 ib_buffer_pool
-rw-r----- 1 root root 12582912 Nov 18 21:46 ibdata1   #数据文件
drwxr-x--- 2 root root     4096 Nov 18 21:46 mysql
drwxr-x--- 2 root root     8192 Nov 18 21:46 performance_schema
drwxr-x--- 2 root root     8192 Nov 18 21:46 sys
drwxr-x--- 2 root root      154 Nov 18 21:46 tomcat
-rw-r----- 1 root root      113 Nov 18 21:46 xtrabackup_checkpoints #备份的类型、状态和LSN状态信息文件
-rw-r----- 1 root root      435 Nov 18 21:46 xtrabackup_info
-rw-r----- 1 root root     2560 Nov 18 21:46 xtrabackup_logfile  ##备份的日志文件
11.3.3.4 恢复数据(从服务器)
[root@slave ~]# systemctl stop mysqld    ##停止数据库
[root@slave ~]# wget https://www.percona.com/downloads/XtraBackup/Percona-XtraBackup-2.4.9/binary/redhat/7/x86_64/percona-xtrabackup-24-2.4.9-1.el7.x86_64.rpm

[root@slave ~]# yum install -y percona-xtrabackup-24-2.4.9-1.el7.x86_64.rpm

#从主服务器将备份文件拷贝到从服务器
[root@localhost backups]# scp -r 2021-11-18_21-46-39/ root@192.168.1.102:/backups

#在从服务器上检查文件的一致性
[root@slave backups]# innobackupex --apply-log /backups/2021-11-18_21-46-39/
211118 22:05:10 innobackupex: Starting the apply-log operation

IMPORTANT: Please check that the apply-log run completes successfully.
           At the end of a successful apply-log run innobackupex
           prints "completed OK!".
InnoDB: FTS optimize thread exiting.
InnoDB: Starting shutdown...
InnoDB: Shutdown completed; log sequence number 6045224
211118 22:05:13 completed OK!
[root@slave backups]#

#删除从服务器上的数据库的数据
[root@slave backups]# cd /var/lib/mysql
[root@slave mysql]# rm -rf *

#在从服务器上重放数据
[root@slave mysql]# innobackupex --copy-back /backups/2021-11-18_21-46-39/
211118 22:07:23 innobackupex: Starting the copy-back operation

IMPORTANT: Please check that the copy-back run completes successfully.
           At the end of a successful copy-back run innobackupex
           prints "completed OK!".
211118 22:07:23 [01] Copying ./HA@002dtest/db.opt to /var/lib/mysql/HA@002dtest/db.opt
211118 22:07:23 [01]        ...done
211118 22:07:23 [01] Copying ./ib_buffer_pool to /var/lib/mysql/ib_buffer_pool
211118 22:07:23 [01]        ...done
211118 22:07:23 [01] Copying ./xtrabackup_info to /var/lib/mysql/xtrabackup_info
211118 22:07:23 [01]        ...done
211118 22:07:23 [01] Copying ./ibtmp1 to /var/lib/mysql/ibtmp1
211118 22:07:23 [01]        ...done
211118 22:07:24 completed OK!
[root@slave mysql]#
11.3.3.5 查看恢复的数据
[root@slave mysql]# ls
HA           ib_buffer_pool  ib_logfile0  ibtmp1  performance_schema  tomcat
HA@002dtest  ibdata1         ib_logfile1  mysql   sys                 xtrabackup_info
[root@slave mysql]# ll
total 122916
drwxr-x--- 2 root root       48 Nov 18 22:07 HA
drwxr-x--- 2 root root       20 Nov 18 22:07 HA@002dtest
-rw-r----- 1 root root      436 Nov 18 22:07 ib_buffer_pool
-rw-r----- 1 root root 12582912 Nov 18 22:07 ibdata1
-rw-r----- 1 root root 50331648 Nov 18 22:07 ib_logfile0
-rw-r----- 1 root root 50331648 Nov 18 22:07 ib_logfile1
-rw-r----- 1 root root 12582912 Nov 18 22:07 ibtmp1
drwxr-x--- 2 root root     4096 Nov 18 22:07 mysql
drwxr-x--- 2 root root     8192 Nov 18 22:07 performance_schema
drwxr-x--- 2 root root     8192 Nov 18 22:07 sys
drwxr-x--- 2 root root      154 Nov 18 22:07 tomcat
-rw-r----- 1 root root      435 Nov 18 22:07 xtrabackup_info
[root@slave mysql]#
11.3.3.6 修改权限启动数据库
[root@slave mysql]# chown mysql.mysql * -R
[root@slave mysql]# ll
total 122916
drwxr-x--- 2 mysql mysql       48 Nov 18 22:07 HA
drwxr-x--- 2 mysql mysql       20 Nov 18 22:07 HA@002dtest
-rw-r----- 1 mysql mysql      436 Nov 18 22:07 ib_buffer_pool
-rw-r----- 1 mysql mysql 12582912 Nov 18 22:07 ibdata1
-rw-r----- 1 mysql mysql 50331648 Nov 18 22:07 ib_logfile0
-rw-r----- 1 mysql mysql 50331648 Nov 18 22:07 ib_logfile1
-rw-r----- 1 mysql mysql 12582912 Nov 18 22:07 ibtmp1
drwxr-x--- 2 mysql mysql     4096 Nov 18 22:07 mysql
drwxr-x--- 2 mysql mysql     8192 Nov 18 22:07 performance_schema
drwxr-x--- 2 mysql mysql     8192 Nov 18 22:07 sys
drwxr-x--- 2 mysql mysql      154 Nov 18 22:07 tomcat
-rw-r----- 1 mysql mysql      435 Nov 18 22:07 xtrabackup_info
11.3.3.7 启动数据库查看数据
[root@slave mysql]# systemctl start mysqld
[root@slave mysql]# mysql -uroot -p
Enter password:
Welcome to the MySQL monitor.  Commands end with ; or \g.
Your MySQL connection id is 2
Server version: 5.7.36 MySQL Community Server (GPL)

Copyright (c) 2000, 2021, Oracle and/or its affiliates.

Oracle is a registered trademark of Oracle Corporation and/or its
affiliates. Other names may be trademarks of their respective
owners.

Type 'help;' or '\h' for help. Type '\c' to clear the current input statement.

mysql> show databases;
+--------------------+
| Database           |
+--------------------+
| information_schema |
| HA                 |
| HA-test            |
| mysql              |
| performance_schema |
| sys                |
| tomcat             |
+--------------------+
7 rows in set (0.00 sec)

mysql>
至此,数据已经备份到了从服务器上了。
11.3.4 增量备份
11.3.4.1 先在主服务器上新增一些数据
mysql> insert into student values(9,"user1",23);
Query OK, 1 row affected (0.00 sec)

mysql> select * from student;
+------+--------+------+
| id   | name   | age  |
+------+--------+------+
|    1 | zhangs |   21 |
|    2 | lis    |   24 |
|    3 | wange  |   26 |
|    4 | hangl  | NULL |
|    5 | wuyi   |   24 |
|    6 | wuyi   |   24 |
|    7 | ermao  |   34 |
|    8 | wange  |   23 |
|    8 | WANGE  |   23 |
|    9 | user1  |   23 |
+------+--------+------+
10 rows in set (0.00 sec)

mysql>
11.3.4.2 使用innobackupex进行增量备份
[root@localhost ~]# innobackupex --user=root --password=123456 --host=127.0.0.1 --incremental /backups/ --incremental-basedir=/backups/2021-11-18_21-46-39/
查看备份数据
[root@localhost backups]# ll
total 0
drwxr-x--- 8 root root 236 Nov 18 21:46 2021-11-18_21-46-39  ##全量备份
drwxr-x--- 8 root root 262 Nov 18 22:14 2021-11-18_22-14-24  ##增量备份
11.3.4.3 增量备份后数据恢复
#模拟mysql故障,删除数据目录所有数据
[root@localhost backups]# systemctl stop mysqld
[root@localhost backups]# rm -rf /var/lib/mysql/*
[root@localhost mysql]# ls
11.3.4.4 合并全备数据目录,确保数据的一致性
[root@localhost ~]# innobackupex --apply-log --redo-only /backups/2021-11-18_21-46-39/

# 将增量备份数据合并到全备数据目录当中
[root@localhost ~]#  innobackupex --apply-log --redo-only /backups/2021-11-18_21-46-39/ --incremental-dir=/backups/2021-11-18_22-14-24/
211118 22:19:36 innobackupex: Starting the apply-log operation

IMPORTANT: Please check that the apply-log run completes successfully.
           At the end of a successful apply-log run innobackupex
           prints "completed OK!".
11.3.4.5 恢复数据
[root@localhost ~]# innobackupex --copy-back /backups/2021-11-18_21-46-39/
#更改数据库的属主
[root@localhost mysql]# chown mysql.mysql * -R
[root@localhost mysql]# ll
total 12324
drwxr-x--- 2 mysql mysql       48 Nov 18 22:21 HA
drwxr-x--- 2 mysql mysql       20 Nov 18 22:21 HA@002dtest
-rw-r----- 1 mysql mysql      436 Nov 18 22:21 ib_buffer_pool
-rw-r----- 1 mysql mysql 12582912 Nov 18 22:21 ibdata1
drwxr-x--- 2 mysql mysql     4096 Nov 18 22:21 mysql
drwxr-x--- 2 mysql mysql     8192 Nov 18 22:21 performance_schema
drwxr-x--- 2 mysql mysql     8192 Nov 18 22:21 sys
drwxr-x--- 2 mysql mysql      154 Nov 18 22:21 tomcat
-rw-r----- 1 mysql mysql      507 Nov 18 22:21 xtrabackup_info
11.3.4.6 查看数据
#启动数据库查看数据
[root@localhost mysql]# systemctl start mysqld
[root@localhost mysql]# mysql -uroot -p
Enter password:
Welcome to the MySQL monitor.  Commands end with ; or \g.
Your MySQL connection id is 2
Server version: 5.7.36 MySQL Community Server (GPL)

Copyright (c) 2000, 2021, Oracle and/or its affiliates.

Oracle is a registered trademark of Oracle Corporation and/or its
affiliates. Other names may be trademarks of their respective
owners.

Type 'help;' or '\h' for help. Type '\c' to clear the current input statement.

mysql> use tomcat
Reading table information for completion of table and column names
You can turn off this feature to get a quicker startup with -A

Database changed
mysql> select * from student;
+------+--------+------+
| id   | name   | age  |
+------+--------+------+
|    1 | zhangs |   21 |
|    2 | lis    |   24 |
|    3 | wange  |   26 |
|    4 | hangl  | NULL |
|    5 | wuyi   |   24 |
|    6 | wuyi   |   24 |
|    7 | ermao  |   34 |
|    8 | wange  |   23 |
|    8 | WANGE  |   23 |
|    9 | user1  |   23 |   ##数据恢复
+------+--------+------+
10 rows in set (0.00 sec)

mysql>
11.4 实战:通过LVM快照进行数据库的备份
11.4.1 备份的目的
能够防止由于机械故障以及人为误操作带来的数据丢失,例如将数据库文件保存在了其它地方。
11.4.2 lvm 快照备份原理
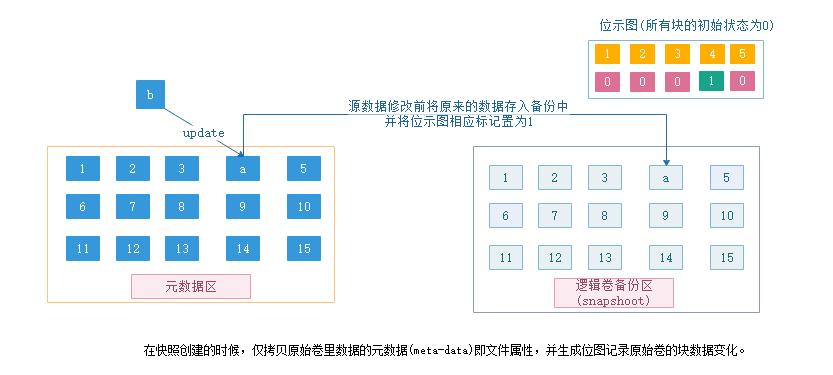
LVM对LV提供的快照功能,只对LVM有效。当一个snapshot创建的时候,仅拷贝原始卷 里数据的 元数据(meta-data)。因此建立快照的速度非常快
创建的时候,并不会有数据的物理拷贝,因此 snapshot的创建几乎是实时的,当原始卷上有写操作执行时,snapshot 跟踪原始卷块的改变,这个时候原始卷上将要改变的数据在 改变之前被拷贝到 snapshot预留的空间里,因此这个原理的实现叫做写时复制 (copy-on-write)。
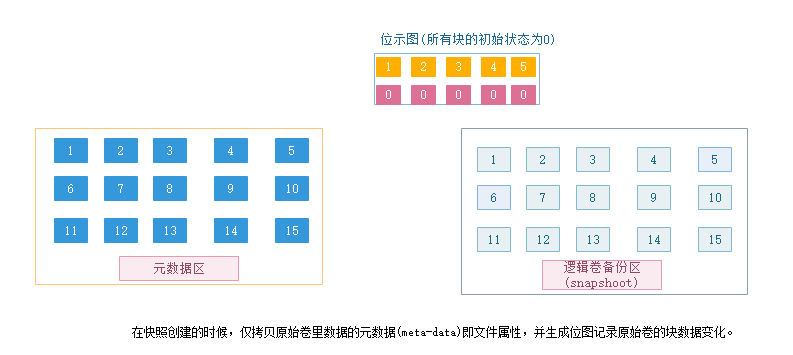
在写操作写入块之前,将原始数据移动到 snapshot空间里,这样就保证了所有的数据在snapshot创建时保持一致。 而对于snapshot的读操作,如果是读取数据块是没有修改过的,那么会将读操作直接重定向到原始卷上,如果是要 读取已经修改过的块,那么就读取拷贝到snapshot中的块。
11.4.3 数据库的备份和还原
11.4.3.1 备份的过程
1、停止数据库
2、tar 备份数据
3、启动数据库
[root@master ~]# systemctl stop mysqld
[root@master ~]# tar cvf /backup/`date +%F`-mysql-all.tar /var/lib/mysql
[root@master backup]# ls
2021-11-22-mysql-all.tar
注意:备份文件应该复制或者保存在其他的服务器上。
11.4.3.2 还原的过程
1、停止数据库
2、清理环境
3、导入备份数据
4、启动数据库
[root@master backup]# systemctl stop mysqld   ##停止数据库
[root@master backup]# rm -rf /var/lib/mysql/*    ##删除数据
[root@master mysql]# tar xvf /backup/2021-11-22-mysql-all.tar -C /  ## 恢复数据
[root@master mysql]# systemctl start mysqld
[root@master mysql]# mysql -uroot -p123456
mysql: [Warning] Using a password on the command line interface can be insecure.
Welcome to the MySQL monitor.  Commands end with ; or \g.
Your MySQL connection id is 2
Server version: 5.7.36-log MySQL Community Server (GPL)

Copyright (c) 2000, 2021, Oracle and/or its affiliates.

Oracle is a registered trademark of Oracle Corporation and/or its
affiliates. Other names may be trademarks of their respective
owners.

Type 'help;' or '\h' for help. Type '\c' to clear the current input statement.

mysql>
11.4.4 LVM_snapshot优缺点
LVM快照备份需要数据是存放在LVM上的。
优点
    几乎是热备 (创建快照前把表上锁,创建完后立即释放)
    支持所有存储引擎
    备份速度快
    无需使用昂贵的商业软件(它是操作系统级别的)
缺点:
    需要系统管理员权限,一般的DBA是没有的这个权限的。
    无法预计停机时间
    如果数据不是存在LVM上,则需要停机迁移数据到LVM上
11.4.5 LVM_SNAPSHOT的备份的过程
1)给加全局读锁
2)LVM快照
3)释放锁
4)挂载快照卷
5)拷贝快照卷数据
6)卸载被删除快照卷
11.4.6 实战:LVM快照备份数据库
如果你的数据库还未安装,可以先创建一个逻辑卷,在安装数据库时将数据库的数据路径安装到你事先定义好的逻辑卷中
如果你的系统是已经运行了一段时间的,并没有将数据存储在逻辑卷中,此时你就需要手动来迁移数据到逻辑卷中,比如
我的数据默认是存储在/var这个目录下的,因此需要手动来迁移数据到LVM中,接下来,我们来先手动迁移数据到逻辑卷
11.4.6.1 先增加一个新的磁盘,将其定义为逻辑卷
11.4.6.2 创建LVM
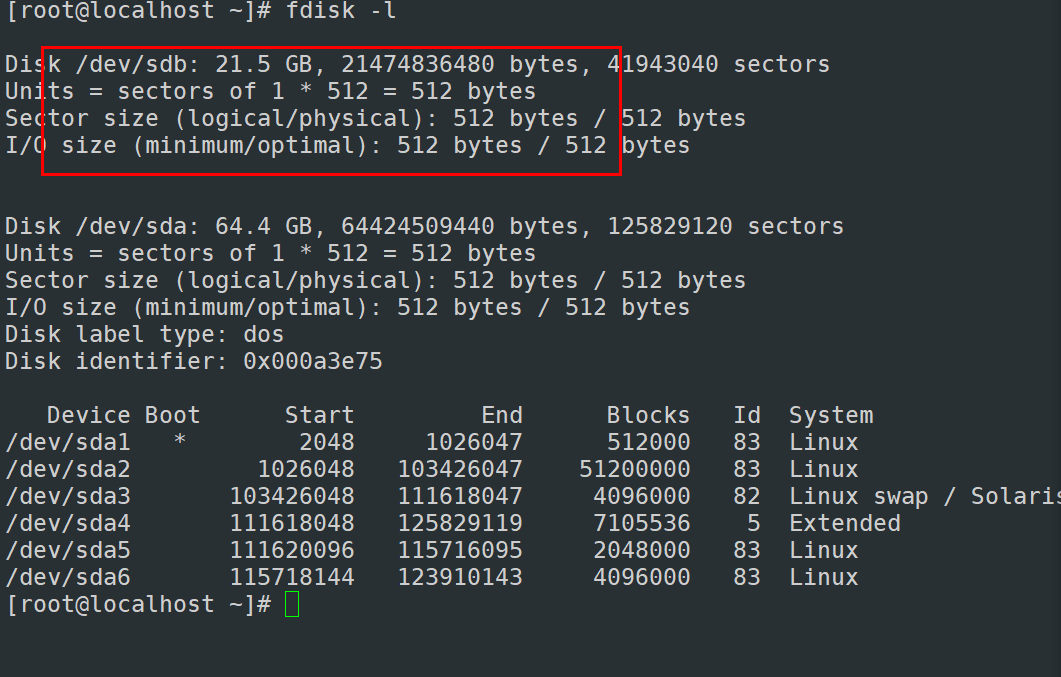
[root@localhost ~]# pvcreate /dev/sdb1
  Physical volume "/dev/sdb1" successfully created.
[root@localhost ~]# vgcreate vg01 /dev/sdb1
  Volume group "vg01" successfully created
[root@localhost ~]# lvcreate -n lv01 -L 5G vg01
  Logical volume "lv01" created.
[root@localhost ~]#
11.4.6.3 格式化文件系统
[root@localhost ~]# lvcreate -n lv01 -L 5G vg01
  Logical volume "lv01" created.
[root@localhost ~]# mkfs.ext4 /dev/vg01/lv01
mke2fs 1.42.9 (28-Dec-2013)
Filesystem label=
OS type: Linux
Block size=4096 (log=2)
Fragment size=4096 (log=2)
Stride=0 blocks, Stripe width=0 blocks
327680 inodes, 1310720 blocks
65536 blocks (5.00%) reserved for the super user
First data block=0
Maximum filesystem blocks=1342177280
40 block groups
32768 blocks per group, 32768 fragments per group
8192 inodes per group
Superblock backups stored on blocks:
	32768, 98304, 163840, 229376, 294912, 819200, 884736

Allocating group tables: done
Writing inode tables: done
Creating journal (32768 blocks): done
Writing superblocks and filesystem accounting information: done
11.4.6.4 新建挂载点
将LVM挂载到新的临时挂载点
[root@localhost ~]# mkdir /data
[root@localhost ~]# mount /dev/vg01/lv01 /data
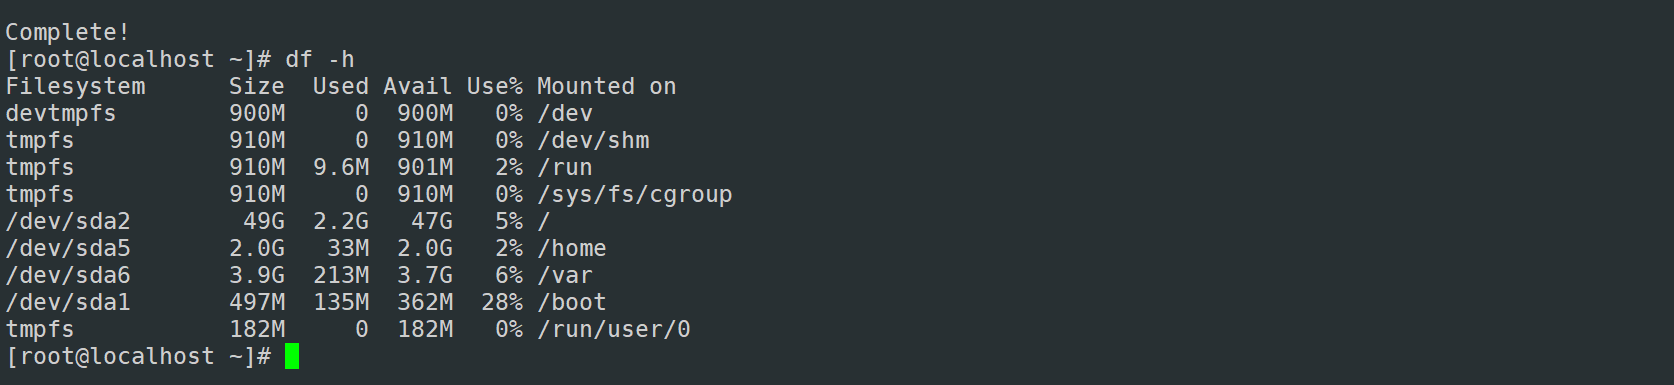
[root@localhost ~]# df -h
Filesystem Size Used Avail Use% Mounted on
devtmpfs 900M 0 900M 0% /dev
tmpfs 910M 0 910M 0% /dev/shm
tmpfs 910M 9.6M 901M 2% /run
tmpfs 910M 0 910M 0% /sys/fs/cgroup
/dev/sda2 49G 2.2G 47G 5% /
/dev/sda6 3.9G 348M 3.6G 9% /var
/dev/sda5 2.0G 33M 2.0G 2% /home
/dev/sda1 497M 135M 362M 28% /boot
tmpfs 182M 0 182M 0% /run/user/0
/dev/mapper/vg01-lv01 4.8G 20M 4.6G 1% /data
11.4.6.5 将数据库数据拷贝到/data临时目录下
[root@localhost ~]# cp -a /var/lib/mysql/* /data/
[root@localhost ~]# cd /data/
[root@localhost data]# ls
auto.cnf    ca.pem           client-key.pem  ib_buffer_pool  ib_logfile0  ibtmp1  mysql.sock       performance_schema  public_key.pem   server-key.pem
ca-key.pem  client-cert.pem  HA              ibdata1         ib_logfile1  mysql   mysql.sock.lock  private_key.pem     server-cert.pem  sys
[root@localhost data]#
11.4.6.6 设置自动挂载
将/dev/vg01/lv01挂载到/var/lib/mysql/下
[root@localhost ~]# vim /etc/fstab
添加如下内容:

/dev/vg01/lv01    /var/lib/mysql/             ext4      defaults      0 0
11.4.6.7 挂载
[root@localhost ~]# mount -a
[root@localhost ~]# df -h
Filesystem             Size  Used Avail Use% Mounted on
devtmpfs               900M     0  900M   0% /dev
tmpfs                  910M     0  910M   0% /dev/shm
tmpfs                  910M  9.6M  901M   2% /run
tmpfs                  910M     0  910M   0% /sys/fs/cgroup
/dev/sda2               49G  2.2G   47G   5% /
/dev/sda6              3.9G  348M  3.6G   9% /var
/dev/sda5              2.0G   33M  2.0G   2% /home
/dev/sda1              497M  135M  362M  28% /boot
tmpfs                  182M     0  182M   0% /run/user/0
/dev/mapper/vg01-lv01  4.8G  154M  4.4G   4% /var/lib/mysql
11.4.6.8 查看数据
[root@localhost ~]# chown -R mysql.mysql /var/lib/mysql   ##修改权限
[root@localhost ~]# systemctl start mysqld    #启动数据库
至此,数据库迁移完成了。接下来,我们开始开进行快照备份
11.4.6.9 开启全局读锁
在快照备份开启之前,需要先加一个全局读锁
mysql> flush tables with read lock; #加全局读锁
演示全局锁的概念
- 注意开启binlog日志:
vim /etc/my.cnf
log-bin=mysql-binlog
server-id=1
查看你msater的binlog的位置,用于明确你自己下次binlog恢复的位置
mysql> show master status\G
* 1. row *
             File: mysql-binlog.000001
         Position: 410
     Binlog_Do_DB:
 Binlog_Ignore_DB:
Executed_Gtid_Set:
1 row in set (0.00 sec)
mysql> create table HA.bbs(id int,name varchar(50)); ##创建一个表
Query OK, 0 rows affected (0.00 sec)

mysql> insert into HA.bbs values(1,"zhangsan");   ##插入一行数据
Query OK, 1 row affected (0.00 sec)

mysql> flush tables with read lock;   ##加一个读锁
Query OK, 0 rows affected (0.00 sec)
- 在同一台服务器上在另开一个终端,进行数查看:
mysql> select * from bbs;   ##查看数据没有问题
+------+----------+
| id   | name     |
+------+----------+
|    1 | zhangsan |
+------+----------+
1 row in set (0.01 sec)

mysql> insert into bbs values(2,"lisi");   ##当我前一个终端没有断开之前,我是无法插入数据的,这就是读锁的概念
Query OK, 1 row affected (20.86 sec)
11.4.6.10 创建快照时不要将锁终端关闭
[root@localhost ~]# lvcreate -L 1G -s -n lv-mysql-snap01 /dev/vg01/lv01   ##创建快照
[root@localhost ~]# mkdir /backup
[root@localhost backup]# mysql -uroot -p123456 -e 'show master status'>/backup/`date +%F`_position.txt
mysql: [Warning] Using a password on the command line interface can be insecure.
[root@localhost backup]# ls
2021-11-23_position.txt
参数说明:
-L 指定逻辑空间大小1G
-s 代表是snapshot快照
-n 指定快照名称
注意:这里的第9-10步其实要在一个会话中运行,因为我们备份时使用的脚本的方式,如果我们分开写了,当我开始加锁了之后,命令就要跳出数据库中,等于锁又自动解开了,因此是没有意义的,所以建议使用如下的办法:
[root@localhost ~]# echo "FLUSH TABLES WITH READ LOCK; SYSTEM lvcreate -L 1G -s -n mysql-snap /dev/vg01/lv01;" |mysql -uroot -p123456
mysql: [Warning] Using a password on the command line interface can be insecure.
File descriptor 3 (socket:[44391]) leaked on lvcreate invocation. Parent PID 13783: mysql
  Logical volume "mysql-snap" created.
11.4.6.11 将新建的快照以只读挂载起来
[root@localhost ~]# mount -o ro /dev/vg01/mysql-snap /data
[root@localhost ~]# cd /data/
[root@localhost data]# ls
auto.cnf    client-cert.pem  ib_buffer_pool  ib_logfile1  mysql-binlog.000001  mysql.sock.lock     public_key.pem   sys
ca-key.pem  client-key.pem   ibdata1         ibtmp1       mysql-binlog.index   performance_schema  server-cert.pem
ca.pem      HA               ib_logfile0     mysql        mysql.sock           private_key.pem     server-key.pem
说明:只读挂载的目的是为了不使数据出现异常。
11.4.6.12 备份快照中的数据
[root@localhost ~]# mkdir /beifen
[root@localhost data]# tar cvf /beifen/mysql_snap_`date +%F`.tar.gz ./*
11.4.6.13 卸载
[root@localhost /]# umount /data
11.4.6.14 移除快照
[root@localhost /]# lvremove -f /dev/vg01/mysql-snap
  Logical volume "mysql-snap" successfully removed
备份脚本
#!/bin/bash
back_dir=/backup/`date +%F`
[ -d $back_dir ] || mkdir -p $back_dir
echo "FLUSH TABLES WITH READ LOCK; SYSTEM lvcreate -L 1G -s -n mysql-snap /dev/vg01/lv01;" \
|mysql -uroot -p123456
mount -o ro /dev/vg01/mysql-snap /data
rsync -a /data/ $back_dir
tar cf mysql_snap_`date +%F`_mysql.tar.gz $back_dir
 if [ $? -eq 0 ];then
      umount /data
      lvremove -f /dev/vg01/mysql-snap
  fi
[root@localhost ~]# ./lvm.sh    ##执行脚本备份
mysql: [Warning] Using a password on the command line interface can be insecure.
File descriptor 3 (socket:[48871]) leaked on lvcreate invocation. Parent PID 8449: mysql
  Logical volume "mysql-snap" created.
tar: Removing leading `/' from member names
tar: /backup/2021-11-24/mysql.sock: socket ignored
  Logical volume "mysql-snap" successfully removed
[root@localhost ~]# ls
anaconda-ks.cfg  lvm.sh  mysql57-community-release-el7-10.noarch.rpm  mysql_snap_2021-11-24_mysql.tar.gz
恢复数据:
[root@localhost ~]# tar xf mysql_snap_2021-11-24_mysql.tar.gz   ##解压
[root@localhost ~]# cd backup/
[root@localhost backup]# ls
2021-11-24
[root@localhost backup]# cd 2021-11-24/
[root@localhost 2021-11-24]# ls
auto.cnf    ca.pem           client-key.pem  ib_buffer_pool  ib_logfile0  ibtmp1      mysql            performance_schema  public_key.pem   server-key.pem
ca-key.pem  client-cert.pem  HA              ibdata1         ib_logfile1  lost+found  mysql.sock.lock  private_key.pem     server-cert.pem  sys
[root@localhost 2021-11-24]# rm -rf /var/lib/mysql/*    ###模拟数据丢失
[root@localhost 2021-11-24]# cp -a * /var/lib/mysql
[root@localhost 2021-11-24]# chown -R mysql.mysql /var/lib/mysql    ##修改权限
[root@localhost 2021-11-24]# systemctl restart mysqld      ##重启服务
[root@localhost 2021-11-24]# mysql -uroot -p123456      ##测试登录
mysql: [Warning] Using a password on the command line interface can be insecure.
Welcome to the MySQL monitor.  Commands end with ; or \g.
Your MySQL connection id is 2
Server version: 5.7.36 MySQL Community Server (GPL)

Copyright (c) 2000, 2021, Oracle and/or its affiliates.

Oracle is a registered trademark of Oracle Corporation and/or its
affiliates. Other names may be trademarks of their respective
owners.

Type 'help;' or '\h' for help. Type '\c' to clear the current input statement.

mysql>
十二、总结
本章节我们在之前学习的基础上学习了一些基本的操作,针对数据库的操作,我们要学会如何进入数据,并如何新建数据库,如何删除数据库,针对表的操作我们要学会如何进行数据表的CRUD操作,这些操作也是在平常的工作中最基础的操作,同时也是操作量最大,同时还介绍了一些数据库的备份和还原的方式,针对数据库的备份又有很多种类型,需要根据自己的需求来选择合适的备份方式,针对数据库的还原方式也很多可以通过数据库自带的还原的方式也可以通过第三方的工具来实现,比如Navicat或者xtrabackup来实现。