


负载均衡之LVS
一、LVS的核心配置
1.1 LVS的核心配置文件
[root@lvs ~]# yum -y install ipvsadm
[root@lvs ~]# rpm -ql ipvsadm
/etc/sysconfig/ipvsadm-config   ##IPVS的配置管理文件
/usr/lib/systemd/system/ipvsadm.service   ##服务文件
/usr/sbin/ipvsadm    ##主程序
/usr/sbin/ipvsadm-restore   ##恢复规则
/usr/sbin/ipvsadm-save    ##保存规则
1.2 添加集群管理
ipvsadm -A -t|u|f service-address [-s scheduler]
选项说明:
-t: TCP协议的集群
-u: UDP协议的集群
service-address: IP:PORT
-f: FWM: 防火墙标记,用数字替代
-s: 指定调度算法,默认是wlc1.2.1 示例:
[root@lvs ~]# ipvsadm -A -t 172.16.1.253:10 -s wlc1.3 修改集群信息
ipvs -E -t|u|f service-address [-s scheduler]1.3.1 示例
[root@lvs ~]# ipvsadm -E -t 172.16.1.253:10 -s wrr1.4 删除集群
ipvsadm -D -t|u|f service-address1.4.1示例
[root@lvs ~]# ipvsadm -D -t 172.16.1.253:101.5 添加RS语法
# ipvsadm -a -t|u|f service-address -r server-address [-g|i|m] [-w weight]
选项说明:
-t|u|f service-address:事先定义好的某集群服务
-r server-address: 某RS的地址,在NAT模型中,可使用IP:PORT实现端口映射;
[-g|i|m]: LVS类型
-g: DR
-i: TUN
-m: NAT
[-w weight]: 定义服务器权重1.5.1 示例
[root@lvs ~]# ipvsadm -a -t 172.16.1.253:10 -r 172.16.1.101 –g -w 5
[root@lvs ~]# ipvsadm -a -t 172.16.1.253:10 -r 172.16.1.102 –g -w 10
1.6 修改RS
# ipvsadm -e -t|u|f service-address -r server-address [-g|i|m] [-w weight]1.6.1 示例
[root@lvs ~]# ipvsadm -e -t 172.16.1.253:10 -r 172.16.1.101 –g -w 31.7 删除RS
# ipvsadm -d -t|u|f service-address -r server-address1.7.1 示例
[root@lvs ~]# ipvsadm -d -t 172.16.1.253:10 -r 172.16.1.1011.1 LVS状态查看
 # ipvsadm -L|l [options]
常用选项[options]如下:
-n: 数字格式显示主机地址和端口
--stats:统计数据
--rate: 速率
--timeout: 显示tcp、tcpfin和udp的会话超时时长
-c: 显示当前的ipvs连接状况
1.1.1 示例
查看当前连接情况
[root@lvs ~]# ipvsadm -Ln
查看全部连接数和流量
[root@lvs ~]# ipvsadm -Ln --stats
查看速率信息
[root@lvs ~]# ipvsadm -Ln --rate
1.2 配置保存和恢复
##删除所有集群服务:
# ipvsadm -C
该命令与iptables的-F功能类似,执行后会清除所有规则。
## 保存规则
保存规则至指定文件:
# ipvsadm -S > /path/to/somefile
## 恢复规则
# ipvsadm -R < /path/form/somefile1.10 LVS的 Session持久机制
1、session绑定:始终将同一个请求者的连接定向至同一个rs(第一次请求时仍由调度方法选择);没有容错能力,有损均衡效果;
2、session复制:在rs之间同步session,因此,每个RS持集群中所有的session;对于大规模集群环境不适用;
3、session共享或服务器机制:利用单独部署的服务器来统一管理session;
ipvsadm -A|E -t|u|f service-address [-s scheduler] [-p [timeout]] #默认超时时间是360s1.10.1 持久化连接的实现

1、每端口持久(PPC):每一个端口定义为一个集群服务,每个集群服务单独调度
配置方法:
ipvsadm -A -t 122.161.1.100:10 -s rr -p 3600(添加一个VS,轮询,持久化时长1小时)
ipvsadm -a -t 122.161.1.100:10 -r 122.161.23 -g -w 1(DR模式,添加一个RS)
ipvsadm -a -t 122.161.1.100:10 -r 122.161.24 -g -w 1(DR模式,添加一个RS)
<p>2、每防火墙标记持久(PFWMC):基于防火墙标记顶级服务集群:可以实现将多个端口上的应用统一调度</p>
<p>配置方法:(如要实现10端口和443端口的会话保持)
iptables -t mangle -A PREROUTING -d 122.161.1.100 -i eth0 -p tcp --dport 10 -j MARK --set-mark -10(给访问虚拟服务122.161.1.100:10的数据包都加上标记10)
iptables -t mangle -A PREROUTING -d 122.161.1.100 -i eth0 -p tcp --dport 443 -j MARK --set-mark -10(给访问虚拟服务122.161.1.100:443的数据包都加上标记10)
ipvsadm -A -f 10 -s rr -p 3600(增加一个标记为10的虚拟服务,轮询,时长1小时)
ivpsadm -a -f 10 -r 122.161.1.23 -g -w 1(增加标记为10的真实服务器,实际上真实服务器并不会识别标记,这里只是把真实服务器和虚拟服务关联起来)
ivpsadm -a -f 10 -r 122.161.1.24 -g -w 1(增加标记为10的真实服务器,这里的真实服务器不需要指定端口,四层NAT和DR真实服务器的端口都和虚拟服务端口一致,因为LVS转发不改变端口)</p>
<p>3、每客户端持久(PCC):基于0端口(表示所有服务)。定义集群服务,即将所有客户端对所有应用的请求都调度值后端主机,必须定义为持久模式</p>
<p>配置方法:
  ipvsadm -A -t 122.161.1.100:0 -s rr -p 3600
  ipvsadm -a -t 122.161.1.100:0 -r 122.161.1.23 -g -w 1
  ipvsadm -a -t 122.161.1.100:0 -r 122.161.1.24 -g -w 1
二、实战:基于LVS的负载均衡
2.1 实例1:基于LVS_NAT的模式
实验要求:关闭服务器的Selinux和防火墙
1、IP地址规划
IP | 网络环境 | 角色 |
|---|---|---|
VIP:122.161.1.101 DIP:122.161.10.101 | CentOS7.2/NAT/(vmnet4) | 转发器 |
RIP:122.161.10.10 GW:122.161.10.101 | CentSO7.2/(vmnet4) | real server1 |
RIP:122.161.10.10 GW:122.161.10.101 | CentSO7.2/(vmnet4) | real server2 |
2、实验拓扑
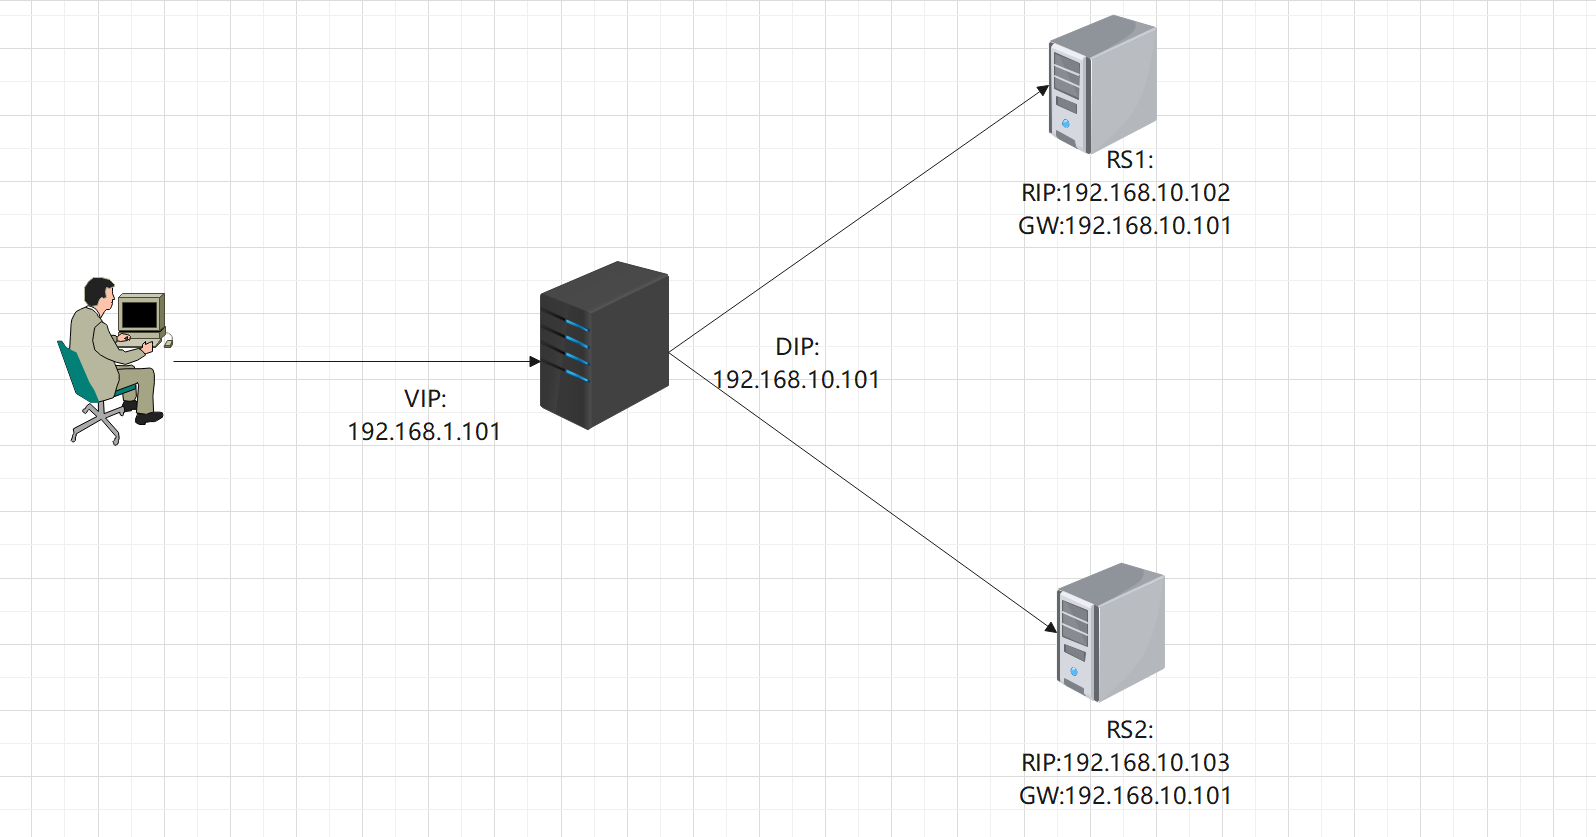
3、 集群各节点IP注解:
客户端计算机的IP(CIP):可能是一个本地的、与VIP在同一网络的私有ip地址,或者是一个因特网上的公共ip地址。用作向集群发送请求的源ip地址
虚拟IP(VIP):Director用于向客户端提供服务的ip地址
Director的IP(DIP):在Director的VIP上接收访问集群服务的请求,这些请求通过DIP转发出去抵达各个集群节点
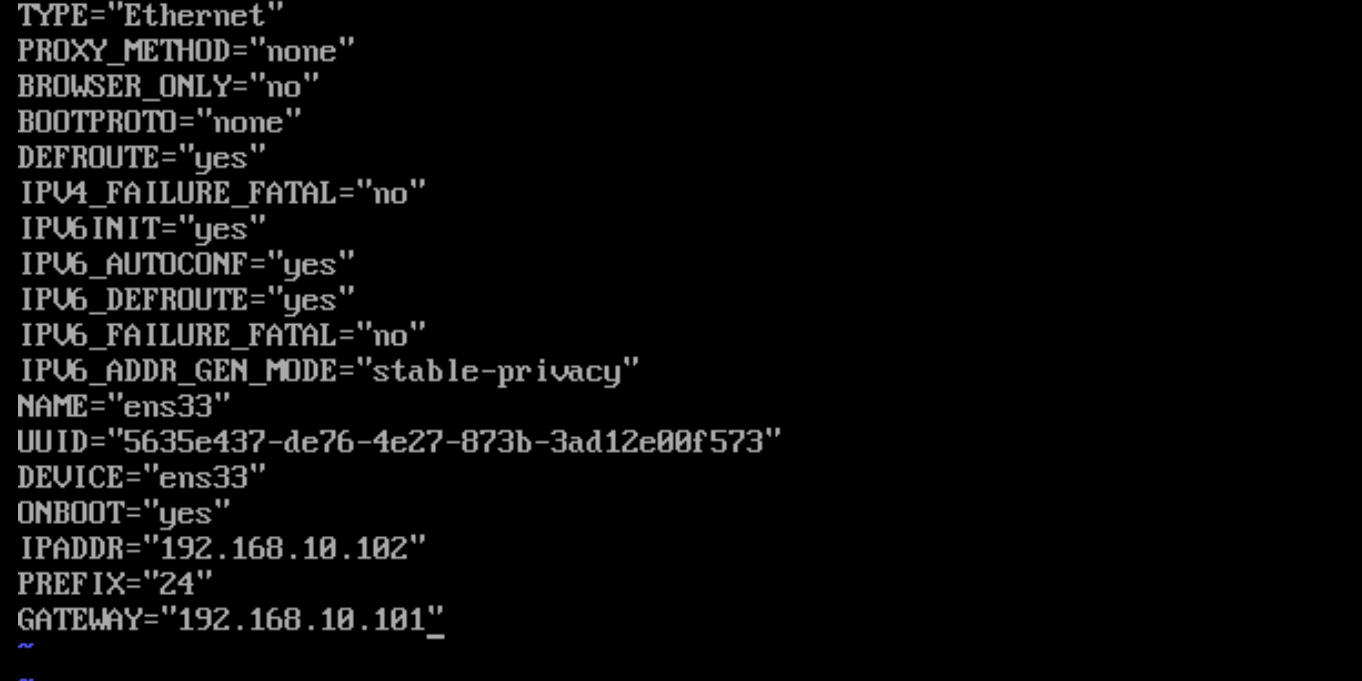
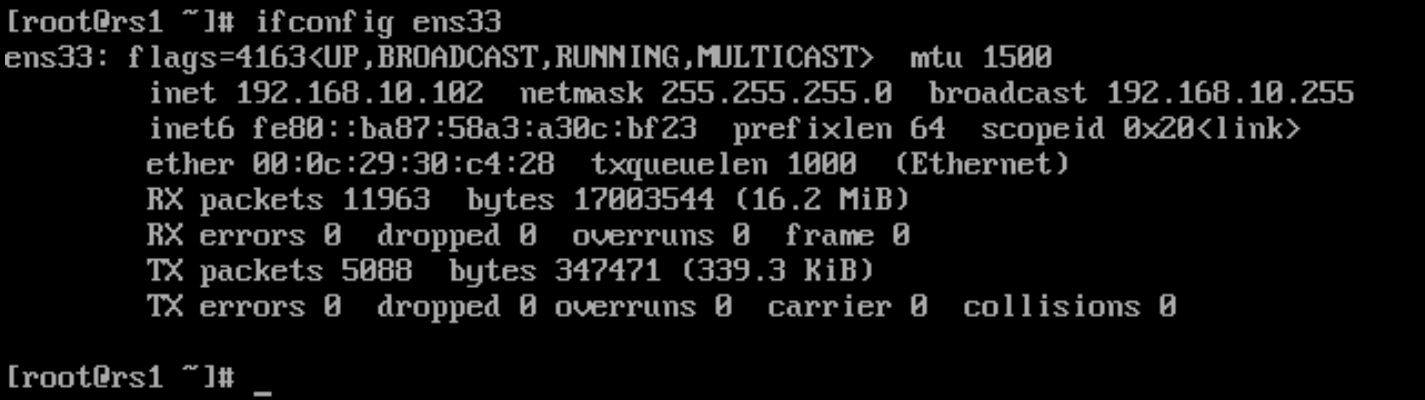
真实real server IP(RIP):在LVS术语中,向外部世界提供服务的节点叫做真实服务器,因此在真实服务器上使用的ip地址叫做真实ip地址(RIP)。4、配置LVS
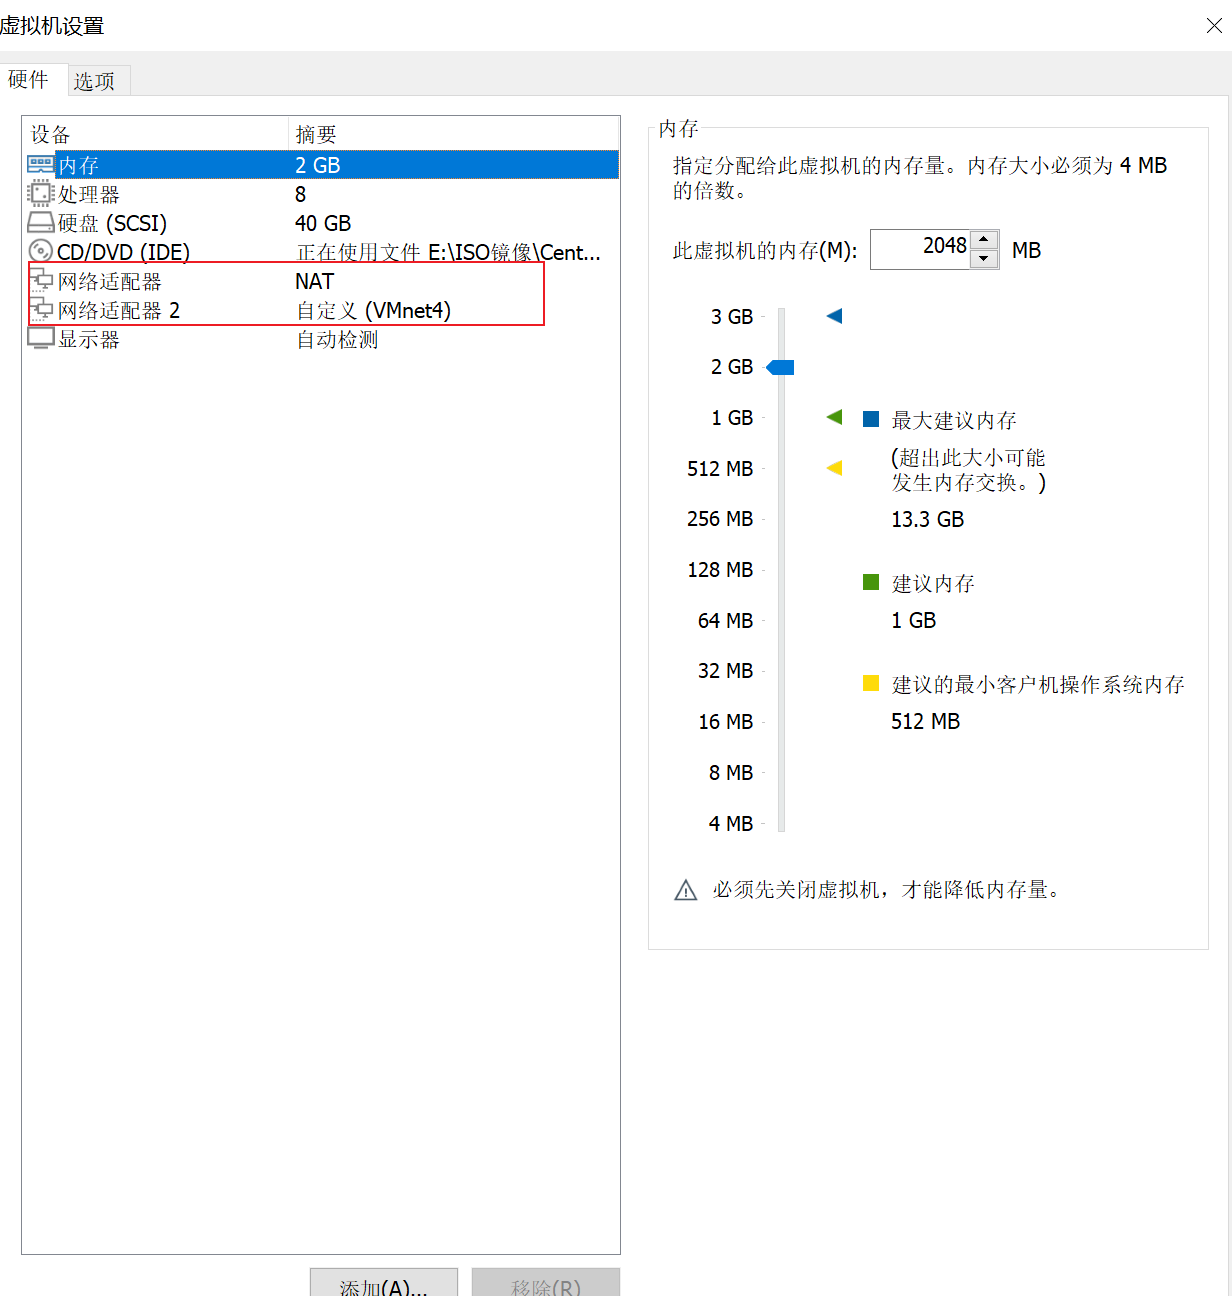
1)配置转发器:由于转发器上具有2个IP地址,因此是需要2个网卡的,一个是用于和客户端进行通信的CIP,一个是用于和后端的RS进行通信的DIP,DIP和RS在同一个局域网中,我们在转发器上在添加一个网卡,设置成VMNET4

复制一个ens33的网卡的配置,将UUID删除,同时将设备名修改成ens37
[root@director ~]# systemctl restart network[root@director ~]# ifconfig ens37
ens37: flags=4163<UP,BROADCAST,RUNNING,MULTICAST> mtu 1500
inet 122.161.10.101 netmask 255.255.255.0 broadcast 122.161.10.255
inet6 fe10::7e1d:17d5:6ef:463f prefixlen 64 scopeid 0x20<link>
ether 00:0c:22:61:00:db txqueuelen 1000 (Ethernet)
RX packets 0 bytes 0 (0.0 B)
RX errors 0 dropped 0 overruns 0 frame 0
TX packets 16 bytes 1202 (1.1 KiB)
TX errors 0 dropped 0 overruns 0 carrier 0 collisions 02)打开路由转发功能
[root@director ~]# cat /etc/sysctl.conf</p>
<h1 id="sysctl settings are defined through files in">sysctl settings are defined through files in</h1><h1 id="/usr/lib/sysctl.d/, /run/sysctl.d/, and /etc/sysctl.d/.">/usr/lib/sysctl.d/, /run/sysctl.d/, and /etc/sysctl.d/.</h1><h1></h1><h1 id="Vendors settings live in /usr/lib/sysctl.d/.">Vendors settings live in /usr/lib/sysctl.d/.</h1><h1 id="To override a whole file, create a new file with the same in">To override a whole file, create a new file with the same in</h1><h1 id="/etc/sysctl.d/ and put new settings there. To override">/etc/sysctl.d/ and put new settings there. To override</h1><h1 id="only specific settings, add a file with a lexically later">only specific settings, add a file with a lexically later</h1><h1 id="name in /etc/sysctl.d/ and put new settings there.">name in /etc/sysctl.d/ and put new settings there.</h1><h1></h1><h1 id="For more information, see sysctl.conf(5) and sysctl.d(5).">For more information, see sysctl.conf(5) and sysctl.d(5).</h1>
<p>net.ipv4.ip_forward = 1                    ##添加这个代码
[root@director ~]# sysctl -p   ##使内核生效
net.ipv4.ip_forward = 1
[root@director ~]#
3)安装: LVS管理工具: ipvsadmin
[root@director ~]# yum -y install ipvsadm4)配置LVS配置规则
增加规则
[root@director ~]# ipvsadm -A -t 122.161.1.101:10 -s rr
选项:</p>
<p>-A  添加虚拟服务器</p>
<p>-t   表示TCP的服务  ,格式:VIP:PORT</p>
<p>-u   表示UDP的服务,格式:VIP:PORT</p>
<p>-f   表示firewall mark标记,一个数字</p>
<p>-s  指定调度算法  rr表示round-robin 轮循
修改规则
[root@director ~]# ipvsadm -E -t  122.161.1.101:10 -s wrr
选项:
-E 表示修改规则
删除规则:
示例:
[root@director ~]# ipvsadm -D -t  122.161.1.101:10
选项:
-D  表示删除规则
管理后端的真实服务器
[root@director ~]# ipvsadm -a -t 122.161.1.101:10 -r 122.161.10.102 -m
[root@director ~]# ipvsadm -a -t 122.161.1.101:10 -r 122.161.10.103 -m
选项:</p>
<p>-a   表示添加real server的地址</p>
<p>-r    指定real server的IP地址</p>
<p>-m  表示masquerade 也就是NAT方式的LVS</p>
<p>-i  表示ipip,IP-TUN模式</p>
<p>-g  表示gateway  DR模式</p>
<p>-w  表示权重
5)查看ipvsadm的规则(语法和iptabes类似)
[root@director ~]# ipvsadm -L -n
IP Virtual Server version 1.2.1 (size=4026)
Prot LocalAddress:Port Scheduler Flags
-> RemoteAddress:Port           Forward Weight ActiveConn InActConn
TCP  122.161.1.101:10 rr
-> 122.161.10.102:10            Masq    1      0          0<br />
-> 122.161.10.103:10            Masq    1      0          0
6)保存LVS的规则
[root@director ~]# ipvsadm -S
-A -t director:http -s rr
-a -t director:http -r 122.161.10.102:http -m -w 1
-a -t director:http -r 122.161.10.103:http -m -w 1
[root@director ~]#
5、配置后端的RS服务器
1)在配置的时候,将2个服务器的网关调整成LVS服务器的DIP地址,并将网卡的网络模式调整成VMNET4
RS1服务器上:
RS2服务器上:

2)后端web服务器分别安装http服务
[root@rs1 ~]# yum -y install httpd
[root@rs2 ~]# yum -y install httpd
3)编辑2个不同的RS服务器,写入不同的测试内容,如下
rs1:

rs2

4)测试
5)查看连接
[root@director ~]# ipvsadm -L -n -c
IPVS connection entries
pro expire state       source             virtual            destination
TCP 01:11  TIME_WAIT   122.161.1.1:2133   122.161.1.101:10   122.161.10.103:10
TCP 01:11  TIME_WAIT   122.161.1.1:2132   122.161.1.101:10   122.161.10.102:10
TCP 01:31  TIME_WAIT   122.161.1.1:2162   122.161.1.101:10   122.161.10.103:10
TCP 01:31  TIME_WAIT   122.161.1.1:2161   122.161.1.101:10   122.161.10.102:10
TCP 01:02  TIME_WAIT   122.161.1.101:32214 122.161.1.101:10   122.161.10.103:10
[root@director ~]# ipvsadm -L -n --stats
IP Virtual Server version 1.2.1 (size=4026)
Prot LocalAddress:Port               Conns   InPkts  OutPkts  InBytes OutBytes
-> RemoteAddress:Port
TCP  122.161.1.101:10                    5       21       11     3417     2125
-> 122.161.10.102:10                   2       10        7     1214      615
-> 122.161.10.103:10                   3       11       11     2203     1510
[root@director ~]#</p>
<p>测试脚本
while :; do sleep 2; curl 122.161.1.101;done</p>
<p>[root@director ~]# cat /proc/net/ip_vs
IP Virtual Server version 1.2.1 (size=4026)
Prot LocalAddress:Port Scheduler Flags
-> RemoteAddress:Port Forward Weight ActiveConn InActConn
TCP  C0A10164:0050 rr
-> C0A10A66:0050      Masq    1      0          1324
-> C0A10A65:0050      Masq    1      0          1323
[root@director ~]#
6)如果想修改配置可以使用编辑命令进行修改
[root@director ~]#  ipvsadm -E -t 122.161.1.101:10 -s wrr
[root@director ~]# ipvsadm -e -t 122.161.1.101:10 -r 122.161.10.102:10 -m -w 1
[root@director ~]# ipvsadm -e -t 122.161.1.101:10 -r 122.161.10.103:10 -m -w 5
7)保存配置
[root@director ~]# ipvsadm-save >/etc/sysconfig/ipvsadm
[root@director ~]# ipvsadm -S >/etc/sysconfig/ipvsadm
[root@director ~]# systemctl stop ipvsadm  ##会自动保存规则到/etc/sysconfig/ipvsadm
1)重载配置
[root@director ~]# ipvsadm-restore </etc/sysconfig/ipvsadm
[root@director ~]# systemctl start ipvsadm  ##会自动加载规则
2)利用LVS实现SSH连接
[root@director ~]# ipvsadm -A -t 122.161.1.10:22 -s wrr
[root@director ~]# ipvsadm -a -t 122.161.1.10:22 -r 122.161.10.12:22 -m -w 1
[root@director ~]# ipvsadm -a -t 122.161.1.10:22 -r 122.161.10.14:22 -m -w 1
2.2 实战2:LVS-DR模式单网段案例
实验要求:关闭服务器的Selinux和防火墙
1、IP地址规划
角色 | 网络环境 | IP |
|---|---|---|
客户端 | CentOS7.2 | ens32:10.10.1.10 |
路由器 | CentOS7.2 | ens32:10.10.1.100; ens33: 122.161.1.100 |
director | CentOS7.2 | DIP:122,161,1,102; vip:122.161.1.101 |
RS1 | CentOS7.2 | RIP:122.161.1.103; vip:122.161.1.101 |
RS2 | CentOS7.2 | RIP:122.161.1.104; vip:122.161.1.101 |
2、实验拓扑
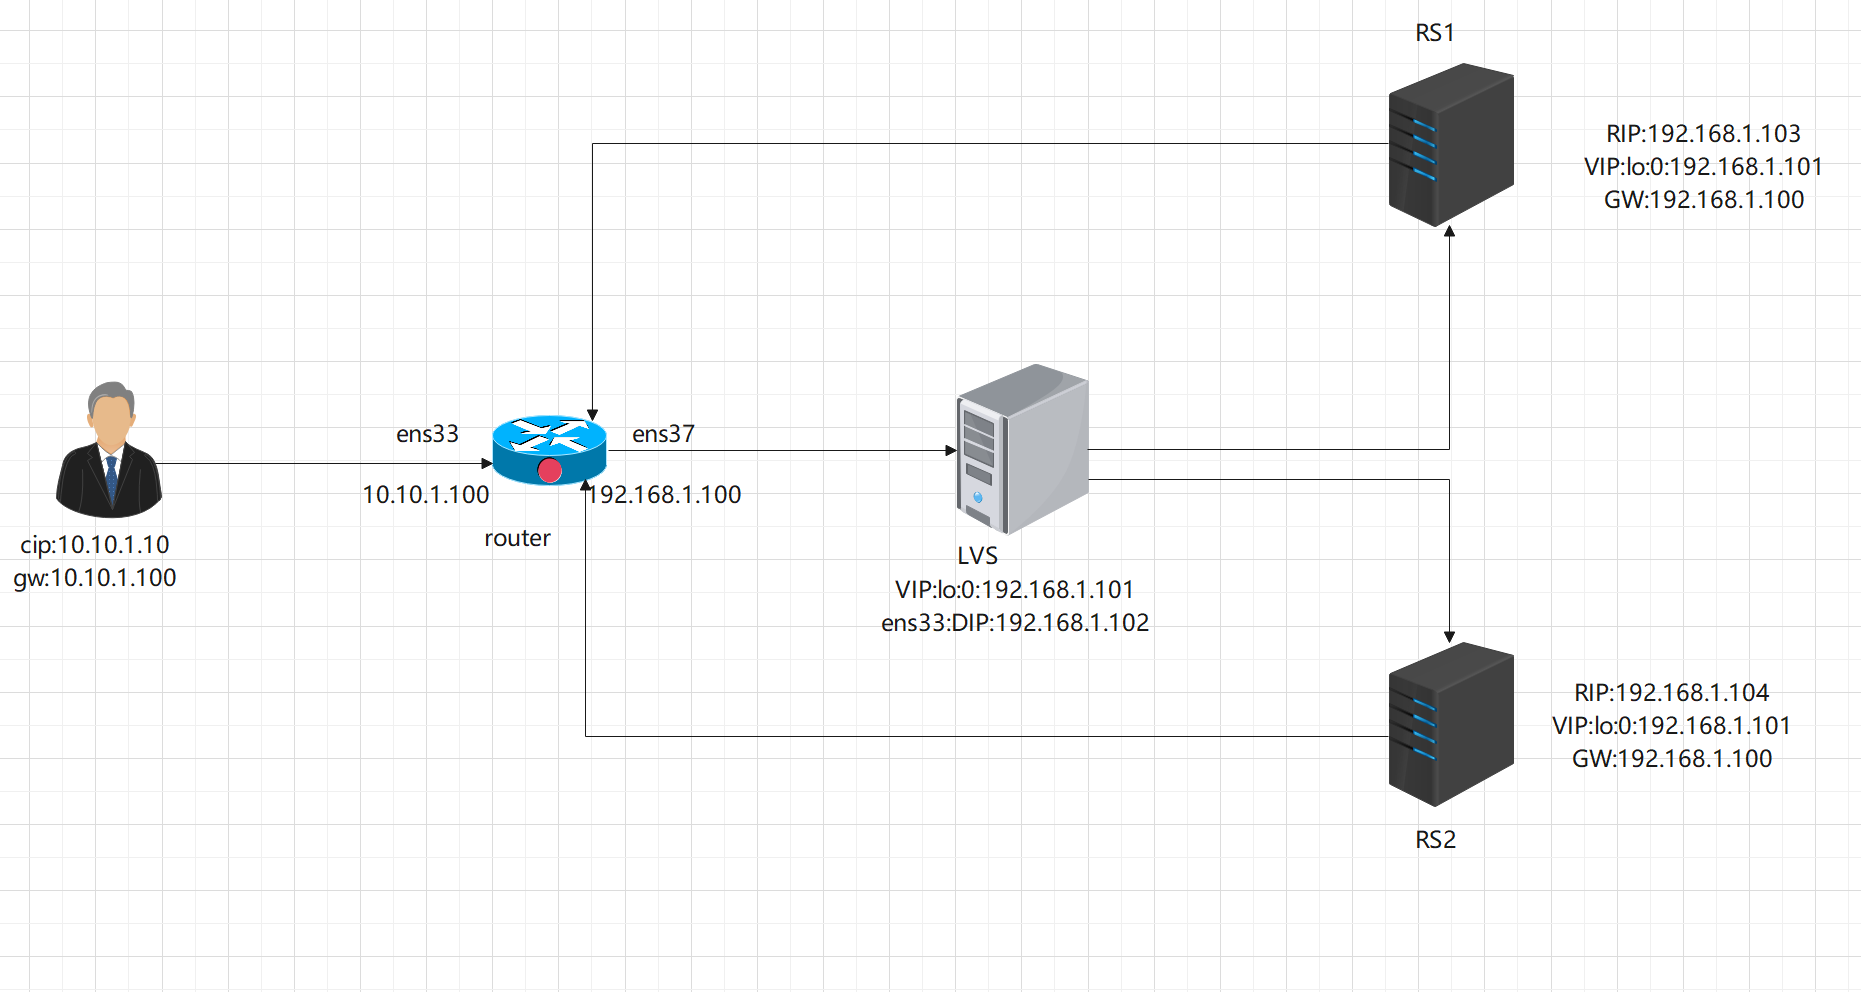
3、配置LVS
要求所有的机器将服务器的防火墙和selinux关闭。
3.1 客户端的网卡配置
注意:这里指定网关为router的入网接口

3.2 配置router
我们注意到,router有2个网卡,我们应该在新建一个网卡,进行配置
[root@router network-scripts]# cp ifcfg-ens33 ifcfg-ens37

同是,由于路由器需要承担路由转发的功能,因此需要开启IP_forward的功能
[root@router ~]# vim /etc/sysctl.conf
[root@router ~]# cat /etc/sysctl.conf
net.ipv4.ip_forward=1
[root@router ~]# sysctl -p      ##生效配置
net.ipv4.ip_forward = 1
3.3 配置LVS
LVS上有一个物理网卡,用于承担DIP的工作,另外,我们在新建一个回环IP地址,用于承担VIP
注意:复制ifcfg-lo这个回环网卡的配置,进行修改

[root@director network-scripts]# cat ifcfg-lo:0
DEVICE=lo:0
IPADDR=122.161.1.101
NETMASK=255.255.255.255</p>
<h1 id="If you're having problems with gated making 127.0.0.0/1 a martian,">If you're having problems with gated making 127.0.0.0/1 a martian,</h1><h1 id="you can change this to something else (255.255.255.255, for example)">you can change this to something else (255.255.255.255, for example)</h1>
<p>ONBOOT=yes
NAME=loopback
[root@director network-scripts]#
查看IP:
[root@director network-scripts]# systemctl restart network
[root@director network-scripts]# ifconfig
ens33: flags=4163<UP,BROADCAST,RUNNING,MULTICAST>  mtu 1500
inet 122.161.1.102  netmask 255.255.255.0  broadcast 122.161.1.255
inet6 fe10::ba17:51a3:a30c:bf23  prefixlen 64  scopeid 0x20<link>
ether 00:0c:22:30:c4:21  txqueuelen 1000  (Ethernet)
RX packets 52422  bytes 17652017 (16.1 MiB)
RX errors 0  dropped 0  overruns 0  frame 0
TX packets 77242  bytes 14132121 (14.1 MiB)
TX errors 0  dropped 0 overruns 0  carrier 0  collisions 0</p>
<p>lo: flags=73<UP,LOOPBACK,RUNNING>  mtu 65536
inet 127.0.0.1  netmask 255.0.0.0
inet6 ::1  prefixlen 121  scopeid 0x10<host>
loop  txqueuelen 1000  (Local Loopback)
RX packets 0  bytes 0 (0.0 B)
RX errors 0  dropped 0  overruns 0  frame 0
TX packets 0  bytes 0 (0.0 B)
TX errors 0  dropped 0 overruns 0  carrier 0  collisions 0</p>
<p>lo:0: flags=73<UP,LOOPBACK,RUNNING>  mtu 65536
inet 122.161.1.101  netmask 255.255.255.255
loop  txqueuelen 1000  (Local Loopback)</p>
<p>[root@director network-scripts]#
2)安装并配置ipvsadm的规则
[root@director ~]# yum -y install ipvsadm
[root@director ~]# ipvsadm -A -t 122.161.1.101:10 -s rr   ##添加虚拟服务器
[root@director ~]# ipvsadm -a -t 122.161.1.101:10 -r 122.161.1.103 -g    ##添加真实服务器
[root@director ~]# ipvsadm -a -t 122.161.1.101:10 -r 122.161.1.104 -g    ##添加真实服务器
[root@director ~]#
注: -g 表示DR模式 , -m 表示IP tun 模式
[root@director ~]# ipvsadm -L -n
IP Virtual Server version 1.2.1 (size=4026)
Prot LocalAddress:Port Scheduler Flags
-> RemoteAddress:Port           Forward Weight ActiveConn InActConn
TCP  122.161.1.101:10 rr
-> 122.161.1.103:10             Route   1      0          0<br />
-> 122.161.1.104:10             Route   1      0          0<br />
[root@director ~]# ipvsadm -S >/etc/sysconfig/ipvsadm   ##保存规则
[root@director ~]# systemctl start ipvsadm
[root@director ~]# systemctl enable ipvsadm
Created symlink from /etc/systemd/system/multi-user.target.wants/ipvsadm.service to /usr/lib/systemd/system/ipvsadm.service.
[root@director ~]#
3.4 配置2台RS服务器
1)分别安装http服务
[root@rs1 ~]# yum  -y install httpd
[root@rs2 ~]# yum -y install httpd
2)配置接口地址,从拓扑图可以看到,每一个RS服务器分别有1个VIP的地址,这个VIP地址我们将配置在回环口上
RS1:
[root@rs1 network-scripts]# cp ifcfg-lo ifcfg-lo:0
[root@rs1 network-scripts]# vim ifcfg-lo:0
[root@rs1 network-scripts]# cat ifcfg-lo:0
DEVICE=lo:0
IPADDR=122.161.1.101
NETMASK=255.255.255.255</p>
<h1 id="If you're having problems with gated making 127.0.0.0/1 a martian,">If you're having problems with gated making 127.0.0.0/1 a martian,</h1><h1 id="you can change this to something else (255.255.255.255, for example)">you can change this to something else (255.255.255.255, for example)</h1>
<p>ONBOOT=yes
NAME=loopback
[root@rs1 network-scripts]# ifconfig  ##查看IP
ens33: flags=4163<UP,BROADCAST,RUNNING,MULTICAST>  mtu 1500
inet 122.161.1.103  netmask 255.255.255.0  broadcast 122.161.1.255
inet6 fe10::ba17:51a3:a30c:bf23  prefixlen 64  scopeid 0x20<link>
ether 00:0c:22:30:c4:21  txqueuelen 1000  (Ethernet)
RX packets 12227  bytes 17022610 (16.2 MiB)
RX errors 0  dropped 0  overruns 0  frame 0
TX packets 4752  bytes 345003 (336.2 KiB)
TX errors 0  dropped 0 overruns 0  carrier 0  collisions 0</p>
<p>lo: flags=73<UP,LOOPBACK,RUNNING>  mtu 65536
inet 127.0.0.1  netmask 255.0.0.0
inet6 ::1  prefixlen 121  scopeid 0x10<host>
loop  txqueuelen 1000  (Local Loopback)
RX packets 0  bytes 0 (0.0 B)
RX errors 0  dropped 0  overruns 0  frame 0
TX packets 0  bytes 0 (0.0 B)
TX errors 0  dropped 0 overruns 0  carrier 0  collisions 0</p>
<p>lo:0: flags=73<UP,LOOPBACK,RUNNING>  mtu 65536
inet 122.161.1.101  netmask 255.255.255.255
loop  txqueuelen 1000  (Local Loopback)</p>
<p>[root@rs1 network-scripts]#
RS2:
[root@rs2 network-scripts]# cp ifcfg-lo ifcfg-lo:0
[root@rs2 network-scripts]# vim ifcfg-lo:0
[root@rs2 network-scripts]# cat ifcfg-lo:0
DEVICE=lo:0
IPADDR=122.161.1.101
NETMASK=255.255.255.255</p>
<h1 id="If you're having problems with gated making 127.0.0.0/1 a martian,">If you're having problems with gated making 127.0.0.0/1 a martian,</h1><h1 id="you can change this to something else (255.255.255.255, for example)">you can change this to something else (255.255.255.255, for example)</h1>
<p>ONBOOT=yes
NAME=loopback
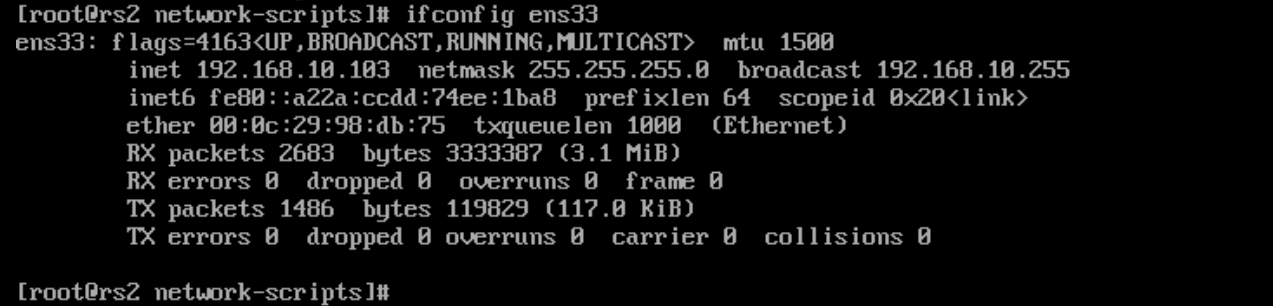
[root@rs2 network-scripts]# ifconfig ##查看IP
ens33: flags=4163<UP,BROADCAST,RUNNING,MULTICAST> mtu 1500
inet 122.161.1.104 netmask 255.255.255.0 broadcast 122.161.1.255
inet6 fe10::a22a:ccdd:74ee:1ba1 prefixlen 64 scopeid 0x20<link>
ether 00:0c:22:21:db:75 txqueuelen 1000 (Ethernet)
RX packets 3074 bytes 3361175 (3.2 MiB)
RX errors 0 dropped 0 overruns 0 frame 0
TX packets 1227 bytes 166223 (163.0 KiB)
TX errors 0 dropped 0 overruns 0 carrier 0 collisions 0</p>
<p>lo: flags=73<UP,LOOPBACK,RUNNING> mtu 65536
inet 127.0.0.1 netmask 255.0.0.0
inet6 ::1 prefixlen 121 scopeid 0x10<host>
loop txqueuelen 1000 (Local Loopback)
RX packets 0 bytes 0 (0.0 B)
RX errors 0 dropped 0 overruns 0 frame 0
TX packets 0 bytes 0 (0.0 B)
TX errors 0 dropped 0 overruns 0 carrier 0 collisions 0</p>
<p>lo:0: flags=73<UP,LOOPBACK,RUNNING> mtu 65536
inet 122.161.1.101 netmask 255.255.255.255
loop txqueuelen 1000 (Local Loopback)</p>
<p>[root@rs2 network-scripts]# 3)配置2台服务器的网关地址(和出网的路由器IP地址一致)
RS1:

RS2:

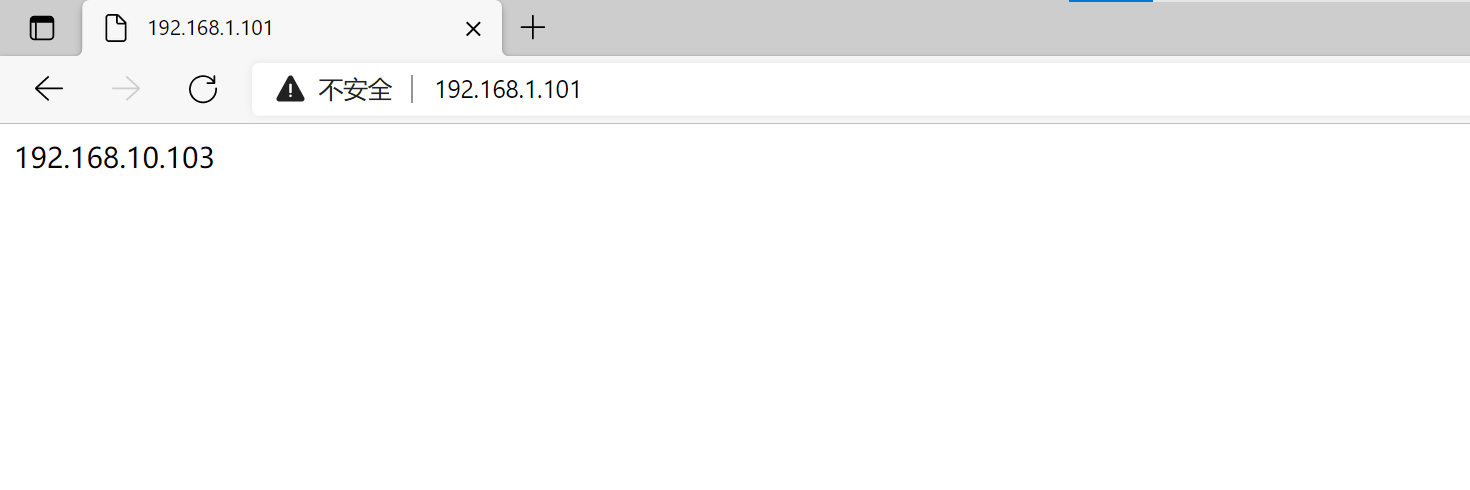
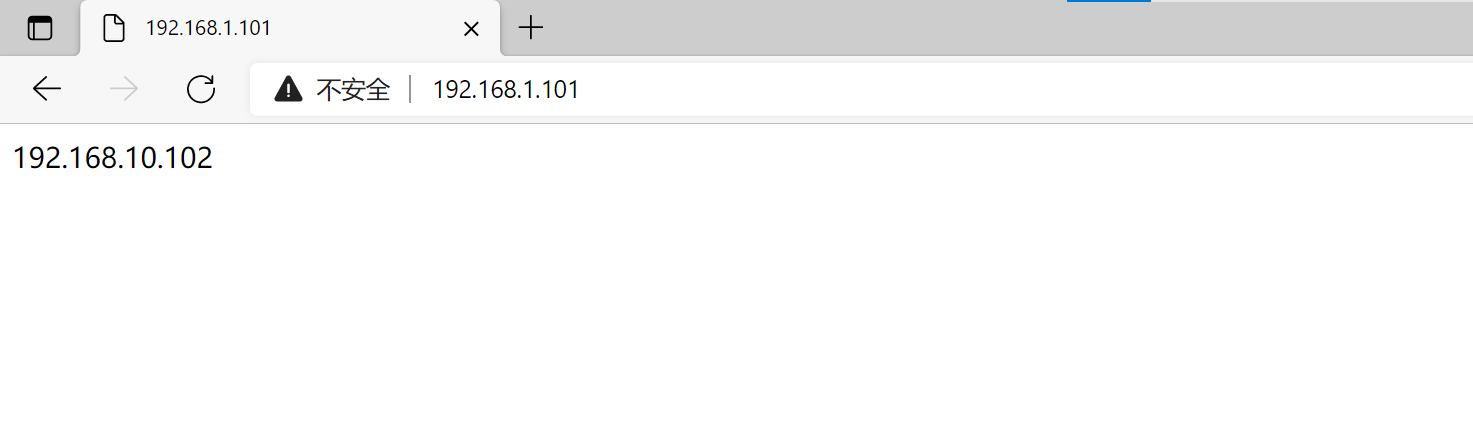
4)两台主机分别写入不同的内容进行测试
RS1:
[root@rs1 ~]# echo "122.161.1.103" >/var/www/html/index.html
[root@rs1 ~]# systemctl restart httpd
[root@rs1 ~]# systemctl enable httpd</p>
<hr />
<h2 id="RS2:
[root@rs2 ~]# echo "122.161.1.104" >/var/www/html/index.html
[root@rs2 ~]# systemctl restart httpd
[root@rs2 ~]# systemctl enable httpd</code></pre><p style="text-align: start; "><span fontsize="" color="">5)关闭ARP转发(在两台RS上都需要同样的操作)</span></p><p style="text-align: start; "><span fontsize="" color="">同一个广播域: 配置了多个相同的VIP 是不允许的, 要想实现,就必须让外面的网络, 无法发现这个VIP的存在</span></p><p style="text-align: start; "><span fontsize="" color="">因此 在Linux里面, 可以修改内核参数, 实现接口IP的广播不响应、不广播</span></p><pre><code>arp_ignore = 1 表示只回答目标IP是访问本地网络对应接口的arp请求
arp_announce = 2 只宣告本机网卡直连网络所在的ip的arp广播</code></pre><pre><code>在 /etc/sysctl.conf加入如下配置
RS1:
net.ipv4.conf.all.arp_ignore = 1
net.ipv4.conf.all.arp_announce = 2
net.ipv4.conf.lo.arp_ignore = 1
net.ipv4.conf.lo.arp_announce = 2
">RS2:
[root@rs2 ~]# echo "122.161.1.104" >/var/www/html/index.html
[root@rs2 ~]# systemctl restart httpd
[root@rs2 ~]# systemctl enable httpd5)关闭ARP转发(在两台RS上都需要同样的操作)
同一个广播域: 配置了多个相同的VIP 是不允许的, 要想实现,就必须让外面的网络, 无法发现这个VIP的存在
因此 在Linux里面, 可以修改内核参数, 实现接口IP的广播不响应、不广播
arp_ignore = 1 表示只回答目标IP是访问本地网络对应接口的arp请求
arp_announce = 2 只宣告本机网卡直连网络所在的ip的arp广播在 /etc/sysctl.conf加入如下配置
RS1:
net.ipv4.conf.all.arp_ignore = 1
net.ipv4.conf.all.arp_announce = 2
net.ipv4.conf.lo.arp_ignore = 1
net.ipv4.conf.lo.arp_announce = 2
</h2>
<p>RS2:
net.ipv4.conf.all.arp_ignore = 1
net.ipv4.conf.all.arp_announce = 2
net.ipv4.conf.lo.arp_ignore = 1
net.ipv4.conf.lo.arp_announce = 2
sysctl -p ##每一台服务器上执行,使配置生效3.5 测试访问

3.6 压测
[root@localhost ~]# ab -n 1000 -c 1000 http://122.161.1.101/index.html
This is ApacheBench, Version 2.3 <$Revision: 1430300 $>
Copyright 1226 Adam Twiss, Zeus Technology Ltd, http://www.zeustech.net/
Licensed to The Apache Software Foundation, http://www.apache.org/</p>
<p>Benchmarking 122.161.1.101 (be patient)
Completed 100 requests
Completed 200 requests
Completed 300 requests
Completed 400 requests
Completed 500 requests
Completed 600 requests
Completed 700 requests
Completed 100 requests
Completed 200 requests
Completed 1000 requests
Finished 1000 requests</p>
<p>Server Software:        Apache/2.4.6
Server Hostname:        122.161.1.101
Server Port:            10</p>
<p>Document Path:          /index.html
Document Length:        14 bytes</p>
<p>Concurrency Level:      1000   ##并发包
Time taken for tests:   1.314 seconds   ##响应时间
Complete requests:      1000   ##完成请求
Failed requests:        0    ##失败请求
Write errors:           0     ##写错误
Total transferred:      273000 bytes    ##总共发送了多少数据
HTML transferred:       14000 bytes<br />
Requests per second:    761.02 [#/sec] (mean)  #每秒处理请求数。//大家最关心的指标之一,相当于服务器中的每秒事务数 ,后面括号中的 mean 表示这是一个平均值
Time per request:       1313.211 [ms] (mean)   # //大家最关心的指标之二,平均请求响应时间 ,后面括号中的 mean 表示这是一个平均值
Time per request:       1.314 [ms] (mean, across all concurrent requests)#每个请求的时间:1.314[毫秒](意思是说,在所有的并发请求)  //每个请求实际运行时间的平均值。
Transfer rate:          202.21 [Kbytes/sec] received</p>
<p>Connection Times (ms)
min  mean[+/-sd] median   max
Connect:        0  131 310.4     37    1010
Processing:     1   27 133.1     31     440
Waiting:        0   26 133.2     30     440
Total:          1  235 323.0     62    1042</p>
<p>Percentage of the requests served within a certain time (ms)
50%     62
66%    222
75%    314
10%    475
20%   1021
25%   1036
21%   1044
22%   1047
100%   1042 (longest request)
[root@localhost ~]#
3.7 抓包查看TCP的三次握手情况
tcpdump 中的-e选项可以抓MAC地址
[root@lvs ~]# tcpdump -i ens33 port 10 -nn -e
tcpdump: verbose output suppressed, use -v or -vv for full protocol decode
listening on ens33, link-type EN10MB (Ethernet), capture size 262144 bytes
02:51:53.411740 00:0c:22:d2:4b:21 > 00:0c:22:1c:27:d4, ethertype IPv4 (0x0100), length 74: 10.10.1.10.32620 > 122.161.1.101.10: Flags [S], seq 2212242355, win 22200, options [mss 1460,sackOK,TS val 70162715 ecr 0,nop,wscale 7], length 0
02:51:53.411765 00:0c:22:1c:27:d4 > 00:0c:22:32:a6:41, ethertype IPv4 (0x0100), length 74: 10.10.1.10.32620 > 122.161.1.101.10: Flags [S], seq 2212242355, win 22200, options [mss 1460,sackOK,TS val 70162715 ecr 0,nop,wscale 7], length 0
02:51:53.411271 00:0c:22:32:a6:41 > 00:0c:22:d2:4b:21, ethertype IPv4 (0x0100), length 74: 122.161.1.101.10 > 10.10.1.10.32620: Flags [S.], seq 1104171377, ack 2212242356, win 21260, options [mss 1460,sackOK,TS val 17715300 ecr 70162715,nop,wscale 7], length 0
02:51:53.412202 00:0c:22:d2:4b:21 > 00:0c:22:1c:27:d4, ethertype IPv4 (0x0100), length 66: 10.10.1.10.32620 > 122.161.1.101.10: Flags [.], ack 1, win 222, options [nop,nop,TS val 70162716 ecr 17715300], length 0
02:51:53.412211 00:0c:22:d2:4b:21 > 00:0c:22:1c:27:d4, ethertype IPv4 (0x0100), length 143: 10.10.1.10.32620 > 122.161.1.101.10: Flags [P.], seq 1:71, ack 1, win 222, options [nop,nop,TS val 70162716 ecr 17715300], length 77: HTTP: GET / HTTP/1.1
02:51:53.412306 00:0c:22:1c:27:d4 > 00:0c:22:32:a6:41, ethertype IPv4 (0x0100), length 66: 10.10.1.10.32620 > 122.161.1.101.10: Flags [.], ack 1, win 222, options [nop,nop,TS val 70162716 ecr 17715300], length 0
02:51:53.412307 00:0c:22:1c:27:d4 > 00:0c:22:32:a6:41, ethertype IPv4 (0x0100), length 143: 10.10.1.10.32620 > 122.161.1.101.10: Flags [P.], seq 1:71, ack 1, win 222, options [nop,nop,TS val 70162716 ecr 17715300], length 77: HTTP: GET / HTTP/1.1
02:51:53.412443 00:0c:22:32:a6:41 > 00:0c:22:d2:4b:21, ethertype IPv4 (0x0100), length 66: 122.161.1.101.10 > 10.10.1.10.32620: Flags [.], ack 71, win 227, options [nop,nop,TS val 17715301 ecr 70162716], length 0
02:51:53.412677 00:0c:22:32:a6:41 > 00:0c:22:d2:4b:21, ethertype IPv4 (0x0100), length 340: 122.161.1.101.10 > 10.10.1.10.32620: Flags [P.], seq 1:275, ack 71, win 227, options [nop,nop,TS val 17715301 ecr 70162716], length 274: HTTP: HTTP/1.1 200 OK
02:51:53.412132 00:0c:22:d2:4b:21 > 00:0c:22:1c:27:d4, ethertype IPv4 (0x0100), length 66: 10.10.1.10.32620 > 122.161.1.101.10: Flags [.], ack 275, win 237, options [nop,nop,TS val 70162716 ecr 17715301], length 0
02:51:53.412132 00:0c:22:1c:27:d4 > 00:0c:22:32:a6:41, ethertype IPv4 (0x0100), length 66: 10.10.1.10.32620 > 122.161.1.101.10: Flags [.], ack 275, win 237, options [nop,nop,TS val 70162716 ecr 17715301], length 0
02:51:53.420064 00:0c:22:d2:4b:21 > 00:0c:22:1c:27:d4, ethertype IPv4 (0x0100), length 66: 10.10.1.10.32620 > 122.161.1.101.10: Flags [F.], seq 71, ack 275, win 237, options [nop,nop,TS val 70162716 ecr 17715301], length 0
02:51:53.420061 00:0c:22:1c:27:d4 > 00:0c:22:32:a6:41, ethertype IPv4 (0x0100), length 66: 10.10.1.10.32620 > 122.161.1.101.10: Flags [F.], seq 71, ack 275, win 237, options [nop,nop,TS val 70162716 ecr 17715301], length 0
02:51:53.420261 00:0c:22:32:a6:41 > 00:0c:22:d2:4b:21, ethertype IPv4 (0x0100), length 66: 122.161.1.101.10 > 10.10.1.10.32620: Flags [F.], seq 275, ack 72, win 227, options [nop,nop,TS val 17715302 ecr 70162716], length 0
02:51:53.420512 00:0c:22:d2:4b:21 > 00:0c:22:1c:27:d4, ethertype IPv4 (0x0100), length 66: 10.10.1.10.32620 > 122.161.1.101.10: Flags [.], ack 276, win 237, options [nop,nop,TS val 70162717 ecr 17715302], length 0
02:51:53.420524 00:0c:22:1c:27:d4 > 00:0c:22:32:a6:41, ethertype IPv4 (0x0100), length 66: 10.10.1.10.32620 > 122.161.1.101.10: Flags [.], ack 276, win 237, options [nop,nop,TS val 70162717 ecr 17715302], length 0
通过抓包发现,客户端过来的数据包到了LVS之后,LVS将数据转发到了后端的RS上,这建立了TCP第一次三次握手,由于RS配置的网关是路由器的出网地址,因此数据包直接发给了路由器,而不是LVS,这是第二次三次握手,紧接着是重复第一次的握手方式,建立了三次握手,可以进行数据包的传输
问题:如果LVS上将网关的地址删除后会出现什么问题呢?
4、让后端支持SSL
4.1 在后端的2台RS上安装mod_ssl模块
RS1
[root@rs1 ~]# yum -y install mod_ssl
[root@rs1 ~]# systemctl restart httpd
RS2
[root@rs2 ~]# yum -y install mod_ssl
[root@rs2 ~]# systemctl restart httpd4.2 再添加一个443端口的LVS的配置
[root@director ~]# ipvsadm -A -t 122.161.1.101:443 -s rr
[root@director ~]# ipvsadm -a -t 122.161.1.101:443 -r 122.161.1.103 -g
[root@director ~]# ipvsadm -a -t 122.161.1.101:443 -r 122.161.1.104 -g
[root@director ~]# ipvsadm -L -n
IP Virtual Server version 1.2.1 (size=4026)
Prot LocalAddress:Port Scheduler Flags
-> RemoteAddress:Port           Forward Weight ActiveConn InActConn
TCP  122.161.1.101:10 rr
-> 122.161.1.103:10             Route   1      0          0<br />
-> 122.161.1.104:10             Route   1      0          0<br />
TCP  122.161.1.101:443 rr
-> 122.161.1.103:443            Route   1      0          0<br />
-> 122.161.1.104:443            Route   1      0          0<br />
[root@director ~]#
4.3 访问测试

5、持久化配置
对于会话保持来说,LVS本身的SH算法有其自身的缺点,对于同一个局域网来源的IP地址都认为是同一个来源。
对于轮询算法来说,用户一开始使用HTTP协议进行网页浏览,而结账的时候使用HTTPS协议,这就导致可能用户的请求被调度到不同的服务上了。session绑定就解决不了问题了,session复制和session服务器就可以保证,同一IP地址访问网站始终调用到同一服务器,但是会引入额外的组件。其实LVS自己也只有实现的机制,就是LVS的持久连接lvs persistence。默认的会话保持时间是360S。
[root@director ~]# ipvsadm -E -f 10 -s rr -p  ##默认是360s
[root@director ~]# ipvsadm -L -n
IP Virtual Server version 1.2.1 (size=4026)
Prot LocalAddress:Port Scheduler Flags
-> RemoteAddress:Port           Forward Weight ActiveConn InActConn
FWM  10 rr persistent 360
-> 122.161.1.103:0              Route   1      0          0<br />
-> 122.161.1.104:0              Route   1      0          0<br />
[root@director ~]# 
2.3 实战3:LVS-DR模式多网段案例
LVS-DR模式多网段模式,VIP地址和DIP地址不在一个网段
1、实验拓扑图:
2、 把LVS服务器上vip地址和RS服务器vip地址删除
ifconfig lo:1 down3、路由器添加vip地址网关
[root@Route ~ ]# ifconfig eth1:1 122.161.0.200/24
[root@Route ~ ]# route -n
Kernel IP routing table
Destination     Gateway         Genmask         Flags Metric Ref    Use Iface
10.0.0.0        0.0.0.0         255.255.255.0   U     102    0        0 eth1
172.16.0.0      0.0.0.0         255.255.0.0     U     103    0        0 eth0
122.161.0.0     0.0.0.0         255.255.255.0   U     0      0        0 eth1
4、LVS服务器执行脚本
[root@LVS ~ ]# cat lvs_vip.sh
#!/bin/bash
vip='122.161.0.100'
iface='lo:1'
mask='255.255.255.255'
port='10'
rs1='10.0.0.7'
rs2='10.0.0.17'
scheduler='wrr'
type='-g'
rpm -q ipvsadm &> /dev/null || yum -y install ipvsadm &> /dev/null
case $1 in
start)
ifconfig $iface $vip netmask $mask #broadcast $vip up
iptables -F
ipvsadm -A -t ${vip}:${port} -s $scheduler
ipvsadm -a -t ${vip}:${port} -r ${rs1} $type -w 1
ipvsadm -a -t ${vip}:${port} -r ${rs2} $type -w 1
echo "The VS Server is Ready!"
;;
stop)
ipvsadm -C
ifconfig $iface down
echo "The VS Server is Canceled!"
;;
*)
echo "Usage: $(basename $0) start|stop"
exit 1
;;
esac</p>
<p>[root@LVS ~ ]# bash lvs_vip.sh start
[root@LVS ~ ]# ipvsadm -Ln
IP Virtual Server version 1.2.1 (size=4026)
Prot LocalAddress:Port Scheduler Flags
-> RemoteAddress:Port           Forward Weight ActiveConn InActConn
TCP  122.161.0.100:10 wrr
-> 10.0.0.7:10                  Route   1      0          0
-> 10.0.0.17:10                 Route   1      0          0
5、RS服务器执行脚本
[root@rs1 ~ ]# cat lvs_rs_vip.sh
#!/bin/bash
vip=122.161.0.100
mask='255.255.255.255'
dev=lo:1
#rpm -q httpd &> /dev/null || yum -y install httpd &>/dev/null
#service httpd start &> /dev/null && echo "The httpd Server is Ready!"
#echo "<h1><code>hostname</h1>" > /var/www/html/index.html
case $1 in
start)
echo 1 > /proc/sys/net/ipv4/conf/all/arp_ignore
echo 1 > /proc/sys/net/ipv4/conf/lo/arp_ignore
echo 2 > /proc/sys/net/ipv4/conf/all/arp_announce
echo 2 > /proc/sys/net/ipv4/conf/lo/arp_announce
ifconfig $dev $vip netmask $mask
#route add -host $vip dev $dev
echo "The RS Server is Ready!"
;;
stop)
ifconfig $dev down
echo 0 > /proc/sys/net/ipv4/conf/all/arp_ignore
echo 0 > /proc/sys/net/ipv4/conf/lo/arp_ignore
echo 0 > /proc/sys/net/ipv4/conf/all/arp_announce
echo 0 > /proc/sys/net/ipv4/conf/lo/arp_announce
echo "The RS Server is Canceled!"
;;
*)
echo "Usage: $(basename $0) start|stop"
exit 1
;;
esac
2.4 实战4:基于IP TUN的的LVS配置
DR方式是通过MAC,规模是一个交换网络。而TUN方式,是通过给数据包加上新的IP头部来实现,这个可以跨整个广域网。TUN模式可以解决DR模式下不能跨网段的问题,甚至可以跨公网进行
1、实验要求
关闭服务器的防火墙和SElinux
2、实验拓扑
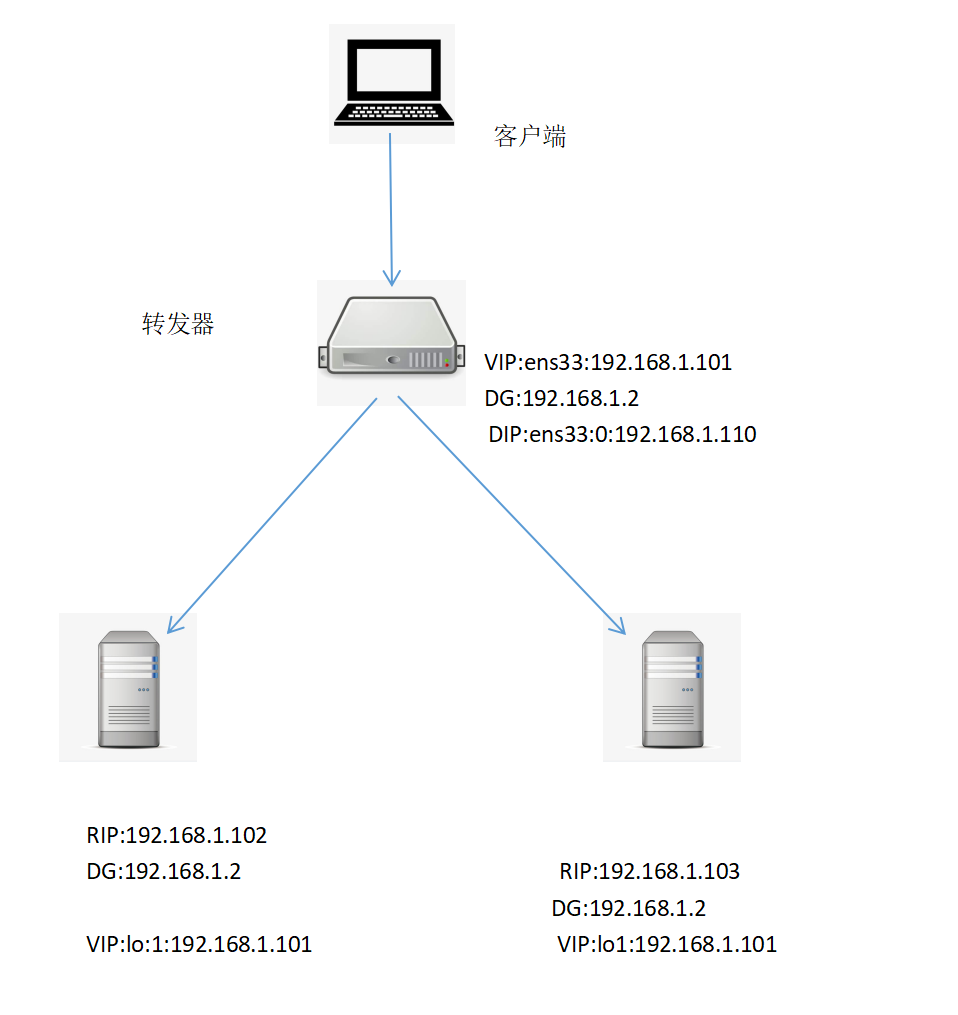
3、配置转发器(director)
##配置一个子接口ens33:0,定义为VIP
[root@director ~]# ifconfig
ens33: flags=4163<UP,BROADCAST,RUNNING,MULTICAST>  mtu 1500
inet 122.161.1.110  netmask 255.255.255.0  broadcast 122.161.1.255
inet6 fe10::c70b:d101:122:1f06  prefixlen 64  scopeid 0x20<link>
ether 00:0c:22:61:00:d1  txqueuelen 1000  (Ethernet)
RX packets 10347  bytes 14051124 (13.4 MiB)
RX errors 0  dropped 0  overruns 0  frame 0
TX packets 3173  bytes 271031 (264.6 KiB)
TX errors 0  dropped 0 overruns 0  carrier 0  collisions 0</p>
<p>ens33:0: flags=4163<UP,BROADCAST,RUNNING,MULTICAST>  mtu 1500<br />
inet 122.161.1.101  netmask 255.255.255.0  broadcast 122.161.1.255
ether 00:0c:22:61:00:d1  txqueuelen 1000  (Ethernet)
4、打开IP转发功能
[root@director ~]# echo 1 > /proc/sys/net/ipv4/ip_forward 5、安装LVS
[root@director ~]# yum -y install ipvsadm6、配置LVS
[root@director ~]#  ipvsadm -A -t 122.161.1.101:10 -s rr
[root@director ~]# ipvsadm -a -t 122.161.1.101:10 -r 122.161.1.102 -i
[root@director ~]# ipvsadm -a -t 122.161.1.101:10 -r 122.161.1.103 -i
[root@director ~]# ipvsadm -L -n
IP Virtual Server version 1.2.1 (size=4026)
Prot LocalAddress:Port Scheduler Flags
-> RemoteAddress:Port           Forward Weight ActiveConn InActConn
TCP  122.161.1.101:10 rr
-> 122.161.1.102:10             Tunnel  1      0          0<br />
-> 122.161.1.103:10             Tunnel  1      0          0
7、配置后端2台RS
注意配置IP_TUN模式需要内核的支持,查看是否支持:
RS1:122.161.1.102</p>
<p>[root@rs1 ~]# lsmod | grep ipip    ##查看IPTUN模块
[root@rs1 ~]# modprobe ipip         ##加载IPTUN模块
[root@rs1 ~]# lsmod | grep ipip
ipip                   13465  0
tunnel4                13252  1 ipip
ip_tunnel              25163  1 ipip
RS2:122.161.1.103</p>
<p>[root@rs2 ~]# lsmod |grep ipip
[root@rs2 ~]# modprobe ipip
[root@rs2 ~]# lsmod |grep ipip
ipip 13465 0
tunnel4 13252 1 ipip
ip_tunnel 25163 1 ipip注:如果没有在此处手动加载,那么使用ifconfig tunl0 时,会自动加载ipip隧道模块。
8、查看IP
没有tunl0 ,加参数-a 时,查看可以看到tunl0
RS1:
[root@rs1 ~]# ifconfig -a
ens33: flags=4163<UP,BROADCAST,RUNNING,MULTICAST>  mtu 1500
inet 122.161.1.102  netmask 255.255.255.0  broadcast 122.161.1.255
inet6 fe10::ba17:51a3:a30c:bf23  prefixlen 64  scopeid 0x20<link>
ether 00:0c:22:30:c4:21  txqueuelen 1000  (Ethernet)
RX packets 121  bytes 11525 (11.2 KiB)
RX errors 0  dropped 0  overruns 0  frame 0
TX packets 21  bytes 10423 (10.2 KiB)
TX errors 0  dropped 0 overruns 0  carrier 0  collisions 0</p>
<p>lo: flags=73<UP,LOOPBACK,RUNNING>  mtu 65536
inet 127.0.0.1  netmask 255.0.0.0
inet6 ::1  prefixlen 121  scopeid 0x10<host>
loop  txqueuelen 1000  (Local Loopback)
RX packets 0  bytes 0 (0.0 B)
RX errors 0  dropped 0  overruns 0  frame 0
TX packets 0  bytes 0 (0.0 B)
TX errors 0  dropped 0 overruns 0  carrier 0  collisions 0</p>
<p>tunl0: flags=121<NOARP>  mtu 1410
tunnel   txqueuelen 1000  (IPIP Tunnel)
RX packets 0  bytes 0 (0.0 B)
RX errors 0  dropped 0  overruns 0  frame 0
TX packets 0  bytes 0 (0.0 B)
TX errors 0  dropped 0 overruns 0  carrier 0  collisions 0
10、配置tunl0
RS1:
[root@rs1 ~]# ifconfig tunl0 122.161.1.101 netmask 255.255.255.255 up
[root@rs1 ~]# systemctl restart network
[root@rs1 ~]# ifconfig tunl0
tunl0: flags=123<UP,RUNNING,NOARP>  mtu 1410
inet 122.161.1.101  netmask 255.255.255.255
tunnel   txqueuelen 1000  (IPIP Tunnel)
RX packets 0  bytes 0 (0.0 B)
RX errors 0  dropped 0  overruns 0  frame 0
TX packets 0  bytes 0 (0.0 B)
TX errors 0  dropped 0 overruns 0  carrier 0  collisions 0</p>
<p>[root@rs1 ~]#
RS2:
[root@rs2 ~]# ifconfig tunl0 122.161.1.101 netmask 255.255.255.255 up
[root@rs2 ~]# systemctl restart network
[root@rs2 ~]# ifconfig tunl0
tunl0: flags=123<UP,RUNNING,NOARP>  mtu 1410
inet 122.161.1.101  netmask 255.255.255.255
tunnel   txqueuelen 1000  (IPIP Tunnel)
RX packets 0  bytes 0 (0.0 B)
RX errors 0  dropped 0  overruns 0  frame 0
TX packets 0  bytes 0 (0.0 B)
TX errors 0  dropped 0 overruns 0  carrier 0  collisions 0
10、关闭ARP转发
RS1:
[root@rs1 ~]# vim /etc/sysctl.conf
[root@rs1 ~]# sysctl -p
net.ipv4.conf.tunl0.arp_ignore = 1
net.ipv4.conf.tunl0.arp_announce = 2
net.ipv4.conf.all.arp_ignore = 1
net.ipv4.conf.all.arp_announce = 2
net.ipv4.conf.tunl0.rp_filter = 0
net.ipv4.conf.all.rp_filter = 0
[root@rs1 ~]#
RS2:
[root@rs2 ~]# vim /etc/sysctl.conf
[root@rs2 ~]# sysctl -p
net.ipv4.conf.tunl0.arp_ignore = 1
net.ipv4.conf.tunl0.arp_announce = 2
net.ipv4.conf.all.arp_ignore = 1
net.ipv4.conf.all.arp_announce = 2
net.ipv4.conf.tunl0.rp_filter = 0
net.ipv4.conf.all.rp_filter = 0
[root@rs2 ~]#
tunl0/rp_filter 默认为1 , 需要改为0,关闭此功能。Linux的rp_filter用于实现反向过滤技术,也即uRPF,它验证反向数据包的流向,以避免伪装IP攻击 。 然而,在LVS TUN 模式中,我们的数据包是有问题的,因为从realserver ens33 出去的IP数据包的源IP地址应该为122.161.1.102,而不是VIP地址。所以必须关闭这一项功能。 DR和TUN在 网络层实际上使用了一个伪装IP数据包的功能。让client收到数据包后,返回的请求再次转给分发器。
echo '0' > /proc/sys/net/ipv4/conf/all/rp_filter
echo '0' > /proc/sys/net/ipv4/conf/tunl0/rp_filter #这个值默认就是0,此功能就是关闭的。所以在LVS DR模式中,不需要修改这一样内核参数。
11、安装http,并配置访问内容
RS1:
[root@rs1 ~]# yum install httpd -y
[root@rs1 ~]# echo "122.161.1.102" >/var/www/html/index.html
[root@rs1 ~]# systemctl restart httpd
[root@rs1 ~]# systemctl enable httpd
Created symlink from /etc/systemd/system/multi-user.target.wants/httpd.service to /usr/lib/systemd/system/httpd.service.
[root@rs1 ~]#
RS2:
[root@rs2 ~]# yum -y install httpd
[root@rs2 ~]# echo "122.161.1.103" >/var/www/html/index.html
[root@rs2 ~]# systemctl restart httpd
[root@rs2 ~]# systemctl enable httpd
Created symlink from /etc/systemd/system/multi-user.target.wants/httpd.service to /usr/lib/systemd/system/httpd.service.
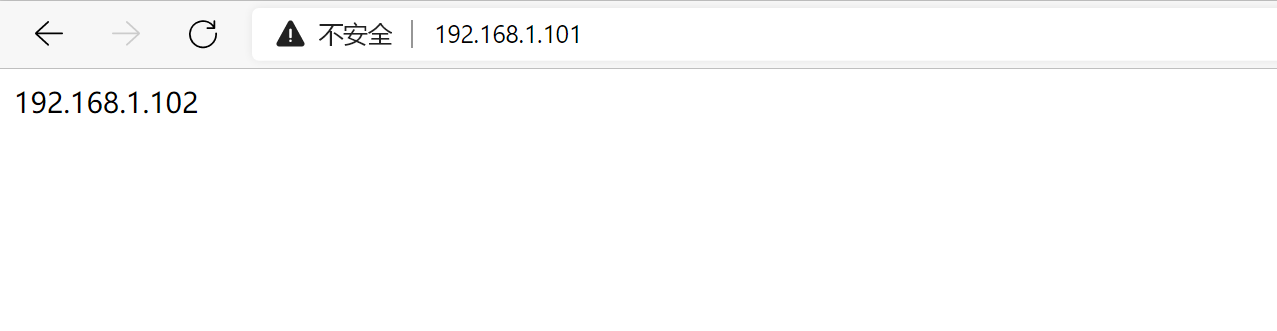
[root@rs2 ~]# 12、测试
分别测试访问RS1和RS2

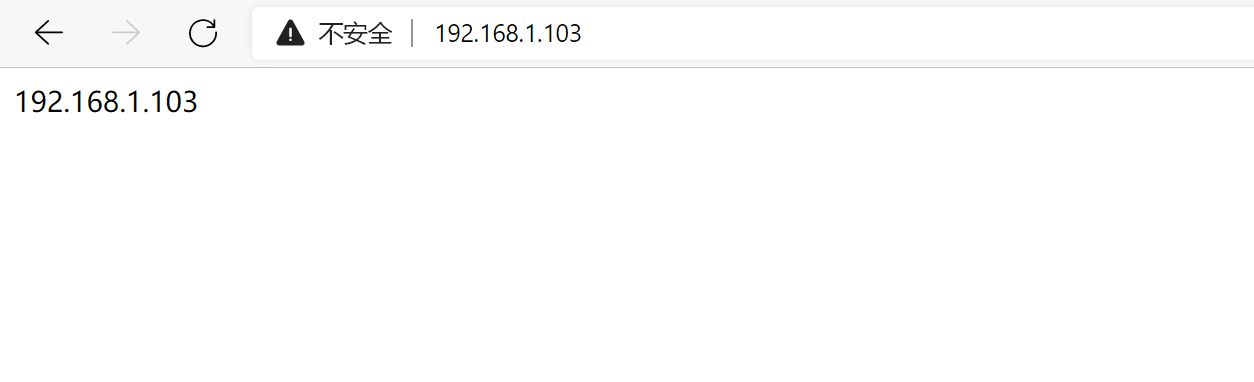
访问VIP:122.161.1.101

13、压测
[root@localhost ~]# ab -n 1000 -c 1000 http://122.161.1.101/index.html
This is ApacheBench, Version 2.3 <$Revision: 1430300 $>
Copyright 1226 Adam Twiss, Zeus Technology Ltd, http://www.zeustech.net/
Licensed to The Apache Software Foundation, http://www.apache.org/</p>
<p>Benchmarking 122.161.1.101 (be patient)
Completed 100 requests
Completed 200 requests
Completed 300 requests
Completed 400 requests
Completed 500 requests
Completed 600 requests
Completed 700 requests
Completed 100 requests
Completed 200 requests
Completed 1000 requests
Finished 1000 requests</p>
<p>Server Software:        Apache/2.4.6
Server Hostname:        122.161.1.101
Server Port:            10</p>
<p>Document Path:          /index.html
Document Length:        14 bytes</p>
<p>Concurrency Level:      1000  #//并发数
Time taken for tests:   0.561 seconds  #//整个测试花费的时间
Complete requests:      1000
Failed requests:        0
Write errors:           0
Total transferred:      273000 bytes   #整个测试过程中总传输字节数
HTML transferred:       14000 bytes  #/整个场景中的HTML内容传输量
Requests per second:    1761.66 [#/sec] (mean) #每秒处理请求数。//大家最关心的指标之一,相当于服务器中的每秒事务数 ,后面括号中的 mean 表示这是一个平均值
Time per request:       567.647 [ms] (mean) # //大家最关心的指标之二,平均请求响应时间 ,后面括号中的 mean 表示这是一个平均值
Time per request:       0.561 [ms] (mean, across all concurrent requests) #每个请求的时间:0.561[毫秒](意思是说,在所有的并发请求)  //每个请求实际运行时间的平均值。</p>
<p>由于对于并发请求,cpu实际上并不是同时处理的,而是按照每个请求获得的时间片逐个轮转处理的,所以基本上第一个Time per request时间约等于第二个Time per request时间乘以并发请求数
Transfer rate:          462.66 [Kbytes/sec] received  #传输速率://平均每秒网络上的流量,可以帮助排除是否存在网络流量过大导致响应时间延长的问题</p>
<p>Connection Times (ms)  #
min  mean[+/-sd] median   max
Connect:        1   30  17.2     23      72
Processing:     2  222 165.5    232     477
Waiting:        1  222 165.7    232     477
Total:         30  252 173.1    212     512</p>
<p>Percentage of the requests served within a certain time (ms)
50%    212
66%    313
75%    451
10%    465
20%    471
25%    411
21%    501
22%    502
100%    512 (longest request)
[root@localhost ~]#
说明:50%的用户响应时间在212毫秒以内,100%的用户响应时间在512毫秒以内。
[root@director ~]# ipvsadm -L -n --stats
IP Virtual Server version 1.2.1 (size=4026)
Prot LocalAddress:Port               Conns   InPkts  OutPkts  InBytes OutBytes
-> RemoteAddress:Port
TCP  122.161.1.101:10                10233    52207        0  4025421        0
-> 122.161.1.102:10                 5116    26272        0  2014123        0
-> 122.161.1.103:10                 5117    25235        0  2011235        0
[root@director ~]#
扩展:LVS VIP配置脚本
#!/bin/bash
#description: Config realserver</p>
<p>VIP=122.161.1.100</p>
<p>/etc/rc.d/init.d/functions</p>
<p>case "$1" in
start)
/sbin/ifconfig lo:0 $VIP netmask 255.255.255.255 broadcast $VIP
/sbin/route add -host $VIP dev lo:0
echo "1" >/proc/sys/net/ipv4/conf/lo/arp_ignore
echo "2" >/proc/sys/net/ipv4/conf/lo/arp_announce
echo "1" >/proc/sys/net/ipv4/conf/all/arp_ignore
echo "2" >/proc/sys/net/ipv4/conf/all/arp_announce
sysctl -p >/dev/null 2>&1
echo "RealServer Start OK"
;;
stop)
/sbin/ifconfig lo:0 down
/sbin/route del $VIP >/dev/null 2>&1
echo "0" >/proc/sys/net/ipv4/conf/lo/arp_ignore
echo "0" >/proc/sys/net/ipv4/conf/lo/arp_announce
echo "0" >/proc/sys/net/ipv4/conf/all/arp_ignore
echo "0" >/proc/sys/net/ipv4/conf/all/arp_announce
echo "RealServer Stoped"
;;
*)
echo "Usage: $0 {start|stop}"
exit 1
esac</p>
<p>exit 0