


SSH基本使用 - 安全防护
SSH基本使用
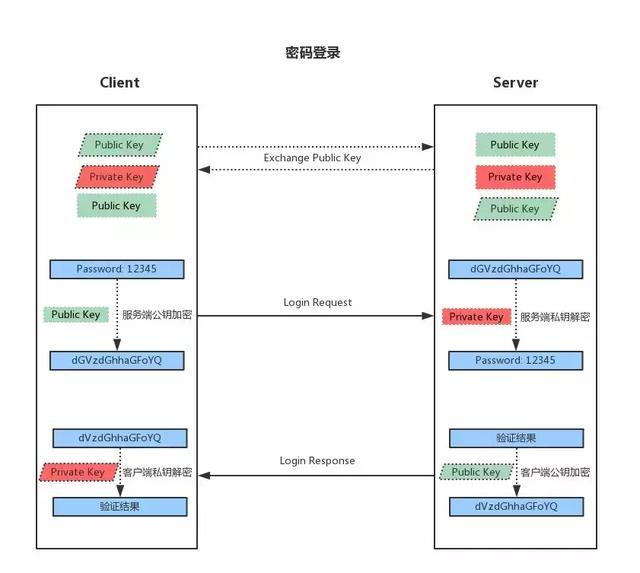
基于用户和口令登录方式
1.  客户端发起ssh请求,客户端和服务端交换公钥之后,客户端提示输入登录用户的密码
2.  客户端会根据服务器发来的公钥对密码进行加密
3.  加密后的信息回传给服务器,服务器用自己的私钥解密,如果密码正确,则用户登录成功
4.  服务端用接收客户端公钥加密登录成功信息返回给客户端,客户端用自己的私钥解密,得到登录结果
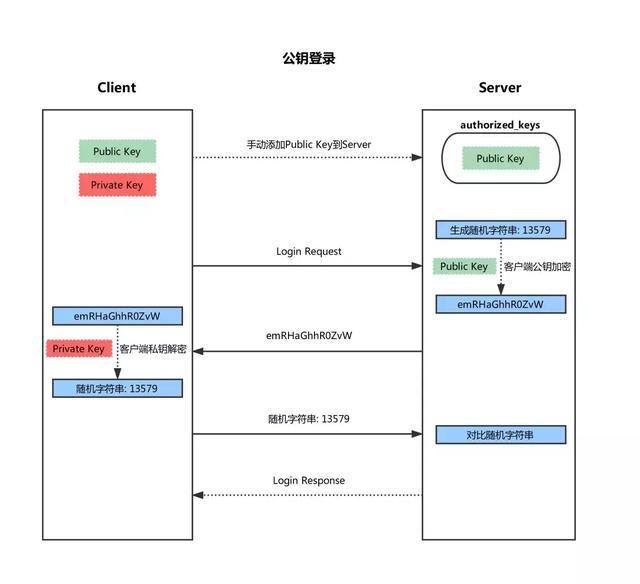
基于客户端公钥登录方式
1.  首先在客户端生成一对密钥(ssh-keygen)
2.  并将客户端的公钥ssh-copy-id 拷贝到服务端
3.  当客户端再次发送一个连接请求,包括ip、用户名
4.  服务端得到客户端的请求后,会到登录用户的家目录下 ~/.ssh/authorized_keys中查找,如果有响应的IP和用户,就会随机生成一个字符串
5.  服务端将使用客户端拷贝过来的公钥进行加密,然后发送给客户端
6.  得到服务端发来的消息后,客户端会使用私钥进行解密,然后将解密后的字符串发送给服务端
7.  服务端接受到客户端发来的字符串后,跟之前的字符串进行对比,如果一致,就允许免密码登录
注意:秘钥对作用在可以免密登录远程目标主机,在秘钥对的公钥传输外层仍被服务端的公钥加密。
生成公钥和私钥
-
ssh-keygen-p # 加密- id_rsa # 私钥
- id_rsa_pub # 公钥
公钥验证的过程
生成密钥:ssh-keygen
将公钥拷贝到目标服务器:ssh-copy-id -i 10.0.0.13

当客户端再次连接服务端时,就会将IP和用户名一起发送过去,服务端收到这些信息后就会在 ~/.ssh/authorized_keys中查找有没有响应的IP和用户,有的话就会随机生成一个字符串,使用客户端发送过来的公钥进行加密后,发送回客户端,客户端收到加密后的字符串就会用自己的私钥对其进行解密,然后将解密后的字符串发送给服务端,服务端将该字符串与之前生成的随机字符串进行比对,如果一致就可以进行连接。
2、完成3个节点的节点互信
远程连接
client --> server	ssh-copy-id -i [server IP]
server --> client	ssh-copy-id -i [client IP]

# 要连哪个机器,就传 公钥到那个机器。
修改ssh登录端口
vim /etc/ssh/sshd_config

Port [端口号]

# 修改后登录

ssh -p [端口号] -l test [ip地址]
或
ssh -p [端口号] test@[ip地址]
传输文件
scp -r test 用户名@IP
远程执行命令
ssh [IP] 命令
使用脚本自动完成多节点之间的SSH节点互信配置,实现远程免密登录
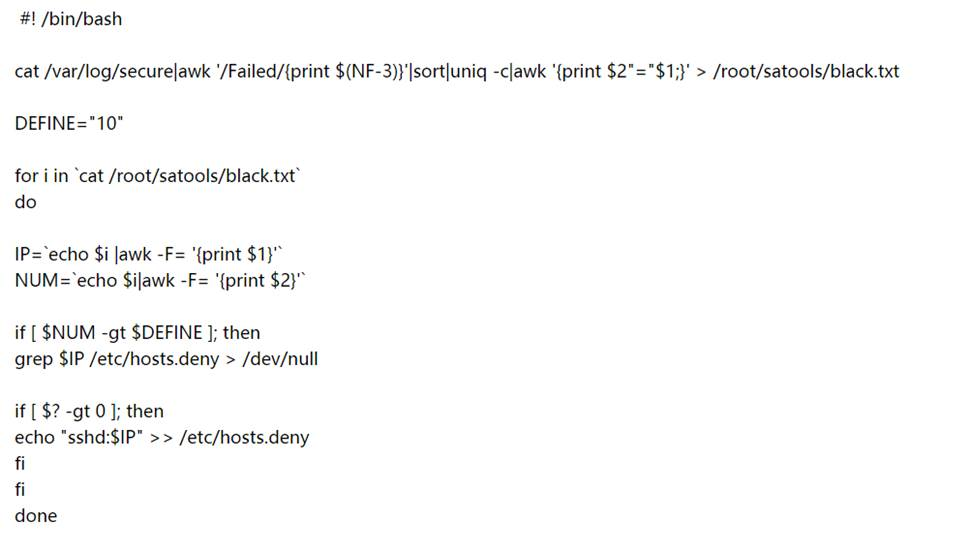
#!/bin/bash
PASS=1
rpm -q sshpass &> /dev/null || yum -y install sshpass &> /dev/null
rm -rf .ssh/id_rsa .ssh/id_rsa.pub
ssh-keygen  -t rsa -P "" -f /root/.ssh/id_rsa &> /dev/null && echo "ssh key is created"
host="10.0.0.8 10.0.0.18 10.0.0.28"
for IP in $host ;do
        {
        sshpass -p$PASS ssh-copy-id -i /root/.ssh/id_rsa.pub root@$IP -o StrictHostKeyChecking=no &>/dev/null
        echo $IP is ready
        }&
done
wait
防止暴力破解
- 下载软件包:https://www.fail2ban.org
# 解压
[root@client~]$ ls
fail2ban-0.8.14.tar.gz

[root@client~]$ tar xf fail2ban-0.8.14.tar.gz

# 安装
[root@client~]$ cd fail2ban-0.8.14/

- 安装需要Python环境
[root@client~/fail2ban-0.8.14]$ yum install -y python

[root@client~/fail2ban-0.8.14]$ python setup.py install


# 生成启动服务脚本

1.找到要复制的文件
[root@client~/fail2ban-0.8.14]$ grep chkconfig ./* -R --color
./files/redhat-initd:# chkconfig: - 92 08

2.复制文件到/etc/init.d/fail2ban目录下
[root@client~/fail2ban-0.8.14]$ cp files/redhat-initd /etc/init.d/fail2ban

3.启动服务
[root@client~/fail2ban-0.8.14]$ chkconfig fail2ban on

4.查看状态
[root@client~/fail2ban-0.8.14]$ chkconfig --list

注:该输出结果只显示 SysV 服务,并不包含
原生 systemd 服务。SysV 配置数据
可能被原生 systemd 配置覆盖。

      要列出 systemd 服务,请执行 'systemctl list-unit-files'。
      查看在具体 target 启用的服务请执行
      'systemctl list-dependencies [target]'。

fail2ban       	0:关	1:关	2:开	3:开	4:开	5:开	6:关
netconsole     	0:关	1:关	2:关	3:关	4:关	5:关	6:关
network        	0:关	1:关	2:开	3:开	4:开	5:开	6:关


# 设置配置文件
[root@client~/fail2ban-0.8.14]$ cat /etc/fail2ban/jail.conf
[DEFAULT]
ignoreip = 127.0.0.1/8
bantime  = 600
findtime  = 600
maxretry = 3
backend = auto

[ssh-iptables]
enabled  = true
filter   = sshd
action   = iptables[name=SSH, port=ssh, protocol=tcp]
sendmail-whois[name=SSH, dest=you@example.com, sender=fail2ban@example.com, sendername="Fail2Ban"]
logpath  = /var/log/secure
bantime  = 3600
findtime  = 300
maxretry = 3
配置文件详细说明
[DEFAULT]        #全局设置

ignoreip = 127.0.0.1/8    #忽略的IP列表,不受设置限制

bantime = 600       #屏蔽时间,单位:秒

findtime = 600       #这个时间段内超过规定次数会被ban掉

maxretry = 3        #最大尝试次数

backend = auto      #日志修改检测机制(gamin、polling和auto这三种)

[ssh-iptables]        #单个服务检查设置,如设置bantime、findtime、maxretry和全局冲突,服务优先级大于全局设置。

enabled = true       #是否激活此项(true/false)修改成 true

filter  = sshd       #过滤规则filter的名字,对应filter.d目录下的sshd.conf

action  = iptables[name=SSH, port=ssh, protocol=tcp]       #动作的相关参数,对应action.d/iptables.conf文件

sendmail-whois[name=SSH, dest=you@example.com, sender=fail2ban@example.c

om, sendername="Fail2Ban"]#触发报警的收件人

logpath = /var/log/secure  #检测的系统的登陆日志文件。这里要写sshd服务日志文件。 默认为logpath = /var/log/sshd.log

#5分钟内3次密码验证失败,禁止用户IP访问主机1小时。 配置如下

bantime = 3600  #禁止用户IP访问主机1小时

findtime = 300  #在5分钟内内出现规定次数就开始工作

maxretry = 3  #3次密码验证失败


# 清空日志开启收集信息
[root@centos7 ~/fail2ban-0.8.14]#>/var/log/secure

# 启动服务
[root@centos7 ~/fail2ban-0.8.14]#/etc/init.d/fail2ban restart
Restarting fail2ban (via systemctl):                       [  确定  ]
查看防火墙
[root@client~/fail2ban-0.8.14]$ iptables -L
Chain INPUT (policy ACCEPT)
target     prot opt source               destination

Chain FORWARD (policy ACCEPT)
target     prot opt source               destination

Chain OUTPUT (policy ACCEPT)
target     prot opt source               destination

[root@client~]$ fail2ban-client status
Status
|- Number of jail:	1
`- Jail list:		ssh-iptables

[root@client~]$ fail2ban-client status ssh-iptables
Status for the jail: ssh-iptables
|- filter
|  |- File list:	/var/log/secure
|  |- Currently failed:	0
|  `- Total failed:	0
`- action
   |- Currently banned:	0
   |  `- IP list:
   `- Total banned:	0
查看fail2ban的日志
[root@server~]$ tail /var/log/fail2ban.log
需要修改的配置文件
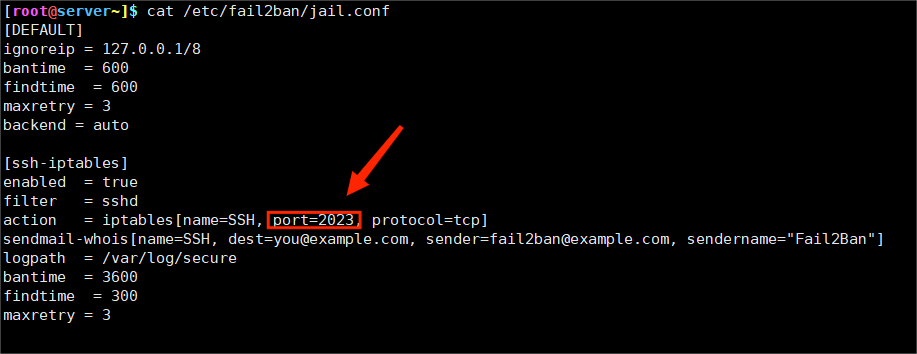
[root@server~]$ vim /etc/fail2ban/jail.conf

#修改iptables动作中的端口号。 默认为ssh。

改:port=ssh 为 port=2023
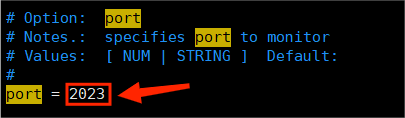
[root@server~]$ vim /etc/fail2ban/action.d/iptables.conf

#修改动作文件中默认端口号

改: port=ssh 为 port=2023
其他方法
1、通过shell脚本来防止暴力破解ssh
2、通过pam 模块来防止暴力破解ssh
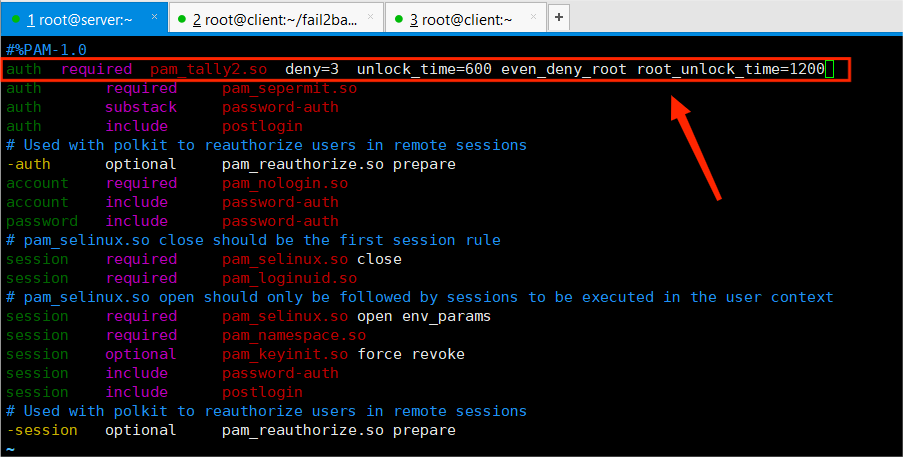
[root@server~]$ vim /etc/pam.d/sshd

#在第一行下面添加一行:
auth  required  pam_tally2.so  deny=3  unlock_time=600 even_deny_root root_unlock_time=1200

说明:尝试登陆失败超过3次,普通用户600秒解锁,root用户1200秒解锁
- 手动解除锁定:
# 查看某一用户错误登陆次数:
[root@centos7 ~]#pam_tally2 --user
Login           Failures Latest failure     From
test                7    10/11/22 23:10:32  192.168.2.2

# 清空 test 用户错误登陆次数:
[root@centos7 ~]#pam_tally2 --user test --reset
Login           Failures Latest failure     From
test                0
SSH本地端口转发
-
实验目的:
1、利用SSH服务建立网络通信安全隧道,让不安全网络协议利用SSH隧道实现安全通信
2、突破防火墙的限制完成一些之前无法建立的 TCP 连接
| 服务器IP | 作用 |
|---|---|
| 10.0.0.11 | telnet-Client |
| 10.0.0.12 | ssh-Server |
| 10.0.0.13 | telnet-Server |
# 格式:
ssh -L <localport>:<deshost>:<desport> <ssh_server>

ssh -L 本地端口:服务端IP:服务端端口:转发IP
# 示例:
ssh -fNL 9660:10.0.0.13:23 10.0.0.12

# 参数:
-f	    #后台运行
-N		#不打开远程主机shell, 处于等待状态
-g		#启用网关,默认绑定本机的127.0.0.1, -g参数绑定本机所有IP地址
- 实验环境搭建
==================Server===================

# 安装telnet服务端
[root@telnet-Server~]$ yum install -y telnet-Server
# 启动telnet服务端
[root@telnet-Server~]$ systemctl start telnet.socket
# 禁止telnet客户端(10.0.0.11)的连接
[root@telnet-Server~]$ iptables -A INPUT -s 10.0.0.11 -j REJECT

# 删除规则
[root@telnet-Server~]$ iptables -D INPUT -s 10.0.0.11 -j REJECT

==================Client===================

# 确认telnet客户端无法连接telnet服务端
[root@telnet-Client~]$ telnet 10.0.0.13
Trying 10.0.0.13...
telnet: connect to address 10.0.0.13: Connection refused		# 看到这个表示环境搭建完成

==================Server===================

# 服务端创建测试登录用户
[root@telnet-server~]$ useradd test && echo 123456 | passwd --stdin test
- 实验开始
==================Client===================

# 客户端通过ssh指定的本地端口 9660 转发
[root@telnet-client~]$ ssh -fNL 9660:10.0.0.13:23 10.0.0.12

[root@telnet-client~]$ ps -ef | grep ssh
      00:00:00 ssh -fNL 9660:10.0.0.13:23 10.0.0.12

[root@telnet-client~]$ ss -ntl | grep 9660
LISTEN     0      128    127.0.0.1:9660                     *:*
LISTEN     0      128      [::1]:9660                  [::]:*

# 客户端通过本地地址连接telnet-server
[root@telnet-client~]$ telnet 127.0.0.1 9660
	telnet-server login: 【test】
	Password:【123456】

[test@telnet-server ~]$		# 登陆成功

==================Server===================

# 此时查看ssh-server端口情况:	ss -nt

# 对于telnet-client来说,ssh-server是服务端
# 对于telnet-server来说,ssh-server是客户端
[root@telnet-server~]$ ss -nt
State       Recv-Q Send-Q Local Address:Port               Peer Address:Port
ESTAB       0      52     10.0.0.13:22                 10.0.0.66:14224
ESTAB       0      0         [::ffff:10.0.0.13]:23                    [::ffff:10.0.0.12]:53136
SSH远程端口转发
-
实验目的
SSH远程端口转发:客户端被动和SSH-client建立SSH隧道
-
实验环境搭建
| 服务器IP | 作用 |
|---|---|
| 10.0.0.8 | Client |
| 10.0.0.18 | ssh-Client |
| 10.0.0.28 | Server |
===================Server==================

# 服务端安装 Apache 服务
[root@server~]$ yum install httpd -y

[root@server~]$ echo "welcome to 10.0.0.13" > /var/www/html/index.html

[root@server~]$ systemctl start httpd

# 禁止telnet客户端(10.0.0.11)的连接
[root@server~]$ iptables -A INPUT -s 10.0.0.11 -j REJECT

===================Client==================

# 客户端配置 sshd 服务,开启网关转发功能
[root@client~]$ vim +100 /etc/ssh/sshd_config
GatewayPorts yes

# 重启 sshd 服务
[root@client~]$ systemctl restart sshd
- 实验开始
================ssh-Client=================

# 【g】 是开启网关
[root@ssh-client~]$ ssh -fgNR 9643:10.0.0.13:80 10.0.0.11

===================Client==================

# 客户端测试端口转发成功
[root@client~]$ ss -ntl | grep 9643
LISTEN     0      128          *:9643                     *:*
LISTEN     0      128       [::]:9643                  [::]:*

===================其他主机=================

# 模拟其他主机通过10.0.0.11(客户端)的ssh隧道访问10.0.0.13(服务端)
[root@myx01~]$ curl 10.0.0.11:9643
welcome to 10.0.0.13
SSH动态端口转发
-
实验目的
客户端和 ssh-Server建立SSH隧道,通过 ssh-Server转发客户端请求到任何主机上。
-
实验环境搭建
| 服务器IP | 作用 |
|---|---|
| 10.0.0.8 | Client |
| 10.0.0.18 | VPS |
| 10.0.0.28 | Server |
================ssh-Client=================
# 安装http服务,模拟外网服务器
[root@server~]$ yum install -y httpd

[root@server~]$ echo "welcome to Google" > /var/www/html/index.html

# 禁止telnet客户端(10.0.0.11)的连接
[root@server~]$ iptables -A INPUT -s 10.0.0.11 -j REJECT

===================VPS====================
# VPS开启SSH动态端口转发
[root@vps~]$ ssh -fgND 9655 10.0.0.12
- 实验开始
[root@client~]$ curl 10.0.0.8:9655
curl: (7) Failed connect to 10.0.0.8:9655; 拒绝连接
[root@client~]$ curl 10.0.0.8
curl: (7) Failed connect to 10.0.0.8:80; 拒绝连接
# 通过代理可以访问
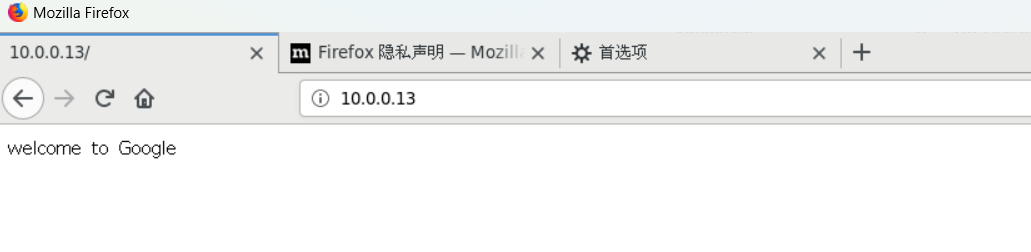
[root@client~]$ curl --socks5 10.0.0.12:9655 http://10.0.0.13
welcome to Google
# 配置 Linux 火狐浏览器访问
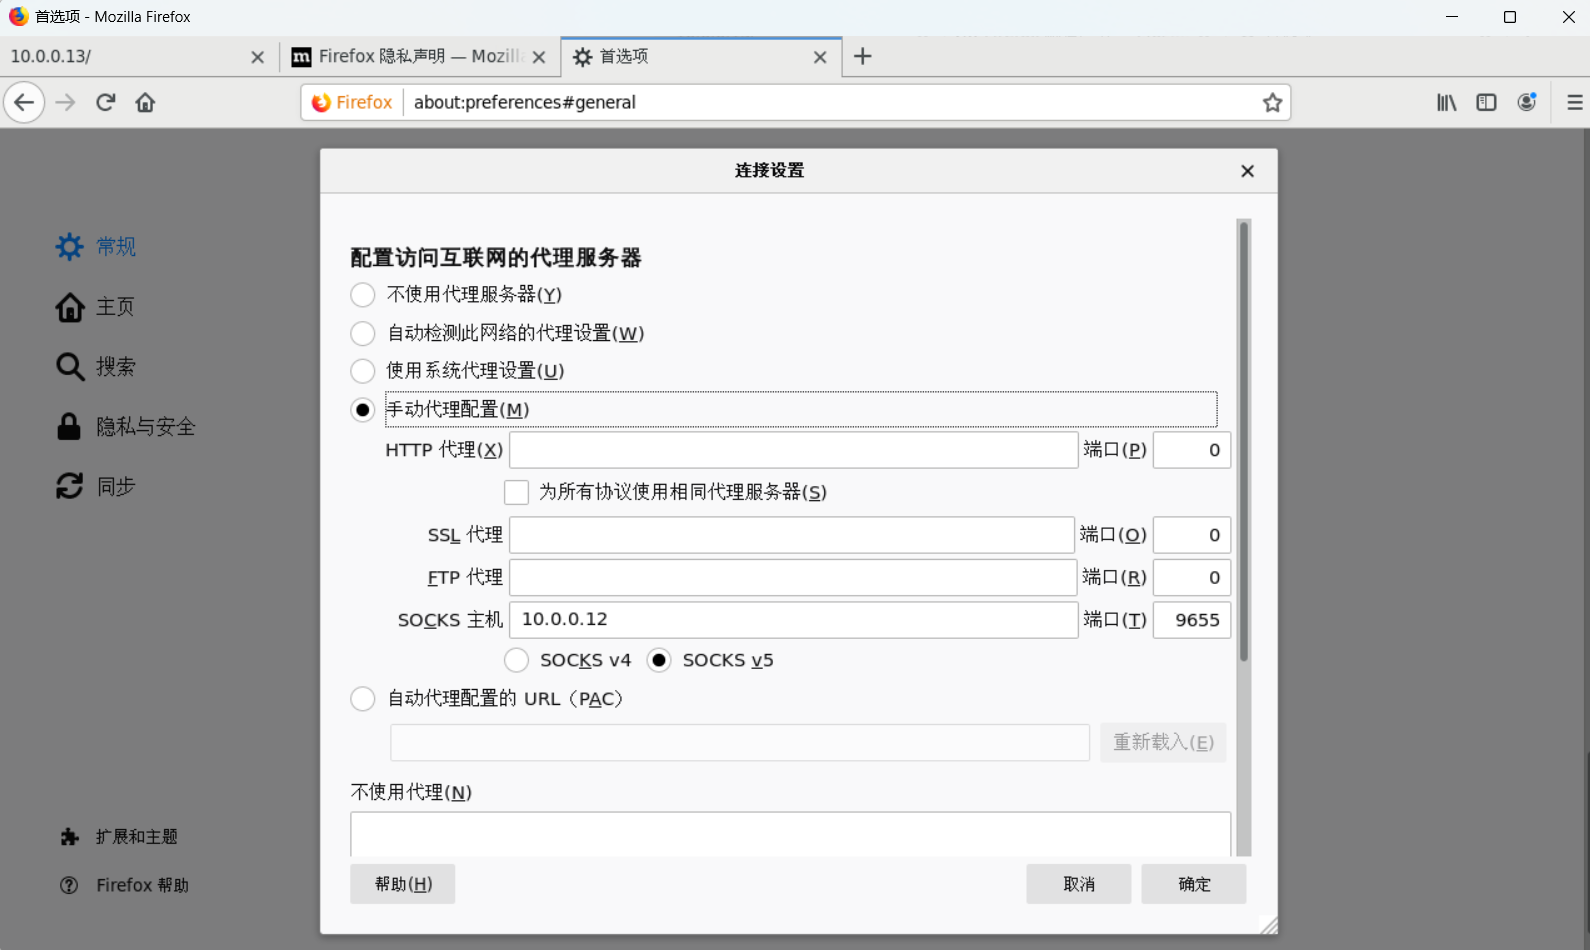
[root@client~]$ yum -y install firefox libglvnd-glx && yum -y groupinstall Fonts
# 打开 Xmanager - Passive
# [root@client~]#export DISPLAY=【Windows IP】: 0.0
[root@client~]$ export DISPLAY=10.0.0.66:0.0
# 启动火狐浏览器
[root@client~]$ firefox
设置 Firefox 代理访问

阅读建议

评论
匿名评论
隐私政策
你无需删除空行,直接评论以获取最佳展示效果