

WEB缓存之redis实战
WEB缓存之redis实战
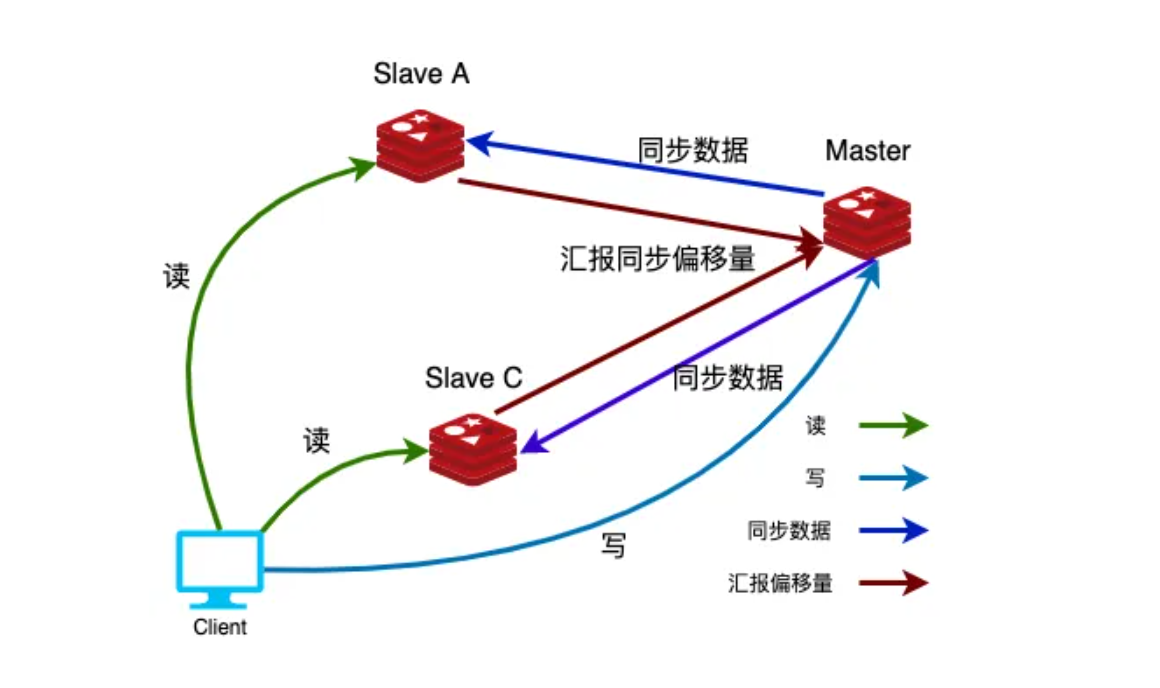
一、Redis的主从同步
1.1 主从同步介绍
虽然Redis可以实现单机的数据持久化,但无论是RDB也好或者AOF也好,都解决不了单点宕机问题,即 一旦单台redis服务器本身出现系统故障、硬件故障等问题后,就会直接造成数据的丢失,因此需要使用 另外的技术来解决单点问题。
Redis主从复制分为全量同步和增量同步
1.1.1 全量同步
首次同步是全量同步,主从同步可以让从服务器从主服务器同步数据,而且从服务器还可再有其它的从 服务器,即另外一台redis服务器可以从一台从服务器进行数据同步,redis 的主从同步是非阻塞的, master收到从服务器的psync(2.8版本之前是SYNC)命令,会fork一个子进程在后台执行bgsave命令,并 将新写入的数据写入到一个缓冲区中,bgsave执行完成之后,将生成的RDB临时文件发送给slave,然后 master再将缓冲区的内容以redis协议格式再全部发送给slave,slave 先删除旧数据,slave将收到后的 RDB文件载入自己的内存,再加载所有收到缓冲区的内容,从而这样一次完整的数据同步,Redis全量复 制一般发生在Slave首次初始化阶段,这时Slave需要将Master上的所有数据都复制一份
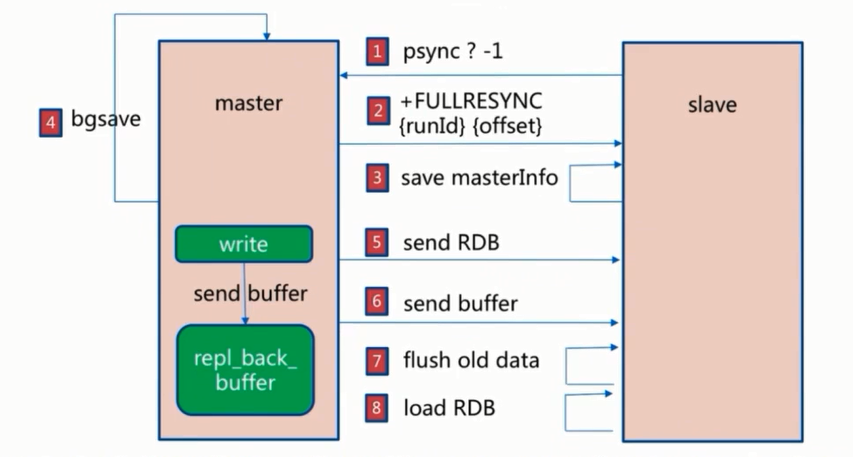
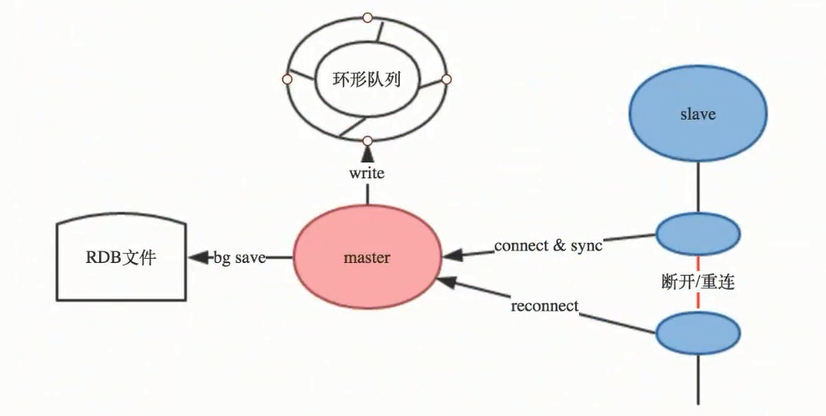
repl_back_buffer 缓冲区是一个环形队列,在主服务器master执行 bgsave 生成RDB文件时,主服务器
master依然接收新数据写入到 repl_back_buffer缓冲区,默认缓冲区大小是 1M 空间,由于缓冲区是环 形队列,master接收的数据大于 1M,新数据就会覆盖旧数据,造成主从数据同步不完整,建议缓冲区 空间调大!!!
1.1.2 增量复制
全量同步之后再次需要同步时,从服务器只要发送当前的offset位置(等同于MySQL的binlog的位置)给主 服务器,然后主服务器根据相应的位置将之后的数据(包括写在缓冲区的积压数据)发送给从服务器,再次 其保存到其内存即可
1.1.3 主从同步完整过程
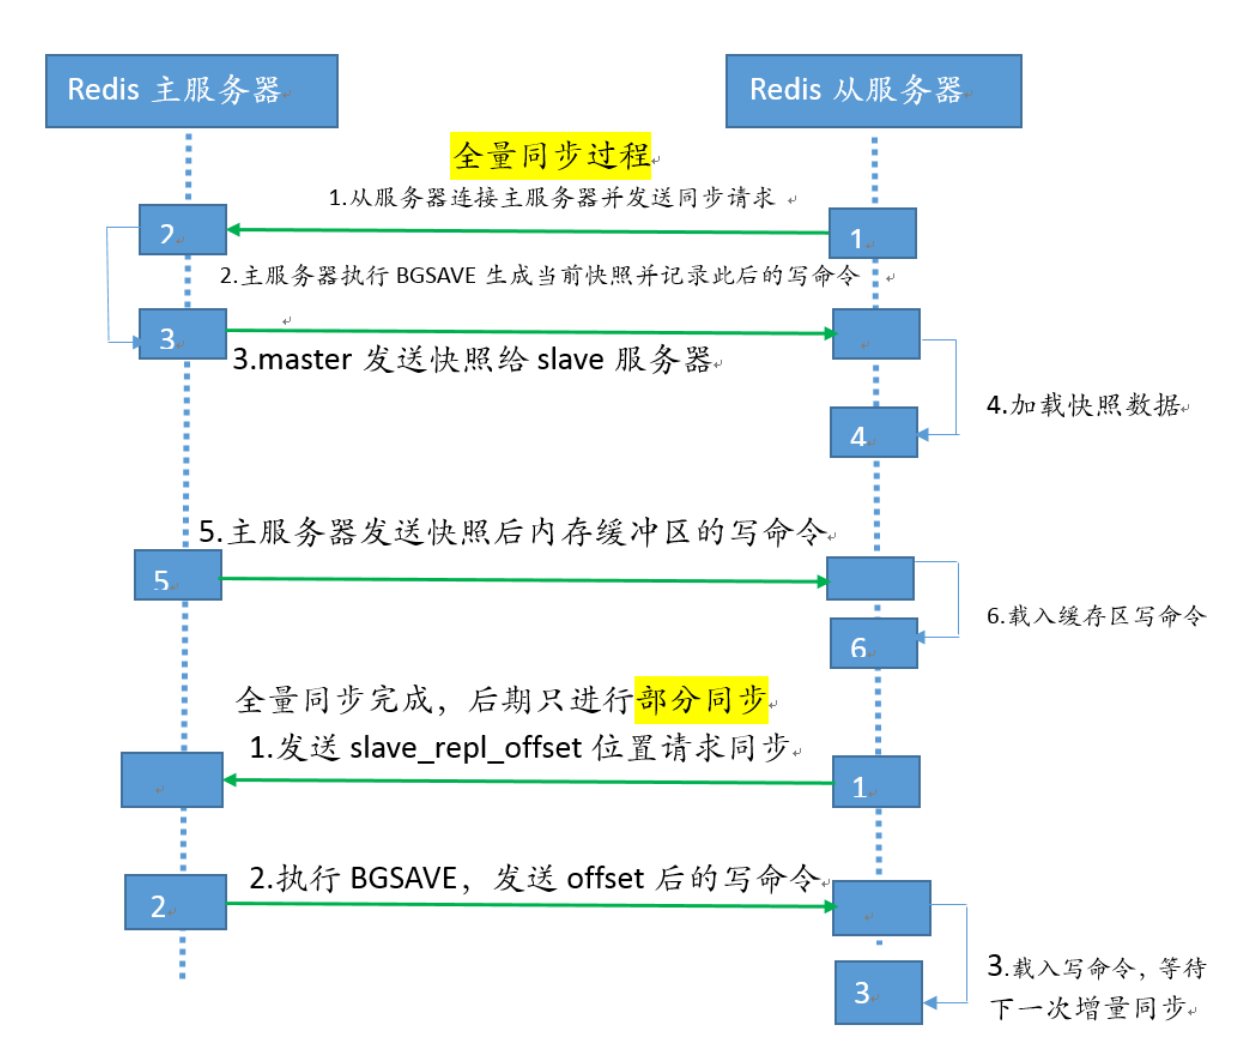
Redis主从复制完整过程说明

1. 从服务器连接主服务器,发送PSYNC命令
2. 主服务器接收到PSYNC命令后,开始执行BGSAVE命令生成RDB快照临时文件并使用缓冲区记录此后执行的所有写命令
3. 主服务器BGSAVE执行完后,向所有从服务器发送RDB快照文件,并在发送期间继续记录被执行的写命令
4. 从服务器收到快照文件后丢弃所有旧数据,载入收到的快照至内存
5. 主服务器快照发送完毕后,开始向从服务器发送缓冲区中的写命令
6. 从服务器完成对快照的载入,开始接收命令请求,并执行来自主服务器缓冲区的写命令
7. 往后数据是由主服务器根据slave_repl_offset位置主动向从服务器同步新数据,不再全量同步
1.1.4 主从同步优化配置
Redis在2.8版本之前没有提供增量部分复制的功能,当网络闪断或者slave Redis重启之后会导致主从之 间的全量同 步,即从2.8版本开始增加了部分复制的功能
#默认为no,no为不使用无盘,需要将RDB文件保存到磁盘后再发送给slave
#yes为支持无盘,不生成RDB文件保存至本地磁盘,而且直接通过网络把master数据发送给slave
repl-diskless-sync no

#diskless时复制的服务器等待的延迟时间,配合 repl-diskless-sync  yes
repl-diskless-sync-delay 5

------------------------------------------------------------------------------
#slave端向master端发送ping的时间间隔,默认为10秒;探测master服务是否存活
repl-ping-slave-period 10

#设置slave探测master的ping连接超时时间,超过此值无法连接,master_link_status显示为down,并记录错误日志
repl-timeout 60

#是否启用TCP_NODELAY,如设置成yes,则redis会合并小的TCP包从而节省带宽, 但会增加同步延迟(40ms),造成master与slave数据不一致,假如设置成no,则redis master会立即发送同步数据,没有延迟,yes关注性能,no关注redis服务中的数据一致性
repl-disable-tcp-nodelay no

----------------------------------------------------------------------------------
#master的写入数据缓冲区,用于记录自上一次同步后到下一次同步过程中间的写入命令
#计算公式:repl-backlog-size = 允许从节点最大中断时长 * 主实例offset每秒写入量,比如master每秒最大写入64mb,最大允许60秒,那么就要设置为64mb*60秒=3840MB(3.8G),建议此值是设置的足够大
repl-backlog-size 1024mb

#如果一段时间后没有slave连接到master,则 repl_back_buffer 内存数据将会被释放。如果值为0则 表示永远不释放这部份内存。
repl-backlog-ttl 3600

#设置一个master的可用slave不能少于多少个,否则master无法执行写
min-replicas-to-write 1
#设置至少有上面数量的slave延迟时间都大于多少秒时,master不接收写操作(拒绝写入)
min-slaves-max-lag 20
1.1.5 Redis主从注意点
注意一:当配置Redis复制功能时,强烈建议打开主服务器的持久化功能。否则的话由于延迟等问题,部署的服务应该要避免自动启动。
参考案例: 导致主从服务器数据全部丢失
1.假设节点A为主服务器,并且关闭了持久化。并且节点B和节点c从节点A复制数据
2.节点A崩溃,然后由自动拉起服务重启了节点A.由于节点A的持久化被关闭了,所以重启之后没有任何数据
3.节点B和节点c将从节点A复制数据,但是A的数据是空的,于是就把自身保存的数据副本删除。
注意二:Redis Slave 也要开启持久化并设置和master同样的连接密码,因为后期slave会有提升为master的可能,Slave 端切换master同步后会丢失之前的所有数据,而通过持久化可以恢复数据
注意四:Redis主从复制过程,从节点第一次向主节点发起数据同步,主节点会把主节点的 run_id发送给从节点,好比:向从节点告诉主节点身份证号;此后从节点进行增量同步时,会拿着上次接收到的 run_id向主节点核对,如果不一致的话,主节点重新发送全量数据给从节点;注意的是:Redis每次重启服务,master_replid 都会变化,一旦开启Redis主从复制,master节点尽量减少重启操作
127.0.0.1:6379> info Replication
master_replid:1424e6e4c2be40af690e118e70481707504bff9d
1.1.6 redis主从复制的特点
1) 主数据库可以进行读写操作,当读写操作导致数据变化时会自动将数据同步给从数据库

2) 从数据库一般都是只读的,并且接收主数据库同步过来的数据

3) 一个master可以拥有多个slave,但是一个slave只能对应一个master

4) slave挂了不影响其他slave的读和master的读和写,重新启动后会将数据从master同步过来

5) master挂了以后,不影响slave的读,但redis不再提供写服务,master重启后redis将重新对外提供写服务

6) master挂了以后,不会在slave节点中重新选一个master
1.2 部署redis主从同步
要求:关闭防火墙和selinux
1.2.1 IP地址的基本规划
| IP地址 | 主机名 | 角色 |
|---|---|---|
| 192.168.1.100 | master.com | master |
| 192.168.1.101 | slave1.com | slave1 |
| 192.168.1.102 | slave2.com | slave2 |
1.2.2 安装redis
此部分,请参考前面第二部分的的安装部署过程
1.2.3 配置master
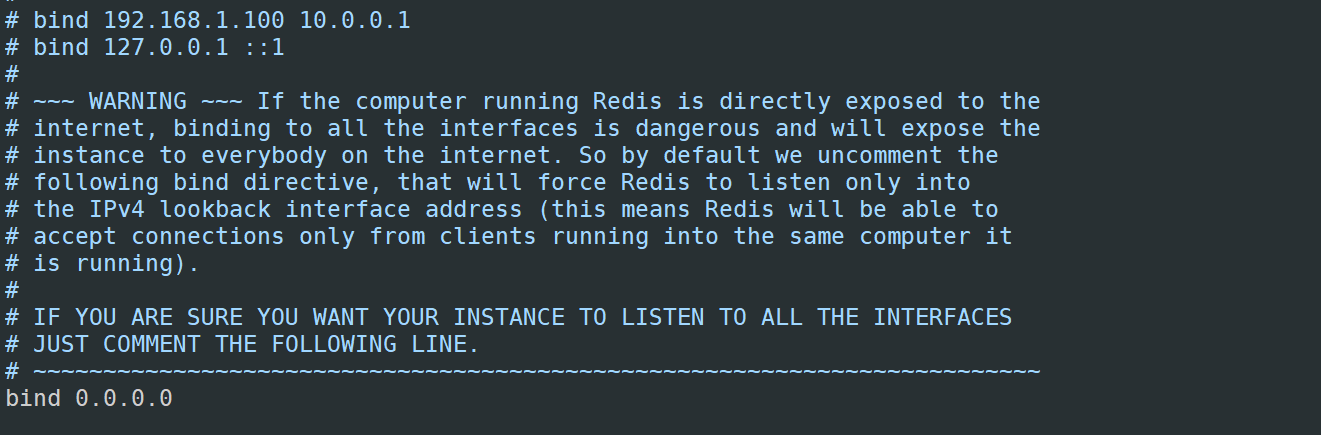
1)将bind的IP地址修改成0.0.0.0,表示所有人都可连接
2)开启守护进程模式

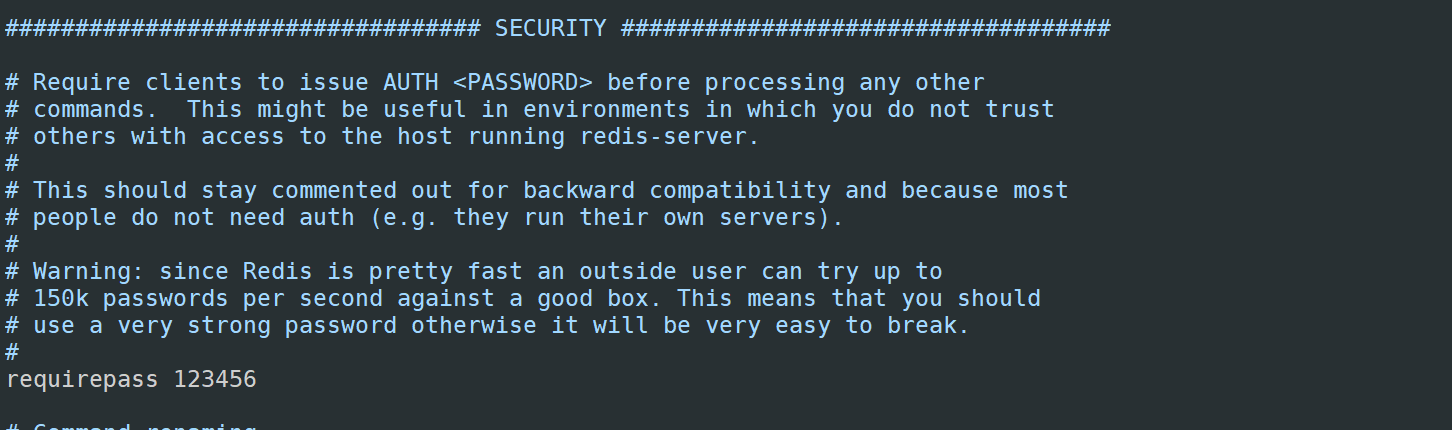
3)设置验证密码
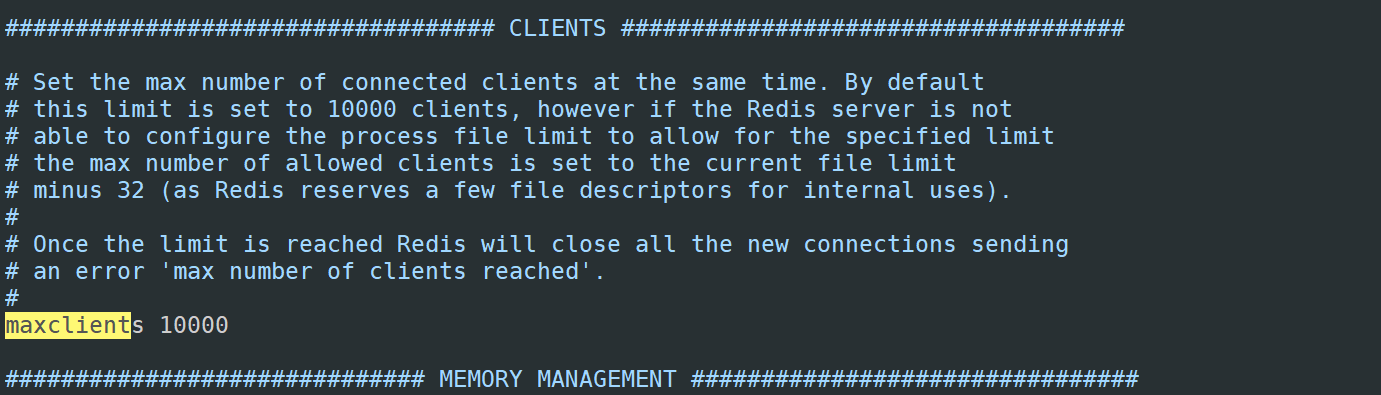
当然,既然用到主从了,那说明对redis依赖非常高,还有几个参数需要根据服务器配置来设置
- 客户端最大连接数(maxclients),默认是10000,可根据需求更改
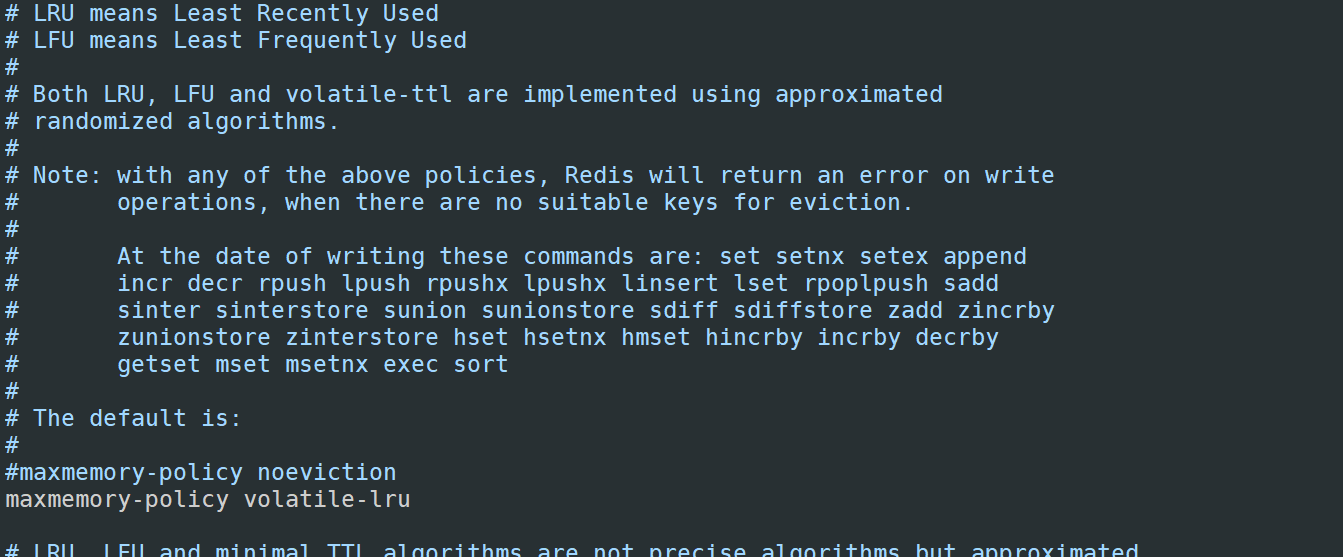
 5)内存策略,如果内存足够用则不用管,如果内存不够用,建议设置最近最少使用策略(LRU),默认是内存不够则报错
6)配置完后,启动redis
[root@master redis-4.0.9]# /usr/local/src/redis-4.0.9/src/redis-server /usr/local/src/redis-4.0.9/redis.conf
[root@master ~]# ps -ef |grep redis
root       1464      1  0 20:13 ?        00:00:00 /usr/local/src/redis-4.0.9/src/redis-server 0.0.0.0:6379
root       1469   1441  0 20:13 pts/0    00:00:00 grep --color=auto redis
[root@master ~]#
1.2.4 配置slave
注意:
1)前3步和master的配置是一致的

2)配置所属主服务器ip和端口

3)slave1和slave2配置一致
3)配置所属主服务器的密码(再次强调,要将密码设置非常复杂,这里只是演示)
4)需要注意的是,从服务器通常是只读,所以要配置只读(默认是只读,不要更改即可)

1.2.5 启动redis
[root@master src]# ./redis-server /root/redis-6.0.16/redis.conf

[root@slave1 src]# ./redis-server /root/redis-6.0.16/redis.conf

[root@slave2 src]#  ./redis-server /root/redis-6.0.16/redis.conf

注意:先启动master,再启动slave。
[root@master src]# netstat -antup|grep 6379
tcp        0      0 192.168.1.100:6379      0.0.0.0:*               LISTEN      2896/./redis-server
[root@master src]#
1.2.6 测试
1.2.6.1 登录master服务器
[root@master src]# ./redis-cli -h 192.168.1.100
192.168.1.100:6379> auth 123456
OK
192.168.1.100:6379> set a 100
OK
192.168.1.100:6379> set b 200
OK
192.168.1.100:6379> keys *
1) "a"
2) "b"
1.2.6.2 登录从服务查看
[root@slave1 src]# ./redis-cli -h 192.168.1.101
192.168.1.101:6379> auth 123456
OK
192.168.1.101:6379> exit
[root@slave1 src]# ./redis-cli -h 192.168.1.101
192.168.1.101:6379> auth 123456
OK
192.168.1.101:6379> keys *
1) "b"
2) "a"
192.168.1.101:6379> get a
"100"
可以看到已经设置成功了,如果有多个从服务器,也可以如此设置,可以减少从服务器读取数据的压力.
1.2.7 master查看同步情况
192.168.1.100:6379> info Replication
# Replication
role:master			#节点的角色
connected_slaves:2	#从节点个数
#state=online表示从节点在线,offset=238 从节点同步偏移量 表示从节点已经同步了多少数据量, lag=1 表示同步落后, lag=0 同步没有落后
slave0:ip=192.168.1.101,port=6379,state=online,offset=3203,lag=1
slave1:ip=192.168.1.102,port=6379,state=online,offset=3203,lag=1
#服务器的复制ID,redis每次重启ID都不一样
master_replid:0ec052d16f77fdee33f87e2071643f32cc157eb9
#第二服务器复制ID,用于故障转移后的PSYNC,用于集群等高可用之后主从节点的互换
master_replid2:0000000000000000000000000000000000000000
#master发送复制偏移量
master_repl_offset:238
#第二master服务器的发送复制偏移量
second_repl_offset:-1
#复制缓冲区状态
repl_backlog_active:1
#复制缓冲区的大小(以字节为单位)
repl_backlog_size:1073741824
#复制缓冲区的偏移量,标识当前缓冲区可用范围
repl_backlog_first_byte_offset:1
#复制缓冲区中数据的大小(以字节为单位)
repl_backlog_histlen:238
1.2.8 slave 查看同步情况
192.168.1.101:6379> info replication
# Replication
role:slave
master_host:192.168.1.100
master_port:6379
#Master的连接状态(up/down)
master_link_status:up
#最近一次主从交互之后的秒数
master_last_io_seconds_ago:1
master_sync_in_progress:0
#从服务器的同步偏移量
slave_repl_offset:3581
#从服务器的优先级
slave_priority:100
#从服务器只读
slave_read_only:1
connected_slaves:0
#主服务器的复制ID
master_replid:0ec052d16f77fdee33f87e2071643f32cc157eb9
master_replid2:0000000000000000000000000000000000000000
。。。。。


#Redis主从复制的从服务器只能读数据
192.168.1.101:6379> set c 300
(error) READONLY You can't write against a read only replica.
192.168.1.101:6379>
1.2.9 模拟master宕机
[root@master src]# ./redis-cli -h 192.168.1.100
192.168.1.100:6379> auth 123456
OK
192.168.1.100:6379> shutdown
观察slave1的复制状态
[root@slave1 src]# ./redis-cli -h 192.168.1.101
192.168.1.101:6379> auth 123456
OK
192.168.1.101:6379> info replication
# Replication
role:slave
master_host:192.168.1.100
master_port:6379
master_link_status:down   #表示无法连接Master
master_last_io_seconds_ago:-1
master_sync_in_progress:0
slave_repl_offset:4099
master_link_down_since_seconds:16
slave_priority:100
slave_read_only:1
connected_slaves:0
master_replid:0ec052d16f77fdee33f87e2071643f32cc157eb9
master_replid2:0000000000000000000000000000000000000000
master_repl_offset:4099
second_repl_offset:-1
repl_backlog_active:1
repl_backlog_size:1048576
repl_backlog_first_byte_offset:421
repl_backlog_histlen:3679

#数据查看正常
192.168.1.101:6379> get a
"100"
1.2.10 停止主从同步
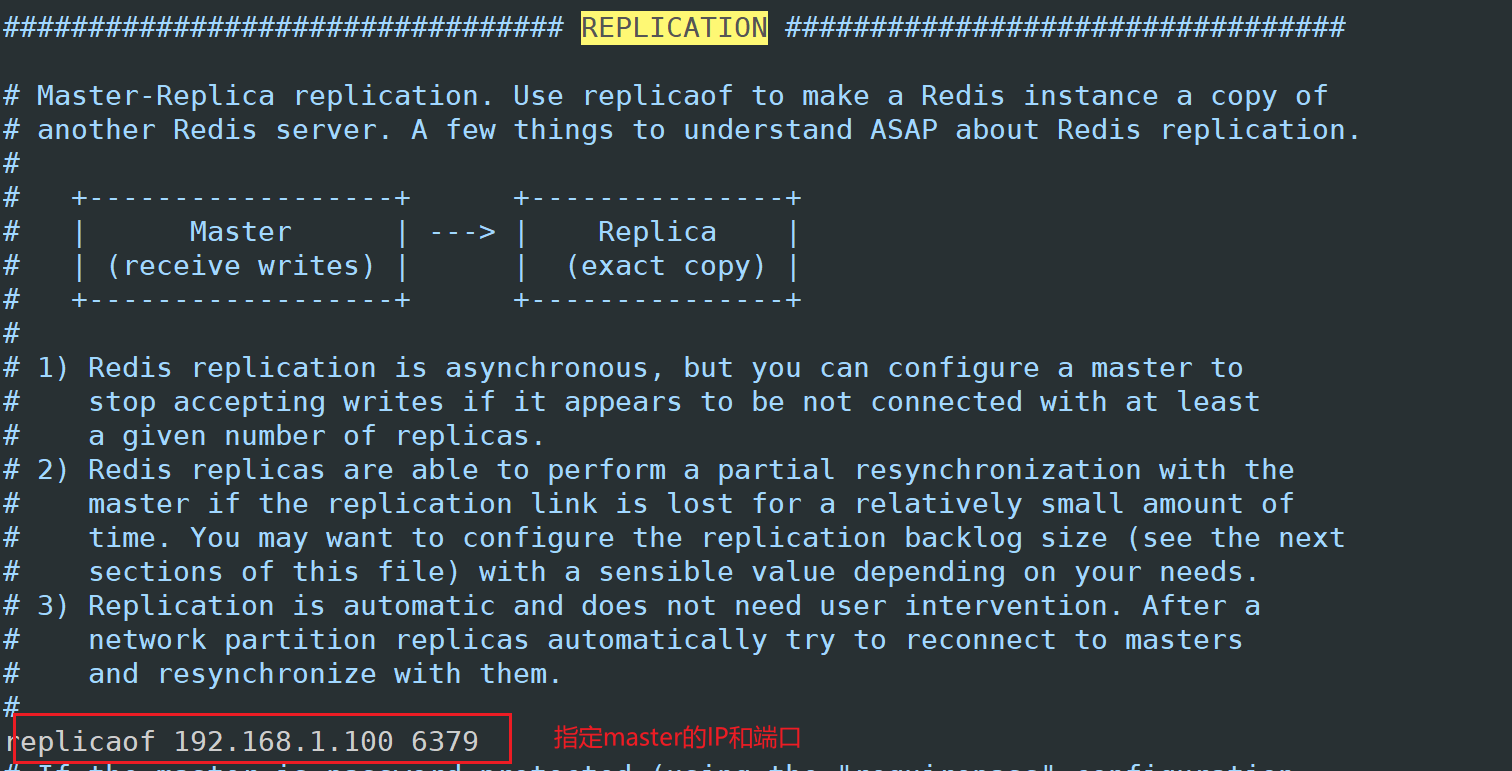
REPLIATOF NO ONE 指令可以取消主从复制
192.168.1.101:6379> REPLICAOF no one
OK
192.168.1.101:6379>
二、哨兵模式
2.1 主从同步的缺陷
主从架构无法实现master和slave角色的自动切换,即当master出现redis服务异常、主机断电、磁盘损坏等问题导致master无法使用,而redis高可用无法实现自故障转移(将slave提升为master),需要手动改环境配置才能切换到slave redis服务器,另外也无法横向扩展Redis服务的并行写入性能,当单台Redis服务器性能无法满足业务写入需求的时候就必须需要一种方式解决以上的两个核心问题,即:
1.   master和slave角色的无缝切换,让业务无感知从而不影响业务使用
2.   可以横向动态扩展Redis服务器,从而实现多台服务器并行写入以实现更高并发的目的。
2.2 哨兵模式介绍
Sentinel(哨兵)是Redis 的高可用性解决方案:由一个或多个Sentinel 实例 组成的Sentinel 系统可以监视任意多个主服务器,以及这些主服务器属下的所有从服务器,并在被监视的主服务器进入下线状态时,自动将下线主服务器属下的某个从服务器升级为新的主服务器。其已经被集成在redis2.6+的版本中,Redis的哨兵模式到了2.8版本之后就稳定了下来。一般在生产环境也建议使用Redis的2.8版本的以后版本
原理:Sentinel(哨兵)通过流言协议(gossip protocols)来接收关于Master主服务器是否下线的信息,并使用投票协议(Agreement Protocols)来决定是否执行自动故障迁移,以及选择哪个Slave作为新的Master。
通过一定的vote算法,从剩下的slave从服务器节点中,选一台提升为Master服务器节点,然后自动修改相关配置,并开启故障转移(failover)。Sentinel 机制可以解决master和slave角色的自动切换问题,但单个Master 的性能瓶颈问题无法解决
2.3 哨兵的作用
哨兵在redis集群架构中是一个非常重要的组件,具有监控、通知、故障转移的功能。
监控:监控主节点和从节点是否正常运行;
通知:哨兵检测的服务器出现问题时,会向其他的哨兵发送通知,哨兵之间就相当于一个通信群,每个哨兵发现的问题都会发在这个群里。
自动故障转移:当检测到主节点宕机后,断开与宕机主节点连接的所有从节点,在从节点中选取一个作为主节点,然后将其他的从节点连接到这个最新主节点的上。并且告知客户端最新的服务器地址。

哨兵也是一台 Redis 服务器,只是不对外提供任何服务。配置哨兵时配置为单数,哨兵使用的配置文件是 sentinel.conf
哨兵集群至少要 3 个节点,来确保自己的健壮性。
redis主从 +sentinel的架构,是不会保证数据的零丢失的,它是为了保证redis集群的高可用。
2.4 哨兵监控工作流程
哨兵有三个定时监控任务完成对各节点的发现和监控,每隔10秒, 每个哨兵 向 master和slave 发送 info命令,通过向主节点发送info,主节点返回 run_id 与从节点的信息,当有新的从节点加入时可以马上感知。每隔2秒, 每个哨兵 , 利用发布订阅的特性向redis数据节点的指定频道(sentinel:hello) 发送, 包括自己的host、ip和runid还有对这个master的监控配置。每个哨兵节点也会订阅该频道,来了解其它哨兵节点的信息及对主节点的判断,每隔1秒, 每个哨兵会向主节点,从节点及其余哨兵节点发送ping命令,做心跳检测,用于判定是否存活。
2.5 哨兵工作流程(故障转移原理)
    哨兵会一直给主节点发送 publish sentinel:hello,直到哨兵报出 sdown,若某个哨兵检测到主节点挂了,就会在哨兵群里通知。其余的哨兵接收到指令后,发送 hello 信息,检测主节点是否真的挂了 。对于一个哨兵认为主节点挂了称之为主观下线,半数哨兵认为主节点挂了称之为客官下线。一旦被认为主节点客官下线后。哨兵间会投票来竞选出一个代表

    每个哨兵-携带携带runid和自己竞选次数,参与竞选。每个哨兵都可以投票,规则一般可以通过,认为先收到谁的消息投票给谁。投票截止到任意一个哨兵的票数为总哨兵数的一半以上,这个就是选为哨兵代表。(这也是哨兵需要基数的原因)代表哨兵会发消息给所有Redis子节点
2.6 主观下线和客观下线
默认情况下,每个 Sentinel 节点会以 每秒一次 的频率对 Redis 节点和 其它 的 Sentinel 节点发送 PING 命令,并通过节点的回复来判断节点是否在线。

主观下线:
    主观下线 适用于所有 主节点 和 从节点。如果在 down-after-milliseconds 毫秒内,Sentinel 没有收到 目标节点 的有效回复,则会判定 该节点 为 主观下线。

客观下线:
    客观下线 只适用于 主节点。如果 主节点 出现故障,Sentinel 节点会通过 sentinel is-master-down-by-addr 命令,向其它 Sentinel 节点询问对该节点的 状态判断。如果超过 <quorum> 个数的节点判定 主节点 不可达,则该 Sentinel 节点会判断 主节点 为 客观下线。
2.7 哨兵模式优缺点
优点
高可用,在主节点故障时能实现故障的转移

缺点:
需要另外部署一套哨兵集群,部署麻烦、原理复杂、浪费资源,从节点作为备份节点不提供服务。
不支持读写分离,实现起来相对复杂。
只支持对主节点的故障转移,不支持对从节点的故障转移。
所有主节点和从节点都包含了 Redis 全量的数据,数据冗余,导致数据存储的数据量有限。
2.8 配置哨兵
哨兵的前提是已经实现了一个redis的主从复制的运行环境,从而实现一个一主两从基于哨兵的高可用 redis架构
2.8.1 所有主从节点的redis.conf中关健配置
bind 0.0.0.0
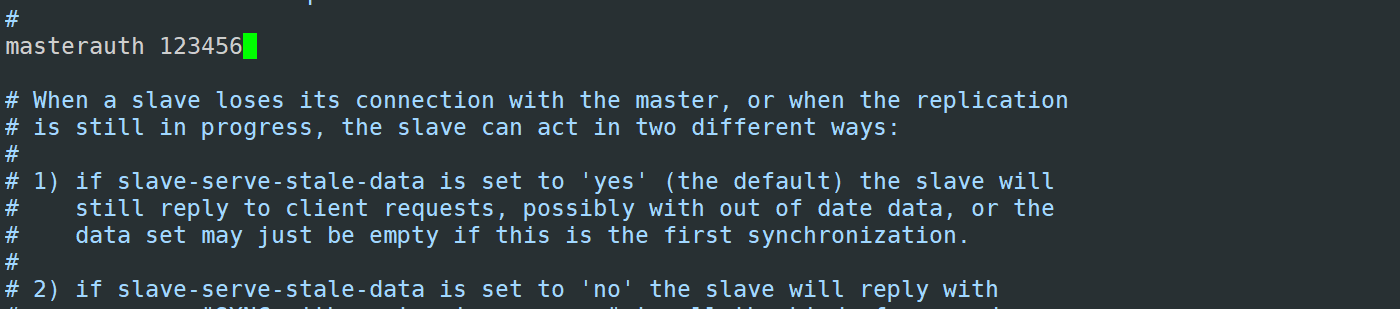
masterauth "123456" #主节点的密码,
requirepass "123456" #Redis节点密码,redis哨兵集群涉及主从切换,所有主从节点密码必须全部一致
2.8.2 搭建主从操作
主从redis搭建的方案参考之前安装部分:
#在所有主从节点执行
sed -i -e 's/bind 127.0.0.1/bind 0.0.0.0/' -e 's/^# masterauth .*/masterauth 123456/' -e 's/^# requirepass .*/requirepass 123456/'/root/redis-6.0.16/redis.conf

#在所有从节点设置主节点信息
echo "replicaof 192.168.1.100 6379" >>/root/redis-6.0.16/redis.conf

#启动Redis
[root@master src]# ./redis-server /root/redis-6.0.16/redis.conf
主节点状态
[root@master ~]# redis-cli -a 123456 info Replication
# Replication
role:master
connected_slaves:2
slave0:ip=192.168.1.101,port=6379,state=online,offset=28,lag=1
slave1:ip=192.168.1.102,port=6379,state=online,offset=28,lag=1
master_replid:51c552e7a766440e4d32eca18cd00fd883fdfd1b
master_replid2:0000000000000000000000000000000000000000
master_repl_offset:28
second_repl_offset:-1
repl_backlog_active:1
repl_backlog_size:1048576
repl_backlog_first_byte_offset:1
repl_backlog_histlen:28
slave1节点状态
[root@slave1 ~ ]# redis-cli -a 123456 info Replication
# Replication
role:slave
master_host:192.168.1.100
master_port:6379
master_link_status:up
master_last_io_seconds_ago:10
master_sync_in_progress:0
slave_repl_offset:84
slave_priority:100
slave_read_only:1
connected_slaves:0
master_replid:51c552e7a766440e4d32eca18cd00fd883fdfd1b
master_replid2:0000000000000000000000000000000000000000
master_repl_offset:84
second_repl_offset:-1
repl_backlog_active:1
repl_backlog_size:1048576
repl_backlog_first_byte_offset:15
repl_backlog_histlen:70
slave2 节点状态
[root@slave2 ~ ]# redis-cli -a 123456 info Replication
# Replication
role:slave
master_host:192.168.1.100
master_port:6379
master_link_status:up
master_last_io_seconds_ago:4
master_sync_in_progress:0
slave_repl_offset:154
slave_priority:100
slave_read_only:1
connected_slaves:0
master_replid:51c552e7a766440e4d32eca18cd00fd883fdfd1b
master_replid2:0000000000000000000000000000000000000000
master_repl_offset:154
second_repl_offset:-1
repl_backlog_active:1
repl_backlog_size:1048576
repl_backlog_first_byte_offset:1
repl_backlog_histlen:154
2.8.3 Sentinel 哨兵配置说明
Sentinel实际上是一个特殊的redis服务器,有些redis指令支持,但很多指令并不支持,默认监听在 26379/tcp 端口.;哨兵可以不和Redis服务器部署在一起,但一般部署在一起
Redis 哨兵配置文件:/root/redis-6.0.16/redis-sentinel.conf
#Redis 哨兵监听端口默认为 263379
port 26379
#daemonize yes 设置哨兵后台运行,默认为 no 以前台方式运行
daemonize no
#哨兵服务进程pid文件
pidfile /var/run/redis-sentinel.pid
#自定义sentinel哨兵日志文件绝对路径
logfile "/var/log/sentinel.log"
#工作目录
dir /tmp

#哨兵监控Redis主从复制集群必须配置参数
######################################################################################################
#sentinel monitor <Redis主从集群名> <主节点地址> <主节点端口> <ODOWN切换主从权重>
#指定哨兵监Redis主从集群中master服务器的地址和端口,一个哨兵服务可以监控多组Redis主从集群
#ODOWN切换主从权重:即有几个sentinel认为master down了就进行故障转移,一般此值是所有sentinel节点(一般总数是>=3的 奇数,如:3,5,7等)的一半以上的整数值,比如,总数是3,即3/2=1.5,取整为2,是master的ODOWN客观下线的依据
sentinel monitor mymaster 127.0.0.1 6379 2

#当主节点出现问题,哨兵通过ODOWN切换新的主节点,并且从节点需要指向新主节点地址,此时哨兵需要登录监控节点修改配置,因此需要登录节点
#sentinel monitor 定义主从集群中master的密码,注意: sentinel auth-pass 配置在 sentinel monitor 紧挨着的下面一行
sentinel auth-pass <master-name> <password>

#(SDOWN)哨兵主观判断mymaster集群中所有节点的主观下线的时间,单位:毫秒,建议3000
sentinel down-after-milliseconds mymaster 30000

######################################################################################################
#发生故障转移后,所有从节点需要向哨兵提升新主节点同步数据,如果从节点同时一并向新主节点同步,会造成新主机负载压力
#sentinel parallel-syncs 限制同时向新master同步数据的slave数量,数字越小总同步时间越长,但可以减轻新master的负载压力
sentinel parallel-syncs mymaster 1

#所有slaves指向新的master所需的超时时间,单位:毫秒
sentinel failover-timeout mymaster 180000

#禁止修改脚本,默认即可
sentinel deny-scripts-reconfig yes

#yum安装定义sentinel日志文件,多个logfile最后配置生效,前面logfile配置项启动Sentinel会自动删除
logfile /var/log/redis/sentinel.log
2.8.4 启动哨兵
三个哨兵服务器的配置都如下
cat > /usr/local/redis-6.0.16/sentinel.conf << EOF
port 26379
daemonize yes
pidfile /var/run/redis-sentinel.pid
logfile /var/log/redis/sentinel.log
dir /tmp
#修改下面俩行
sentinel monitor mymaster 10.0.0.9 6379 2
sentinel auth-pass mymaster 123456
sentinel down-after-milliseconds mymaster 30000
sentinel parallel-syncs mymaster 1
sentinel failover-timeout mymaster 180000
sentinel deny-scripts-reconfig yes
EOF
三台哨兵服务器都要启动
[root@master src]# ./redis-sentinel /root/redis-6.0.16/sentinel.conf
查看端口28379 是否正常开启
#master节点
[root@master ~ ]# netstat -lnt | grep 26379
tcp        0      0 0.0.0.0:26379           0.0.0.0:*               LISTEN
tcp6       0      0 :::26379                :::*                    LISTEN

#slave1节点
[root@slave1 ~ ]# netstat -lnt | grep 26379
tcp        0      0 0.0.0.0:26379           0.0.0.0:*               LISTEN
tcp6       0      0 :::26379                :::*                    LISTEN

#slave2节点
[root@slave2 ~ ]# netstat -lnt | grep 26379
tcp        0      0 0.0.0.0:26379           0.0.0.0:*               LISTEN
tcp6       0      0 :::26379                :::*                    LISTEN
哨兵服务启动后,会在 sentinel.conf文件添加一些信息,确保主从复制集群每个节点的sentinel.conf 配置文件中的 sentinel myid ID 必须不同
#master节点
[root@master ~ ]# egrep -v '^$|^#' /root/redis-6.0.16/sentinel.conf
port 26379
daemonize no
pidfile "/var/run/redis-sentinel.pid"
logfile "/var/log/redis/sentinel.log"
dir "/tmp"
sentinel myid 23b408383c33a833b52b36fc7d9a4247811faddb		#每个主从节点集群必须不同
sentinel deny-scripts-reconfig yes
sentinel monitor mymaster 127.0.0.1 6379 2
sentinel auth-pass mymaster 123456
sentinel config-epoch mymaster 0
sentinel leader-epoch mymaster 0
protected-mode no
supervised systemd
sentinel known-replica mymaster 192.168.1.102 6379
sentinel known-replica mymaster 192.168.1.101 6379
sentinel known-sentinel mymaster 192.168.1.101 26379 4dfea0efa7ed1aeb5107ca79241b8848f8231112
sentinel known-sentinel mymaster 192.168.1.102 26379 c9ce54d10d70fdde1ee8cb2c78f3f66787a06d94
sentinel current-epoch 0

#slave1节点
[root@slave1 ~ ]# egrep -v '^$|^#' /root/redis-6.0.16/sentinel.conf
port 26379
daemonize no
pidfile "/var/run/redis-sentinel.pid"
logfile "/var/log/redis/sentinel.log"
dir "/tmp"
sentinel myid c9ce54d10d70fdde1ee8cb2c78f3f66787a06d94
sentinel deny-scripts-reconfig yes
sentinel monitor mymaster 192.168.1.100 6379 2
sentinel auth-pass mymaster 123456
sentinel config-epoch mymaster 0
sentinel leader-epoch mymaster 0
protected-mode no
supervised systemd
sentinel known-replica mymaster 192.168.1.102 6379
sentinel known-replica mymaster 192.168.1.101 6379
sentinel known-sentinel mymaster 192.168.1.100 26379 23b408383c33a833b52b36fc7d9a4247811faddb
sentinel known-sentinel mymaster 192.168.1.101 26379 4dfea0efa7ed1aeb5107ca79241b8848f8231112
sentinel current-epoch 0

#slave2节点
[root@slave2 ~ ]# egrep -v '^$|^#' /root/redis-6.0.16/sentinel.conf
port 26379
daemonize no
pidfile "/var/run/redis-sentinel.pid"
logfile "/var/log/redis/sentinel.log"
dir "/tmp"
sentinel myid 4dfea0efa7ed1aeb5107ca79241b8848f8231112
sentinel deny-scripts-reconfig yes
sentinel monitor mymaster 192.168.1.100 6379 2
sentinel auth-pass mymaster 123456
sentinel config-epoch mymaster 0
sentinel leader-epoch mymaster 0
protected-mode no
supervised systemd
sentinel known-replica mymaster 192.168.1.102 6379
sentinel known-replica mymaster 192.168.1.101 6379
sentinel known-sentinel mymaster 192.168.1.100 26379 23b408383c33a833b52b36fc7d9a4247811faddb
sentinel known-sentinel mymaster 192.168.1.102 26379 c9ce54d10d70fdde1ee8cb2c78f3f66787a06d94
2.8.5 查看哨兵日志
[root@master src]#  tail /var/log/redis/sentinel.log
3258:X 02 Jun 2023 09:50:54.460 # oO0OoO0OoO0Oo Redis is starting oO0OoO0OoO0Oo
3258:X 02 Jun 2023 09:50:54.460 # Redis version=6.0.16, bits=64, commit=00000000, modified=0, pid=3258, just started
3258:X 02 Jun 2023 09:50:54.460 # Configuration loaded
3258:X 02 Jun 2023 09:50:54.461 * Increased maximum number of open files to 10032 (it was originally set to 1024).
3258:X 02 Jun 2023 09:50:54.461 * Running mode=sentinel, port=26379.
3258:X 02 Jun 2023 09:50:54.461 # WARNING: The TCP backlog setting of 511 cannot be enforced because /proc/sys/net/core/somaxconn is set to the lower value of 128.
3258:X 02 Jun 2023 09:50:54.463 # Sentinel ID is a0105bb4ac4cfc34b688b1c33c12724221ff1753
3258:X 02 Jun 2023 09:50:54.463 # +monitor master master 192.168.1.100 6379 quorum 2
3258:X 02 Jun 2023 09:50:54.464 * +slave slave 192.168.1.101:6379 192.168.1.101 6379 @ master 192.168.1.100 6379
3258:X 02 Jun 2023 09:50:54.466 * +slave slave 192.168.1.102:6379 192.168.1.102 6379 @ master 192.168.1.100 6379
2.8.6 查看sentinel状态
在sentinel状态中尤其是最后一行,涉及到masterIP是多少,有几个slave,有几个sentinels,必须是 符合全部服务器数量
[root@master src]# ./redis-cli -h 192.168.1.100 -a 123456 -p 26379
192.168.1.100:26379> info sentinel
# Sentinel
sentinel_masters:1
sentinel_tilt:0
sentinel_running_scripts:0
sentinel_scripts_queue_length:0
sentinel_simulate_failure_flags:0
master0:name=master,status=ok,address=192.168.1.100:6379,slaves=2,sentinels=1

#name=<主从集群名>,status 集群状态, address 集群中主节点, slaves 从节点个数, sentinel 监控集群的哨兵个数
2.8.7 停止Redis Master测试故障转移
模拟master节点故障宕机
[root@master src]# killall redis-server
查看哨兵故障转移时sentinel的信息:
[root@slave1 src]# redis-cli -h 192.168.1.101 -p 26379 info Sentinel
# Sentinel
sentinel_masters:1
sentinel_tilt:0
sentinel_running_scripts:0
sentinel_scripts_queue_length:0
sentinel_simulate_failure_flags:0
master0:name=mymaster,status=ok,address=192.168.1.101:6379,slaves=2,sentinels=2
哨兵主观发现master主节点故障信息
[root@slave1 redis-6.0.16]# tail /var/log/redis/sentinel.log
1921:X 02 Jun 2023 10:11:16.495 # +failover-state-reconf-slaves master mymaster 192.168.1.101 6379
1921:X 02 Jun 2023 10:11:16.547 * +slave-reconf-sent slave 192.168.1.100:6379 192.168.1.100 6379 @ mymaster 192.168.1.101 6379
1921:X 02 Jun 2023 10:11:17.537 * +slave-reconf-inprog slave 192.168.1.100:6379 192.168.1.100 6379 @ mymaster 192.168.1.101 6379
1921:X 02 Jun 2023 10:11:17.592 # -odown master mymaster 192.168.1.101 6379
1921:X 02 Jun 2023 10:14:16.536 # +failover-end-for-timeout master mymaster 192.168.1.101 6379
1921:X 02 Jun 2023 10:14:16.536 # +failover-end master mymaster 192.168.1.101 6379
1921:X 02 Jun 2023 10:14:16.536 * +slave-reconf-sent-be slave 192.168.1.100:6379 192.168.1.100 6379 @ mymaster 192.168.1.101 6379
1921:X 02 Jun 2023 10:14:16.536 # +switch-master mymaster 192.168.1.101 6379 192.168.1.102 6379
1921:X 02 Jun 2023 10:14:16.536 * +slave slave 192.168.1.100:6379 192.168.1.100 6379 @ mymaster 192.168.1.102 6379
1921:X 02 Jun 2023 10:14:16.536 * +slave slave 192.168.1.101:6379 192.168.1.101 6379 @ mymaster 192.168.1.102 6379
2.8.8 故障转移后的redis配置文件会被自动修改
故障转移后新主节点master sentinel 哨兵配置文件的sentinel monitor IP 自动修改
[root@slave1 redis-6.0.16]# cat sentinel.conf
port 26379
daemonize yes
pidfile "/var/run/redis-sentinel.pid"
logfile "/var/log/redis/sentinel.log"
dir "/tmp"
#修改下面俩行
sentinel myid 5f973491babbd749ce9e99add0994c468fd93cb0
sentinel deny-scripts-reconfig yes
sentinel monitor mymaster 192.168.1.102 6379 2   ##自动修改成新的master的ip
sentinel auth-pass mymaster 123456
sentinel config-epoch mymaster 1
sentinel leader-epoch mymaster 1
# Generated by CONFIG REWRITE
protected-mode no
user default on nopass ~* +@all
sentinel known-replica mymaster 192.168.1.102 6379
sentinel known-replica mymaster 192.168.1.100 6379
sentinel known-sentinel mymaster 192.168.1.102 26379 e247a440a58531f2f83bd951d5927c39ba5186a9
sentinel current-epoch 1
故障转移后slave节点修改 redis.conf 文件指向新主节点
[root@slave2 ~ ]# egrep -v '^$|^#'/root/redis-6.0.16/redis.conf | grep replicaof
replicaof 192.168.1.102 6379
2.8.9 恢复故障的原master重新加入redis集群
恢复故障的原master重新加入redis集群,作为slave从节点
[root@master ~ ]# systemctl restart redis.service
[root@master ~ ]# egrep -v '^$|^#'/root/redis-6.0.16/redis.conf | grep replicaof
replicaof 192.168.1.102 6379

[root@master ~ ]# redis-cli  -a 123456 info Replication
# Replication
role:slave
master_host:192.168.1.102
master_port:6379
master_link_status:up
master_last_io_seconds_ago:0
master_sync_in_progress:0
slave_repl_offset:1117130
slave_priority:100
slave_read_only:1
connected_slaves:0
master_replid:c53545e42f6bed993e0434d2c8b9ced52c507ff2
2.8.10 切换主从
手动切换主从服务集群的master节点
sentinel failover <masterName>
范例:
[root@slave2 src]# ./redis-cli -p 26379 -h 192.168.1.102
192.168.1.102:26379> sentinel failover mymaster
OK
[root@slave2 src]# ./redis-cli -p 26379 -h 192.168.1.102
192.168.1.102:26379> info sentinel
# Sentinel
sentinel_masters:1
sentinel_tilt:0
sentinel_running_scripts:0
sentinel_scripts_queue_length:0
sentinel_simulate_failure_flags:0
master0:name=mymaster,status=sdown,address=192.168.1.102:6379,slaves=2,sentinels=2
在master查看切换日志
[root@master src]# tailf /var/log/redis/sentinel.log
3258:X 02 Jun 2023 09:50:54.460 # oO0OoO0OoO0Oo Redis is starting oO0OoO0OoO0Oo
3258:X 02 Jun 2023 09:50:54.460 # Redis version=6.0.16, bits=64, commit=00000000, modified=0, pid=3258, just started
3258:X 02 Jun 2023 09:50:54.460 # Configuration loaded
3258:X 02 Jun 2023 09:50:54.461 * Increased maximum number of open files to 10032 (it was originally set to 1024).
3258:X 02 Jun 2023 09:50:54.461 * Running mode=sentinel, port=26379.
3258:X 02 Jun 2023 09:50:54.461 # WARNING: The TCP backlog setting of 511 cannot be enforced because /proc/sys/net/core/somaxconn is set to the lower value of 128.
3258:X 02 Jun 2023 09:50:54.463 # Sentinel ID is a0105bb4ac4cfc34b688b1c33c12724221ff1753
3258:X 02 Jun 2023 09:50:54.463 # +monitor master master 192.168.1.100 6379 quorum 2
3258:X 02 Jun 2023 09:50:54.464 * +slave slave 192.168.1.101:6379 192.168.1.101 6379 @ master 192.168.1.100 6379
3258:X 02 Jun 2023 09:50:54.466 * +slave slave 192.168.1.102:6379 192.168.1.102 6379 @ master 192.168.1.100 6379
3258:X 02 Jun 2023 09:59:50.827 # +sdown master master 192.168.1.100 6379
3520:X 02 Jun 2023 10:09:46.535 # oO0OoO0OoO0Oo Redis is starting oO0OoO0OoO0Oo
3520:X 02 Jun 2023 10:09:46.535 # Redis version=6.0.16, bits=64, commit=00000000, modified=0, pid=3520, just started
3520:X 02 Jun 2023 10:09:46.535 # Configuration loaded
3520:X 02 Jun 2023 10:09:46.543 * Increased maximum number of open files to 10032 (it was originally set to 1024).
3520:X 02 Jun 2023 10:09:46.543 # Could not create server TCP listening socket *:26379: bind: Address already in use
3258:X 02 Jun 2023 10:10:17.996 * +reboot master master 192.168.1.100 6379
3258:X 02 Jun 2023 10:10:18.052 # -sdown master master 192.168.1.100 6379
3258:X 02 Jun 2023 10:10:23.923 * +convert-to-slave slave 192.168.1.101:6379 192.168.1.101 6379 @ master 192.168.1.100 6379
3258:X 02 Jun 2023 10:10:24.937 * +fix-slave-config slave 192.168.1.102:6379 192.168.1.102 6379 @ master 192.168.1.100 6379
3258:X 02 Jun 2023 10:12:08.270 # +sdown master master 192.168.1.100 6379
3258:X 02 Jun 2023 10:19:21.776 # Executing user requested FAILOVER of 'master'
3258:X 02 Jun 2023 10:19:21.776 # +new-epoch 1
3258:X 02 Jun 2023 10:19:21.776 # +try-failover master master 192.168.1.100 6379
3258:X 02 Jun 2023 10:19:21.791 # +vote-for-leader a0105bb4ac4cfc34b688b1c33c12724221ff1753 1
3258:X 02 Jun 2023 10:19:21.791 # +elected-leader master master 192.168.1.100 6379
3258:X 02 Jun 2023 10:19:21.791 # +failover-state-select-slave master master 192.168.1.100 6379
3258:X 02 Jun 2023 10:19:21.844 # +selected-slave slave 192.168.1.101:6379 192.168.1.101 6379 @ master 192.168.1.100 6379
3258:X 02 Jun 2023 10:19:21.844 * +failover-state-send-slaveof-noone slave 192.168.1.101:6379 192.168.1.101 6379 @ master 192.168.1.100 6379
3258:X 02 Jun 2023 10:19:21.897 * +failover-state-wait-promotion slave 192.168.1.101:6379 192.168.1.101 6379 @ master 192.168.1.100 6379
3258:X 02 Jun 2023 10:19:22.150 # +promoted-slave slave 192.168.1.101:6379 192.168.1.101 6379 @ master 192.168.1.100 6379
3258:X 02 Jun 2023 10:19:22.150 # +failover-state-reconf-slaves master master 192.168.1.100 6379
3258:X 02 Jun 2023 10:19:22.237 * +slave-reconf-sent slave 192.168.1.102:6379 192.168.1.102 6379 @ master 192.168.1.100 6379
3258:X 02 Jun 2023 10:19:22.843 * +slave-reconf-inprog slave 192.168.1.102:6379 192.168.1.102 6379 @ master 192.168.1.100 6379
3258:X 02 Jun 2023 10:19:23.896 * +slave-reconf-done slave 192.168.1.102:6379 192.168.1.102 6379 @ master 192.168.1.100 6379
3258:X 02 Jun 2023 10:19:23.968 # +failover-end master master 192.168.1.100 6379
3258:X 02 Jun 2023 10:19:23.968 # +switch-master master 192.168.1.100 6379 192.168.1.101 6379
3258:X 02 Jun 2023 10:19:23.970 * +slave slave 192.168.1.102:6379 192.168.1.102 6379 @ master 192.168.1.101 6379
3258:X 02 Jun 2023 10:19:23.970 * +slave slave 192.168.1.100:6379 192.168.1.100 6379 @ master 192.168.1.101 6379
3258:X 02 Jun 2023 10:21:14.565 * +convert-to-slave slave 192.168.1.102:6379 192.168.1.102 6379 @ master 192.168.1.101 6379
3258:X 02 Jun 2023 10:24:03.917 * +fix-slave-config slave 192.168.1.100:6379 192.168.1.100 6379 @ master 192.168.1.101 6379        ##Master已经切换到了192.168.1.101
在Redis的主配置文件 redis.conf中,可以设置哨兵提升新master节点优先级
[root@master ~ ]# grep 'replica-priority'/root/redis-6.0.16/redis.conf
replica-priority 100		#数值越低,提升新master节点优先级越高

#设置
[root@master src]# redis-cli -h 192.168.1.100 -p 6379 -a 123456 config set slave-priority 100
#查看优先级
[root@master src]# redis-cli -h 192.168.1.100 -p 6379 -a 123456 config get slave-priority
2.8.11 python 连接Sentinel哨兵
Redis主从复制集群特点:主master节点可以写数据,从slave节点不能写数据,只能读数据;那么配置哨兵实现主从故障自动切换,随机提升slave节点作为新的master主节点,客户端代码连接Redis主节点写数据,就必须通过哨兵获取master主节点信息,代码如下:
[root@master ~ ]# yum -y install python3 python3-redis
[root@master ~ ]# vim sentinel_test.py
#!/usr/bin/python3
import redis
from redis.sentinel import Sentinel
#连接哨兵服务器(主机名也可以用域名)
sentinel = Sentinel([('192.168.1.100', 26379),
                     ('192.168.1.102', 26379),
                     ('192.168.1.101', 26379)],
                    socket_timeout=0.5)
redis_auth_pass = '123456'
#mymaster 是配置哨兵模式的redis集群名称,此为默认值,实际名称按照个人部署案例来填写
#获取主服务器地址
master = sentinel.discover_master('mymaster')
print(master)
#获取从服务器地址
slave = sentinel.discover_slaves('mymaster')
print(slave)
#获取主服务器进行写入
master = sentinel.master_for('mymaster', socket_timeout=0.5,
password=redis_auth_pass, db=0)
w_ret = master.set('name', 'xuan')
#输出:True
#获取从服务器进行读取(默认是round-roubin)
slave = sentinel.slave_for('mymaster', socket_timeout=0.5,
password=redis_auth_pass, db=0)
r_ret = slave.get('name')
print(r_ret)

[root@master ~ ]# chmod +x sentinel_test.py
[root@master ~ ]# ./sentinel_test.py
('192.168.1.101', 6379)
[('192.168.1.100', 6379), ('192.168.1.102', 6379)]
b'xuan'
三、Redis集群
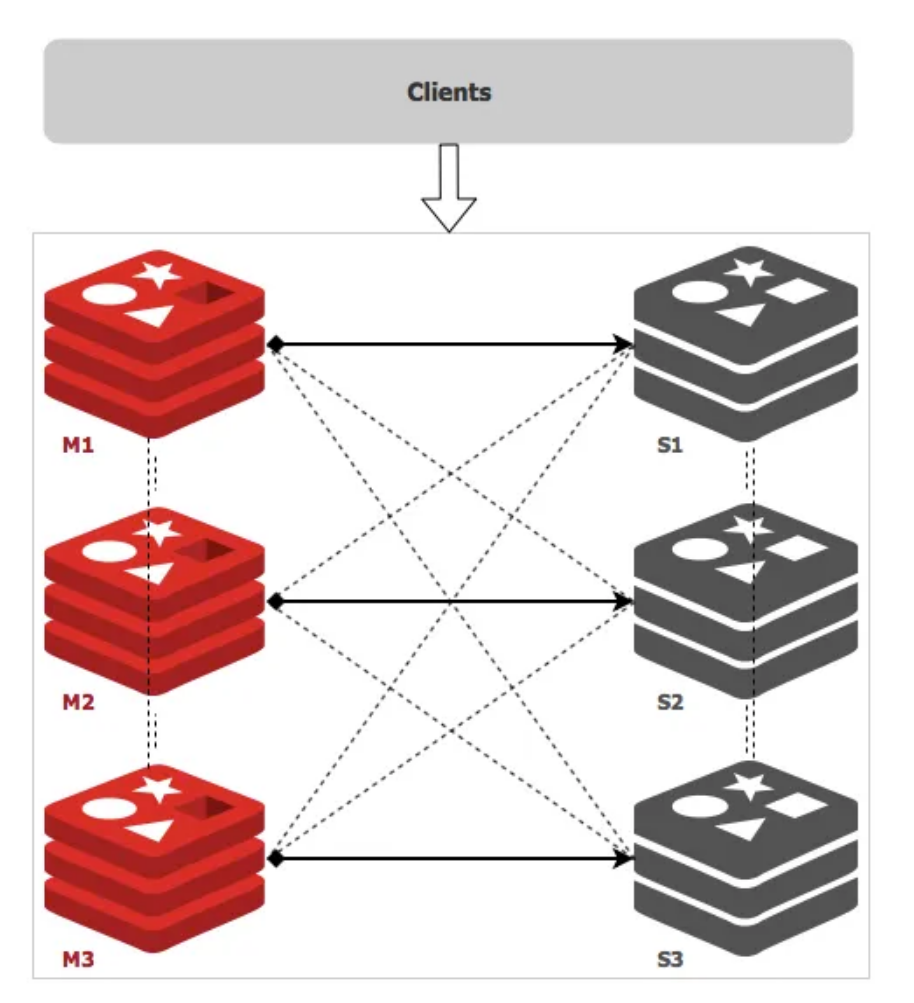
Redis 是一个开源的 key-value 存储系统,由于出众的性能,大部分互联网企业都用来做服务器端缓存。Redis 在3.0版本前只支持单实例模式,虽然支持主从模式、哨兵模式部署来解决单点故障,但是现在互联网企业动辄大几百G的数据,可完全是没法满足业务的需求,所以,Redis 在 3.0 版本以后就推出了集群模式。
Redis 集群采用了P2P的模式,完全去中心化。Redis 把所有的 Key 分成了 16384 个 slot,每个 Redis 实例负责其中一部分 slot 。集群中的所有信息(节点、端口、slot等),都通过节点之间定期的数据交换而更新。 Redis 客户端可以在任意一个 Redis 实例发出请求,如果所需数据不在该实例中,通过重定向命令引导客户端访问所需的实例。
sentinel模式基本可以满足一般生产的需求,具备高可用性。但是当数据量过大到一台服务器存放不下的情况时,主从模式或sentinel模式就不能满足需求了,这个时候需要对存储的数据进行分片,将数据存储到多个Redis实例中。cluster模式的出现就是为了解决单机Redis容量有限的问题,将Redis的数据根据一定的规则分配到多台机器。

cluster可以说是sentinel和主从模式的结合体,通过cluster可以实现主从和master重选功能,所以如果配置两个副本三个分片的话,就需要六个Redis实例。因为Redis的数据是根据一定规则分配到cluster的不同机器的,当数据量过大时,可以新增机器进行扩容。

使用集群,只需要将redis配置文件中的cluster-enable配置打开即可。每个集群中至少需要三个主数据库才能正常运行,新增节点非常方便。
3.1 redis cluster的特点
1.  所有Redis节点使用(PING机制)互联
2.  集群中某个节点的是否失效,是由整个集群中超过半数的节点监测都失效,才能算真正的失效客户端不需要proxy即可直接连接redis,应用程序需要写全部的redis服务器IP
3.  redis cluster把所有的redis node 平均映射到 0-16383个槽位(slot)上,读写需要到指定的redis node上进行操作,因此有多少个redis node相当于redis 并发扩展了多少倍,每个redis node 承担16384/N个槽位
4.  Redis cluster预先向 0 号库分配16384个(slot)槽位,当需要在redis集群中写入一个key-value的时候,会使用CRC16(key) % 16384之后的值,决定将key写入值哪一个槽位从而决定写入哪一个Redis节点上,从而有效解决单机瓶颈
假如三个主节点分别是:A, B, C 三个节点,采用哈希槽 (hash slot)的方式来分配16384个slot 的话
它们三个节点分别承担的slot 区间是:
节点A覆盖 0-5460
节点B覆盖 5461-10922
节点C覆盖 10923-16383

3.2 基本环境要求
要求:关闭防火墙和selinux
| IP地址 | 主机名 | 角色 |
|---|---|---|
| 192.168.1.100 | redis01 | master01 |
| 192.168.1.101 | redis02 | master02 |
| 192.168.1.102 | redis03 | master03 |
| 192.168.1.103 | redis04 | slave01 |
| 192.168.1.104 | redis05 | slave02 |
| 192.168.1.105 | redis06 | slave03 |
3.3 实验部署
3.3.1 安装依赖(6台服务器都安装)
[root@localhost]# yum -y install gcc
3.3.2 安装redis
[root@redis ~]# tar zxvf redis-6.0.16.tar.gz -C /usr/local/src/
[root@redis redis-6.0.16]# make PREFIX=/usr/local/redis install
安装过程中如果存在如下的报错,则是因为默认的gcc的版本太低导致的,可以使用如下的办法解决
[root@redis redis-6.0.16]#yum -y install centos-release-scl
[root@redis redis-6.0.16]#yum -y install devtoolset-9-gcc devtoolset-9-gcc-c++ devtoolset-9-binutils
[root@redis redis-6.0.16]#scl enable devtoolset-9 bash
3.3.3 编辑redis的配置文件
注意: redis01配置项修改如下(其他5台服务器redis一样,IP地址进行修改)
[root@redis redis-6.0.16]# vim redis.conf

bind 192.168.1.100   #绑定IP地址
protected-mode no    #关闭保护模式
port 6379       #设置端口(可不修改)
daemonize yes    #设置是否守护进程启动
pidfile /var/run/redis_6379.pid
cluster-enabled yes    #开启集群
cluster-config-file nodes-6379.conf  #设置集群配置文件
cluster-node-timeout 15000    #设置节点超时时间:ms)
3.3.4 分别启动6个redis服务
[root@redis01 redis]# /usr/local/redis/bin/redis-server /usr/local/redis/redis.conf
3.3.5 集群环境设置(其中一台集群安装即可,此方法适用于低版本的redis)
#安装ruby环境
 1)yum install centos-release-scl-rh
 2)yum install rh-ruby26  -y
 3)scl  enable  rh-ruby26 bash
 4)ruby -v
 5)gem install redis  # 不需要安装
注意:不能直接使用Yum 安装ruby,安装的版本是2.x的版本,在创建集群的时候会出现如下的报错,需要至少2.4以上的版本

3.3.6 配置集群策略
[root@redis01 bin]# ./redis-cli --cluster create 192.168.1.100:6379 192.168.1.101:6379 192.168.1.102:6379 192.168.1.103:6379 192.168.1.104:6379 192.168.1.105:6379 --cluster-replicas 1       #配置集群,cluster-replicas 1代表是1主一从
>>> Performing hash slots allocation on 6 nodes...
Master[0] -> Slots 0 - 5460
Master[1] -> Slots 5461 - 10922
Master[2] -> Slots 10923 - 16383
Adding replica 192.168.1.104:6379 to 192.168.1.100:6379
Adding replica 192.168.1.105:6379 to 192.168.1.101:6379
Adding replica 192.168.1.103:6379 to 192.168.1.102:6379
M: 90b995de25d43d4290558907e7cc0463dc923d91 192.168.1.100:6379
   slots:[0-5460] (5461 slots) master
M: e18cc1c07e1d2cdc75c2b688fb2654e131ea3ba6 192.168.1.101:6379
   slots:[5461-10922] (5462 slots) master
M: 70ebf6152b5fa905b325b6deefdf10c4ffce772a 192.168.1.102:6379
   slots:[10923-16383] (5461 slots) master
S: 825b87385d21bbcd0852e5ceaab5df00cc47690b 192.168.1.103:6379
   replicates 70ebf6152b5fa905b325b6deefdf10c4ffce772a
S: 714b154964a33558b6e2db10b3daeee6d2087a03 192.168.1.104:6379
   replicates 90b995de25d43d4290558907e7cc0463dc923d91
S: fa821a4cbf938d44e78bc368e58b9d0a91348a45 192.168.1.105:6379
   replicates e18cc1c07e1d2cdc75c2b688fb2654e131ea3ba6
Can I set the above configuration? (type 'yes' to accept): yes
>>> Nodes configuration updated
>>> Assign a different config epoch to each node
>>> Sending CLUSTER MEET messages to join the cluster
Waiting for the cluster to join
.
>>> Performing Cluster Check (using node 192.168.1.100:6379)
M: 90b995de25d43d4290558907e7cc0463dc923d91 192.168.1.100:6379
   slots:[0-5460] (5461 slots) master
   1 additional replica(s)
M: 70ebf6152b5fa905b325b6deefdf10c4ffce772a 192.168.1.102:6379
   slots:[10923-16383] (5461 slots) master
   1 additional replica(s)
S: 714b154964a33558b6e2db10b3daeee6d2087a03 192.168.1.104:6379
   slots: (0 slots) slave
   replicates 90b995de25d43d4290558907e7cc0463dc923d91
S: 825b87385d21bbcd0852e5ceaab5df00cc47690b 192.168.1.103:6379
   slots: (0 slots) slave
   replicates 70ebf6152b5fa905b325b6deefdf10c4ffce772a
M: e18cc1c07e1d2cdc75c2b688fb2654e131ea3ba6 192.168.1.101:6379
   slots:[5461-10922] (5462 slots) master
   1 additional replica(s)
S: fa821a4cbf938d44e78bc368e58b9d0a91348a45 192.168.1.105:6379
   slots: (0 slots) slave
   replicates e18cc1c07e1d2cdc75c2b688fb2654e131ea3ba6
[OK] All nodes agree about slots configuration.
>>> Check for open slots...
>>> Check slots coverage...
[OK] All 16384 slots covered.
[root@redis01 bin]#
如上提示,说明集群配置成功了
使用redis-cli命令来创建集群 replicas 1 表示主从比例为1:1 一个主节点对应一个从节点,然后默认给我们分配好了每个主节点和对应从节点服务,以及 solt 的大小,因为在 Redis 集群中有且仅有 16383 个 solt ,默认情况会给我们平均分配,当然你可以指定,后续的增减节点也可以重新分配
[root@redis01 src]# ./redis-trib.rb create --replicas 1 192.168.1.100:6379 192.168.1.101:6379 192.168.1.102:6379 192.168.1.103:6379 192.168.1.104:6379 192.168.1.105:6379  #配置集群,--replicas 1代表是1主一从
>>> Creating cluster
>>> Performing hash slots allocation on 6 nodes...
Using 3 masters:
192.168.1.100:6379
192.168.1.101:6379
192.168.1.102:6379
Adding replica 192.168.1.104:6379 to 192.168.1.100:6379
Adding replica 192.168.1.105:6379 to 192.168.1.101:6379
Adding replica 192.168.1.103:6379 to 192.168.1.102:6379
M: 3cf06b1e503387bdb5899fb164de1dc84afdde72 192.168.1.100:6379
   slots:0-5460 (5461 slots) master
M: d9e4848c0f20fca41b374b27b53ab48815e86785 192.168.1.101:6379
   slots:5461-10922 (5462 slots) master
M: 44e23b95d2b906b1dd7fe15ffb9feb83e31b3b65 192.168.1.102:6379
   slots:10923-16383 (5461 slots) master
S: 6edd2c6d3afadabdf420e55935b2a90a0778e308 192.168.1.103:6379
   replicates 44e23b95d2b906b1dd7fe15ffb9feb83e31b3b65
S: 03cf24cdd2cd02ab79facb52bd240bb837870a1b 192.168.1.104:6379
   replicates 3cf06b1e503387bdb5899fb164de1dc84afdde72
S: 371da1894d2a764e3675f419df18b29fbd2b6f74 192.168.1.105:6379
   replicates d9e4848c0f20fca41b374b27b53ab48815e86785
Can I set the above configuration? (type 'yes' to accept): yes    #这里输入“yes”
>>> Nodes configuration updated
>>> Assign a different config epoch to each node
>>> Sending CLUSTER MEET messages to join the cluster
Waiting for the cluster to join......
>>> Performing Cluster Check (using node 192.168.1.100:6379)
M: 3cf06b1e503387bdb5899fb164de1dc84afdde72 192.168.1.100:6379
   slots:0-5460 (5461 slots) master
   1 additional replica(s)
S: 6edd2c6d3afadabdf420e55935b2a90a0778e308 192.168.1.103:6379
   slots: (0 slots) slave
   replicates 44e23b95d2b906b1dd7fe15ffb9feb83e31b3b65
S: 03cf24cdd2cd02ab79facb52bd240bb837870a1b 192.168.1.104:6379
   slots: (0 slots) slave
   replicates 3cf06b1e503387bdb5899fb164de1dc84afdde72
M: d9e4848c0f20fca41b374b27b53ab48815e86785 192.168.1.101:6379
   slots:5461-10922 (5462 slots) master
   1 additional replica(s)
M: 44e23b95d2b906b1dd7fe15ffb9feb83e31b3b65 192.168.1.102:6379
   slots:10923-16383 (5461 slots) master
   1 additional replica(s)
S: 371da1894d2a764e3675f419df18b29fbd2b6f74 192.168.1.105:6379
   slots: (0 slots) slave
   replicates d9e4848c0f20fca41b374b27b53ab48815e86785
[OK] All nodes agree about slots configuration.
>>> Check for open slots...
>>> Check slots coverage...
[OK] All 16384 slots covered.
[root@redis01 src]#
3.3.7 登录redis集群
[root@redis01 bin]# ./redis-cli -h 192.168.1.100
192.168.1.100:6379> cluster info      ##查看集群信息
cluster_state:ok
cluster_slots_assigned:16384
cluster_slots_ok:16384
cluster_slots_pfail:0
cluster_slots_fail:0
cluster_known_nodes:6
cluster_size:3
cluster_current_epoch:6
cluster_my_epoch:1
cluster_stats_messages_ping_sent:242
cluster_stats_messages_pong_sent:259
cluster_stats_messages_sent:501
cluster_stats_messages_ping_received:254
cluster_stats_messages_pong_received:242
cluster_stats_messages_meet_received:5
cluster_stats_messages_received:501
3.3.8 查看集群节点信息
192.168.1.100:6379> cluster nodes      ##查看集群节点信息
90b995de25d43d4290558907e7cc0463dc923d91 192.168.1.100:6379@16379 myself,master - 0 1668698000000 1 connected 0-5460
70ebf6152b5fa905b325b6deefdf10c4ffce772a 192.168.1.102:6379@16379 master - 0 1668698004980 3 connected 10923-16383
714b154964a33558b6e2db10b3daeee6d2087a03 192.168.1.104:6379@16379 slave 90b995de25d43d4290558907e7cc0463dc923d91 0 1668698001000 1 connected
825b87385d21bbcd0852e5ceaab5df00cc47690b 192.168.1.103:6379@16379 slave 70ebf6152b5fa905b325b6deefdf10c4ffce772a 0 1668698001928 3 connected
e18cc1c07e1d2cdc75c2b688fb2654e131ea3ba6 192.168.1.101:6379@16379 master - 0 1668698003963 2 connected 5461-10922
fa821a4cbf938d44e78bc368e58b9d0a91348a45 192.168.1.105:6379@16379 slave e18cc1c07e1d2cdc75c2b688fb2654e131ea3ba6 0 1668697999000 2 connected
192.168.1.100:6379>
3.3.9 集群状态检查
[root@redis01 bin]# redis-cli --cluster check 192.168.1.100:6379   #集群状态检查
192.168.1.100:6379 (90b995de...) -> 1 keys | 5461 slots | 1 slaves.
192.168.1.102:6379 (70ebf615...) -> 1 keys | 5461 slots | 1 slaves.
192.168.1.101:6379 (e18cc1c0...) -> 1 keys | 5462 slots | 1 slaves.
[OK] 3 keys in 3 masters.
0.00 keys per slot on average.
>>> Performing Cluster Check (using node 192.168.1.100:6379)
M: 90b995de25d43d4290558907e7cc0463dc923d91 192.168.1.100:6379
   slots:[0-5460] (5461 slots) master
   1 additional replica(s)
M: 70ebf6152b5fa905b325b6deefdf10c4ffce772a 192.168.1.102:6379
   slots:[10923-16383] (5461 slots) master
   1 additional replica(s)
S: 714b154964a33558b6e2db10b3daeee6d2087a03 192.168.1.104:6379
   slots: (0 slots) slave
   replicates 90b995de25d43d4290558907e7cc0463dc923d91
S: 825b87385d21bbcd0852e5ceaab5df00cc47690b 192.168.1.103:6379
   slots: (0 slots) slave
   replicates 70ebf6152b5fa905b325b6deefdf10c4ffce772a
M: e18cc1c07e1d2cdc75c2b688fb2654e131ea3ba6 192.168.1.101:6379
   slots:[5461-10922] (5462 slots) master
   1 additional replica(s)
S: fa821a4cbf938d44e78bc368e58b9d0a91348a45 192.168.1.105:6379
   slots: (0 slots) slave
   replicates e18cc1c07e1d2cdc75c2b688fb2654e131ea3ba6
[OK] All nodes agree about slots configuration.
>>> Check for open slots...
>>> Check slots coverage...
[OK] All 16384 slots covered.
[root@redis01 bin]#
3.3.10 插入键值测试
192.168.1.100:6379> set name zhangsan
(error) MOVED 5798 192.168.1.101:6379
192.168.1.100:6379> exit
[root@redis01 bin]# ./redis-cli -c -h 192.168.1.100  ##发现报错了,这是因为当前我们的环境是集群的环境,需要在登录的时候加上“-c”选项
192.168.1.100:6379> keys *
(empty array)
192.168.1.100:6379> set name zhangsan
-> Redirected to slot [5798] located at 192.168.1.101:6379   #再次测试发现正常了,可以看到这个"name=zhangsan"的键值被分配到了192.168.1.101这台机器了。
OK
192.168.1.101:6379> keys *
1) "name"
192.168.1.101:6379> get name
"zhangsan"
192.168.1.101:6379>
测试在redis02中设置一个键值,在其他的节点中查看
[root@redis02 bin]# ./redis-cli -c -h 192.168.1.101   ##登录redis集群
192.168.1.101:6379> set age 20
-> Redirected to slot [741] located at 192.168.1.100:6379
OK
192.168.1.100:6379> set addr hubei
-> Redirected to slot [12790] located at 192.168.1.102:6379
OK
192.168.1.102:6379>
在redis01中查看
[root@redis01 bin]# ./redis-cli -c -h 192.168.1.100
192.168.1.100:6379> keys *
1) "age"
192.168.1.100:6379> get age      #查看键值
"20"
192.168.1.100:6379>
3.3.11 新增节点
[root@redis01 ~]# mkdir /usr/local/redis-6370
[root@redis01 ~]# cp /usr/local/src/redis-4.0.9/redis.conf /usr/local/redis-6370/
[root@redis01 ~]# vim /usr/local/redis-6370/redis.conf

bind 192.168.1.100

protected-mode no

port 6380


daemonize yes

supervised no

pidfile /var/run/redis_6380.pid

loglevel notice

logfile "/usr/local/redis-6370/redis-6380.log"

dir /usr/local/redis-6380

cluster-enabled yes

cluster-config-file nodes-6380.conf

cluster-node-timeout 15000
3.3.12 启动redis_6380
[root@redis01 redis]# /usr/local/redis/bin/redis-server /opt/redis/redis.conf
[root@redis01 redis]# ps -ef |grep redis
root      42610      1  0 23:08 ?        00:00:03 /usr/local/redis/bin/redis-server 192.168.1.100:6379 [cluster]
root      44001      1  0 23:36 ?        00:00:00 /usr/local/redis/bin/redis-server 192.168.1.100:6380 [cluster]
3.3.13 将新节点加入集群
[root@redis01 bin]# redis-cli --cluster add-node 192.168.1.100:6380 192.168.1.100:6379
>>> Adding node 192.168.1.100:6380 to cluster 192.168.1.100:6379
>>> Performing Cluster Check (using node 192.168.1.100:6379)
M: 90b995de25d43d4290558907e7cc0463dc923d91 192.168.1.100:6379
   slots:[0-5460] (5461 slots) master
   1 additional replica(s)
M: 70ebf6152b5fa905b325b6deefdf10c4ffce772a 192.168.1.102:6379
   slots:[10923-16383] (5461 slots) master
   1 additional replica(s)
S: 714b154964a33558b6e2db10b3daeee6d2087a03 192.168.1.104:6379
   slots: (0 slots) slave
   replicates 90b995de25d43d4290558907e7cc0463dc923d91
S: 825b87385d21bbcd0852e5ceaab5df00cc47690b 192.168.1.103:6379
   slots: (0 slots) slave
   replicates 70ebf6152b5fa905b325b6deefdf10c4ffce772a
M: e18cc1c07e1d2cdc75c2b688fb2654e131ea3ba6 192.168.1.101:6379
   slots:[5461-10922] (5462 slots) master
   1 additional replica(s)
S: fa821a4cbf938d44e78bc368e58b9d0a91348a45 192.168.1.105:6379
   slots: (0 slots) slave
   replicates e18cc1c07e1d2cdc75c2b688fb2654e131ea3ba6
[OK] All nodes agree about slots configuration.
>>> Check for open slots...
>>> Check slots coverage...
[OK] All 16384 slots covered.
>>> Send CLUSTER MEET to node 192.168.1.100:6380 to make it join the cluster.
[OK] New node added correctly.
[root@redis01 bin]#


#查看集群信息
[root@redis01 bin]# redis-cli --cluster check 192.168.1.100:6379
192.168.1.100:6379 (90b995de...) -> 1 keys | 5461 slots | 1 slaves.
192.168.1.102:6379 (70ebf615...) -> 1 keys | 5461 slots | 1 slaves.
192.168.1.100:6380 (7286c342...) -> 0 keys | 0 slots | 0 slaves.
192.168.1.101:6379 (e18cc1c0...) -> 1 keys | 5462 slots | 1 slaves.
[OK] 3 keys in 4 masters.
0.00 keys per slot on average.
>>> Performing Cluster Check (using node 192.168.1.100:6379)
M: 90b995de25d43d4290558907e7cc0463dc923d91 192.168.1.100:6379
   slots:[0-5460] (5461 slots) master
   1 additional replica(s)
M: 70ebf6152b5fa905b325b6deefdf10c4ffce772a 192.168.1.102:6379
   slots:[10923-16383] (5461 slots) master
   1 additional replica(s)
S: 714b154964a33558b6e2db10b3daeee6d2087a03 192.168.1.104:6379
   slots: (0 slots) slave
   replicates 90b995de25d43d4290558907e7cc0463dc923d91
M: 7286c3425c555286a65897b25e228870eff42a09 192.168.1.100:6380
   slots: (0 slots) master
S: 825b87385d21bbcd0852e5ceaab5df00cc47690b 192.168.1.103:6379
   slots: (0 slots) slave
   replicates 70ebf6152b5fa905b325b6deefdf10c4ffce772a
M: e18cc1c07e1d2cdc75c2b688fb2654e131ea3ba6 192.168.1.101:6379
   slots:[5461-10922] (5462 slots) master
   1 additional replica(s)
S: fa821a4cbf938d44e78bc368e58b9d0a91348a45 192.168.1.105:6379
   slots: (0 slots) slave
   replicates e18cc1c07e1d2cdc75c2b688fb2654e131ea3ba6
[OK] All nodes agree about slots configuration.
>>> Check for open slots...
>>> Check slots coverage...
[OK] All 16384 slots covered.
[root@redis01 bin]#
3.3.14 重新分配槽位
[root@redis01 bin]# ./redis-cli --cluster reshard 192.168.1.100:6379
How many slots do you want to move (from 1 to 16384)? 4096      ##4台机器平均分配slot
What is the receiving node ID? 7286c3425c555286a65897b25e228870eff42a09  ##新加入机器的ID

随后输入all,表示从每个现有master中都取出一定的slot进行迁移。(done的话是从指定的节点中拿出一部分slot来迁移)
然后再yes,表示执行reshard操作。

Do you want to proceed with the proposed reshard plan (yes/no)? yes   ##按y
3.3.15 查看新分配的slot
[root@redis01 bin]# redis-cli --cluster check 192.168.1.100:6379
192.168.1.100:6379 (90b995de...) -> 0 keys | 4096 slots | 1 slaves.
192.168.1.102:6379 (70ebf615...) -> 1 keys | 4096 slots | 1 slaves.
192.168.1.100:6380 (7286c342...) -> 2 keys | 4096 slots | 0 slaves.    ##可以看到已经有slot
192.168.1.101:6379 (e18cc1c0...) -> 0 keys | 4096 slots | 1 slaves.
[OK] 3 keys in 4 masters.
0.00 keys per slot on average.
>>> Performing Cluster Check (using node 192.168.1.100:6379)
M: 90b995de25d43d4290558907e7cc0463dc923d91 192.168.1.100:6379
   slots:[1365-5460] (4096 slots) master
   1 additional replica(s)
M: 70ebf6152b5fa905b325b6deefdf10c4ffce772a 192.168.1.102:6379
   slots:[12288-16383] (4096 slots) master
   1 additional replica(s)
S: 714b154964a33558b6e2db10b3daeee6d2087a03 192.168.1.104:6379
   slots: (0 slots) slave
   replicates 90b995de25d43d4290558907e7cc0463dc923d91
M: 7286c3425c555286a65897b25e228870eff42a09 192.168.1.100:6380
   slots:[0-1364],[5461-6826],[10923-12287] (4096 slots) master
S: 825b87385d21bbcd0852e5ceaab5df00cc47690b 192.168.1.103:6379
   slots: (0 slots) slave
   replicates 70ebf6152b5fa905b325b6deefdf10c4ffce772a
M: e18cc1c07e1d2cdc75c2b688fb2654e131ea3ba6 192.168.1.101:6379
   slots:[6827-10922] (4096 slots) master
   1 additional replica(s)
S: fa821a4cbf938d44e78bc368e58b9d0a91348a45 192.168.1.105:6379
   slots: (0 slots) slave
   replicates e18cc1c07e1d2cdc75c2b688fb2654e131ea3ba6
[OK] All nodes agree about slots configuration.
>>> Check for open slots...
>>> Check slots coverage...
[OK] All 16384 slots covered.
[root@redis01 bin]#
3.3.16 给新的master添加新的slave节点
[root@redis02 redis]# /usr/local/redis/bin/redis-server /opt/redis/redis.conf
[root@redis02 redis]# ps -ef |grep redis
root      14896      1  0 14:40 ?        00:00:08 /usr/local/redis/bin/redis-server 192.168.1.101:6379 [cluster]
root      15343      1  0 15:44 ?        00:00:00 /usr/local/redis/bin/redis-server 192.168.1.101:6380 [cluster]
root      15348  14848  0 15:44 pts/1    00:00:00 grep --color=auto redis
[root@redis02 redis]#

##添加新的slave
[root@redis01 bin]# ./redis-cli --cluster add-node 192.168.1.101:6380 192.168.1.100:6380 --cluster-slave  7286c3425c555286a65897b25e228870eff42a09
>>> Adding node 192.168.1.101:6380 to cluster 192.168.1.100:6380
>>> Performing Cluster Check (using node 192.168.1.100:6380)
M: 7286c3425c555286a65897b25e228870eff42a09 192.168.1.100:6380
   slots:[0-1364],[5461-6826],[10923-12287] (4096 slots) master
M: e18cc1c07e1d2cdc75c2b688fb2654e131ea3ba6 192.168.1.101:6379
   slots:[6827-10922] (4096 slots) master
   1 additional replica(s)
S: 825b87385d21bbcd0852e5ceaab5df00cc47690b 192.168.1.103:6379
   slots: (0 slots) slave
   replicates 70ebf6152b5fa905b325b6deefdf10c4ffce772a
M: 90b995de25d43d4290558907e7cc0463dc923d91 192.168.1.100:6379
   slots:[1365-5460] (4096 slots) master
   1 additional replica(s)
M: 70ebf6152b5fa905b325b6deefdf10c4ffce772a 192.168.1.102:6379
   slots:[12288-16383] (4096 slots) master
   1 additional replica(s)
S: fa821a4cbf938d44e78bc368e58b9d0a91348a45 192.168.1.105:6379
   slots: (0 slots) slave
   replicates e18cc1c07e1d2cdc75c2b688fb2654e131ea3ba6
S: 714b154964a33558b6e2db10b3daeee6d2087a03 192.168.1.104:6379
   slots: (0 slots) slave
   replicates 90b995de25d43d4290558907e7cc0463dc923d91
[OK] All nodes agree about slots configuration.
>>> Check for open slots...
>>> Check slots coverage...
[OK] All 16384 slots covered.
Automatically selected master 192.168.1.100:6380
>>> Send CLUSTER MEET to node 192.168.1.101:6380 to make it join the cluster.
Waiting for the cluster to join

>>> Configure node as replica of 192.168.1.100:6380.
[OK] New node added correctly

说明:
  redis-cli --cluster add-node 新的slave_ip:slave_port 新的master_ip:master:port --cluster-slave --clsuter-master-id 新的master的ID


##查看集群信息
[root@redis01 bin]# redis-cli --cluster check 192.168.1.100:6379
192.168.1.100:6379 (90b995de...) -> 0 keys | 4096 slots | 1 slaves.
192.168.1.102:6379 (70ebf615...) -> 1 keys | 4096 slots | 1 slaves.
192.168.1.100:6380 (7286c342...) -> 2 keys | 4096 slots | 1 slaves.
192.168.1.101:6379 (e18cc1c0...) -> 0 keys | 4096 slots | 1 slaves.
[OK] 3 keys in 4 masters.
0.00 keys per slot on average.
>>> Performing Cluster Check (using node 192.168.1.100:6379)
M: 90b995de25d43d4290558907e7cc0463dc923d91 192.168.1.100:6379
   slots:[1365-5460] (4096 slots) master
   1 additional replica(s)
M: 70ebf6152b5fa905b325b6deefdf10c4ffce772a 192.168.1.102:6379
   slots:[12288-16383] (4096 slots) master
   1 additional replica(s)
M: 7286c3425c555286a65897b25e228870eff42a09 192.168.1.100:6380
   slots:[0-1364],[5461-6826],[10923-12287] (4096 slots) master
   1 additional replica(s)
S: fa821a4cbf938d44e78bc368e58b9d0a91348a45 192.168.1.105:6379
   slots: (0 slots) slave
   replicates e18cc1c07e1d2cdc75c2b688fb2654e131ea3ba6
S: f1098ec1360f12ffa380bee17dc913ad138f55f0 192.168.1.101:6380   ##可以看到已经添加进来
   slots: (0 slots) slave
   replicates 7286c3425c555286a65897b25e228870eff42a09
S: 714b154964a33558b6e2db10b3daeee6d2087a03 192.168.1.104:6379
   slots: (0 slots) slave
   replicates 90b995de25d43d4290558907e7cc0463dc923d91
M: e18cc1c07e1d2cdc75c2b688fb2654e131ea3ba6 192.168.1.101:6379
   slots:[6827-10922] (4096 slots) master
   1 additional replica(s)
S: 825b87385d21bbcd0852e5ceaab5df00cc47690b 192.168.1.103:6379
   slots: (0 slots) slave
   replicates 70ebf6152b5fa905b325b6deefdf10c4ffce772a
[OK] All nodes agree about slots configuration.
>>> Check for open slots...
>>> Check slots coverage...
[OK] All 16384 slots covered.
[root@redis01 bin]#
3.3.17 缩容(三主三从)
3.3.17.1 获取新的slave的node_id
f1098ec1360f12ffa380bee17dc913ad138f55f0
3.3.17.2 将新的slave删除
[root@redis01 bin]# ./redis-cli --cluster del-node 192.168.1.101:6380 f1098ec1360f12ffa380bee17dc913ad138f55f0
>>> Removing node f1098ec1360f12ffa380bee17dc913ad138f55f0 from cluster 192.168.1.101:6380
>>> Sending CLUSTER FORGET messages to the cluster...
>>> Sending CLUSTER RESET SOFT to the deleted node.
[root@redis01 bin]#
3.3.17.3 查看新的集群节点信息
[root@redis01 bin]# redis-cli --cluster check 192.168.1.100:6379
192.168.1.100:6379 (90b995de...) -> 0 keys | 4096 slots | 1 slaves.
192.168.1.102:6379 (70ebf615...) -> 1 keys | 4096 slots | 1 slaves.
192.168.1.100:6380 (7286c342...) -> 2 keys | 4096 slots | 0 slaves.
192.168.1.101:6379 (e18cc1c0...) -> 0 keys | 4096 slots | 1 slaves.
[OK] 3 keys in 4 masters.
0.00 keys per slot on average.
>>> Performing Cluster Check (using node 192.168.1.100:6379)
M: 90b995de25d43d4290558907e7cc0463dc923d91 192.168.1.100:6379
   slots:[1365-5460] (4096 slots) master
   1 additional replica(s)
M: 70ebf6152b5fa905b325b6deefdf10c4ffce772a 192.168.1.102:6379
   slots:[12288-16383] (4096 slots) master
   1 additional replica(s)
M: 7286c3425c555286a65897b25e228870eff42a09 192.168.1.100:6380
   slots:[0-1364],[5461-6826],[10923-12287] (4096 slots) master
S: fa821a4cbf938d44e78bc368e58b9d0a91348a45 192.168.1.105:6379
   slots: (0 slots) slave
   replicates e18cc1c07e1d2cdc75c2b688fb2654e131ea3ba6
S: 714b154964a33558b6e2db10b3daeee6d2087a03 192.168.1.104:6379
   slots: (0 slots) slave
   replicates 90b995de25d43d4290558907e7cc0463dc923d91
M: e18cc1c07e1d2cdc75c2b688fb2654e131ea3ba6 192.168.1.101:6379
   slots:[6827-10922] (4096 slots) master
   1 additional replica(s)
S: 825b87385d21bbcd0852e5ceaab5df00cc47690b 192.168.1.103:6379
   slots: (0 slots) slave
   replicates 70ebf6152b5fa905b325b6deefdf10c4ffce772a
[OK] All nodes agree about slots configuration.
>>> Check for open slots...
>>> Check slots coverage...
[OK] All 16384 slots covered.
[root@redis01 bin]#
3.3.17.4 重新分配槽位
[root@redis01 bin]# ./redis-cli --cluster reshard 192.168.1.100:6379
>>> Performing Cluster Check (using node 192.168.1.100:6379)
M: 90b995de25d43d4290558907e7cc0463dc923d91 192.168.1.100:6379
   slots:[1365-5460] (4096 slots) master
   1 additional replica(s)
M: 70ebf6152b5fa905b325b6deefdf10c4ffce772a 192.168.1.102:6379
   slots:[12288-16383] (4096 slots) master
   1 additional replica(s)
M: 7286c3425c555286a65897b25e228870eff42a09 192.168.1.100:6380
   slots:[0-1364],[5461-6826],[10923-12287] (4096 slots) master
S: fa821a4cbf938d44e78bc368e58b9d0a91348a45 192.168.1.105:6379
   slots: (0 slots) slave
   replicates e18cc1c07e1d2cdc75c2b688fb2654e131ea3ba6
S: 714b154964a33558b6e2db10b3daeee6d2087a03 192.168.1.104:6379
   slots: (0 slots) slave
   replicates 90b995de25d43d4290558907e7cc0463dc923d91
M: e18cc1c07e1d2cdc75c2b688fb2654e131ea3ba6 192.168.1.101:6379
   slots:[6827-10922] (4096 slots) master
   1 additional replica(s)
S: 825b87385d21bbcd0852e5ceaab5df00cc47690b 192.168.1.103:6379
   slots: (0 slots) slave
   replicates 70ebf6152b5fa905b325b6deefdf10c4ffce772a
[OK] All nodes agree about slots configuration.
>>> Check for open slots...
>>> Check slots coverage...
[OK] All 16384 slots covered.
How many slots do you want to move (from 1 to 16384)? 4096   ##指定移除的槽位数4096
What is the receiving node ID? 90b995de25d43d4290558907e7cc0463dc923d91  ##指定由哪个节点来接收槽位
Please enter all the source node IDs.
  Type 'all' to use all the nodes as source nodes for the hash slots.
  Type 'done' once you entered all the source nodes IDs.
Source node #1: 7286c3425c555286a65897b25e228870eff42a09   ##指定移除的槽位(新master)
Source node #2: done     ##执行
Do you want to proceed with the proposed reshard plan (yes/no)? yes
3.3.17.5 查看集群新的slot
[root@redis01 bin]# redis-cli --cluster check 192.168.1.100:6379
192.168.1.100:6379 (90b995de...) -> 2 keys | 8192 slots | 1 slaves.
192.168.1.102:6379 (70ebf615...) -> 1 keys | 4096 slots | 1 slaves.
192.168.1.100:6380 (7286c342...) -> 0 keys | 0 slots | 0 slaves.   ##新的master已经没有slot
192.168.1.101:6379 (e18cc1c0...) -> 0 keys | 4096 slots | 1 slaves.
[OK] 3 keys in 4 masters.
3.3.17.6 移除主节点
[root@redis01 bin]# ./redis-cli --cluster del-node 192.168.1.100:6380 7286c3425c555286a65897b25e228870eff42a09
>>> Removing node 7286c3425c555286a65897b25e228870eff42a09 from cluster 192.168.1.100:6380
>>> Sending CLUSTER FORGET messages to the cluster...
>>> Sending CLUSTER RESET SOFT to the deleted node.


##查看新的集群信息
[root@redis01 bin]# redis-cli --cluster check 192.168.1.100:6379
192.168.1.100:6379 (90b995de...) -> 2 keys | 8192 slots | 1 slaves.
192.168.1.102:6379 (70ebf615...) -> 1 keys | 4096 slots | 1 slaves.
192.168.1.101:6379 (e18cc1c0...) -> 0 keys | 4096 slots | 1 slaves.
[OK] 3 keys in 3 masters.
0.00 keys per slot on average.
>>> Performing Cluster Check (using node 192.168.1.100:6379)
M: 90b995de25d43d4290558907e7cc0463dc923d91 192.168.1.100:6379
   slots:[0-6826],[10923-12287] (8192 slots) master
   1 additional replica(s)
M: 70ebf6152b5fa905b325b6deefdf10c4ffce772a 192.168.1.102:6379
   slots:[12288-16383] (4096 slots) master
   1 additional replica(s)
S: fa821a4cbf938d44e78bc368e58b9d0a91348a45 192.168.1.105:6379
   slots: (0 slots) slave
   replicates e18cc1c07e1d2cdc75c2b688fb2654e131ea3ba6
S: 714b154964a33558b6e2db10b3daeee6d2087a03 192.168.1.104:6379
   slots: (0 slots) slave
   replicates 90b995de25d43d4290558907e7cc0463dc923d91
M: e18cc1c07e1d2cdc75c2b688fb2654e131ea3ba6 192.168.1.101:6379
   slots:[6827-10922] (4096 slots) master
   1 additional replica(s)
S: 825b87385d21bbcd0852e5ceaab5df00cc47690b 192.168.1.103:6379
   slots: (0 slots) slave
   replicates 70ebf6152b5fa905b325b6deefdf10c4ffce772a
[OK] All nodes agree about slots configuration.
>>> Check for open slots...
>>> Check slots coverage...
[OK] All 16384 slots covered.
[root@redis01 bin]#
3.3.18 保存配置
192.168.1.100:6379> cluster saveconfig   ##将节点配置信息保存到硬盘
OK
192.168.1.100:6379>
#查看配置信息
[root@redis01 redis]# cat nodes.conf
90b995de25d43d4290558907e7cc0463dc923d91 192.168.1.100:6379@16379 myself,master - 0 1668702926000 8 connected 0-6826 10923-12287
70ebf6152b5fa905b325b6deefdf10c4ffce772a 192.168.1.102:6379@16379 master - 0 1668702931085 3 connected 12288-16383
fa821a4cbf938d44e78bc368e58b9d0a91348a45 192.168.1.105:6379@16379 slave e18cc1c07e1d2cdc75c2b688fb2654e131ea3ba6 0 1668702929043 2 connected
714b154964a33558b6e2db10b3daeee6d2087a03 192.168.1.104:6379@16379 slave 90b995de25d43d4290558907e7cc0463dc923d91 0 1668702930065 8 connected
e18cc1c07e1d2cdc75c2b688fb2654e131ea3ba6 192.168.1.101:6379@16379 master - 0 1668702929000 2 connected 6827-10922
825b87385d21bbcd0852e5ceaab5df00cc47690b 192.168.1.103:6379@16379 slave 70ebf6152b5fa905b325b6deefdf10c4ffce772a 0 1668702932111 3 connected
vars currentEpoch 8 lastVoteEpoch 0
[root@redis01 redis]#
3.3.19 模拟redis01的6379宕机
3.3.19.1 关闭redis01的redis
192.168.1.100:6379> shutdown    ##关闭redis
not connected>
#查看集群信息
192.168.1.101:6379> cluster nodes
fa821a4cbf938d44e78bc368e58b9d0a91348a45 192.168.1.105:6379@16379 slave e18cc1c07e1d2cdc75c2b688fb2654e131ea3ba6 0 1668759186285 2 connected
714b154964a33558b6e2db10b3daeee6d2087a03 192.168.1.104:6379@16379 master - 0 1668759185262 9 connected 0-6826 10923-12287     ##已经是master
e18cc1c07e1d2cdc75c2b688fb2654e131ea3ba6 192.168.1.101:6379@16379 myself,master - 0 1668759177000 2 connected 6827-10922
90b995de25d43d4290558907e7cc0463dc923d91 192.168.1.100:6379@16379 master,fail - 1668758942050 1668758937959 8 disconnected
825b87385d21bbcd0852e5ceaab5df00cc47690b 192.168.1.103:6379@16379 slave 70ebf6152b5fa905b325b6deefdf10c4ffce772a 0 1668759187302 3 connected
70ebf6152b5fa905b325b6deefdf10c4ffce772a 192.168.1.102:6379@16379 master - 0 1668759184243 3 connected 12288-16383
192.168.1.101:6379>
3.3.19.2 查看数据
可以看到192.168.1.104已经提升为master了查看数据也是正常的
[root@redis05 bin]# ./redis-cli  -c -h 192.168.1.104
192.168.1.104:6379> keys *
1) "name"
2) "age"
192.168.1.104:6379>
3.3.20 集群维护之导入现有Redis数据至集群
官方提供了离线迁移数据到集群的工具,有些公司开发了离线迁移工具
- 官方工具:redis-cli --cluster import
- 第三方在线迁移工具:模拟slave 节点实现,比如: 唯品会 redis-migrate-tool ,豌豆荚 redis-port
实战案例:公司将redis cluster部署完成之后,需要将之前的数据导入至Redis cluster集群,但是由于Redis cluster使用的分片保存key的机制,因此使用传统的AOF文件或RDB快照无法满足需求,因此需要使用集群数据导入命令完成。
注意: 导入数据需要redis cluster不能与被导入的数据有重复的key名称,否则导入不成功或中断
redis-cli --cluster import <集群服务器IP:PORT> --cluster-from <外部Redis node-IP:PORT> --cluster-copy --cluster-replace

#只使用cluster-copy,则要导入集群中的key不能存在;如果cluster集群已存在要导入的key键,导入操作将失败
#如果集群中已有同样的key,如果需要替换,可以cluster-copy和cluster-replace联用,这样集群中的key就会被替换为外部数据
3.3.20.1 模拟Redis数据
向节点插入数据,模拟公司之前Redis服务器
[root@redis-master4 ~ ]# cat redis-test.sh
#!/bin/bash
NUM=10000
PASS=123456
for i in `seq $NUM`;do
	redis-cli -h 127.0.0.1 -a "$PASS"  --no-auth-warning  set key${i} value${i}
	echo "key${i} value${i} 写入完成"
done
echo "$NUM个key写入到Redis完成"

#执行脚本
[root@redis-master4 ~ ]# bash redis-test.sh
3.3.20.2 迁移数据
#取消需要导入的主机的密码(必须)
redis-cli -h 192.168.1.20 -p 6379 -a 123456 --no-auth-warning  CONFIG SET requirepass ""

#取消所有集群服务器的密码(必须)
redis-cli -h 192.168.1.100 -p 6379 -a 123456 --no-auth-warning  CONFIG SET requirepass ""
redis-cli -h 192.168.1.101 -p 6379 -a 123456 --no-auth-warning  CONFIG SET requirepass ""
redis-cli -h 192.168.1.102 -p 6379 -a 123456 --no-auth-warning  CONFIG SET requirepass ""
redis-cli -h 192.168.1.103 -p 6379 -a 123456 --no-auth-warning  CONFIG SET requirepass ""
redis-cli -h 192.168.1.104 -p 6379 -a 123456 --no-auth-warning  CONFIG SET requirepass ""
redis-cli -h 192.168.1.105 -p 6379 -a 123456 --no-auth-warning  CONFIG SET requirepass ""

#导入数据
[root@redis-master1 ~ ]# redis-cli --cluster import 192.168.1.100:6379 --cluster-from 192.168.1.20:6379 --cluster-copy --cluster-replace
3.3.20.3 报错解决
在移动slot槽位时,异常停止操作,会造成槽位损坏
#情况一
[root@centos8 ~ ]# redis-cli -h 192.168.1.100 -a 123456 --no-auth-warning --cluster reshard 192.168.1.100:6379 --cluster-slots 1144 --cluster-to 74bb914996e38e800f5931ee16ba0b9d195ea0cd--cluster-from 555bb6fcf6b50c57270639db83b58bb4f7779e7a --cluster-yes
[ERR] Nodes don't agree about configuration!
>>> Check for open slots...
>>> Check slots coverage...
[ERR] Not all 16384 slots are covered by nodes.

#情况二
[root@centos8 ~ ]# redis-cli -h 192.168.1.100 -a 123456 --no-auth-warning --cluster reshard 192.168.1.100:6379 --cluster-slots 221 --cluster-to 555bb6fcf6b50c57270639db83b58bb4f7779e7a --cluster-from 74bb914996e38e800f5931ee16ba0b9d195ea0cd  --cluster-yes
>>> Check for open slots...
[WARNING] Node 192.168.1.102:6379 has slots in importing state 11143.
[WARNING] Node 192.168.1.20:6379 has slots in migrating state 11143.
[WARNING] The following slots are open: 11143.
>>> Check slots coverage...
[ERR] Not all 16384 slots are covered by nodes.


#情况三
>>> Check for open slots...
[WARNING] Node 192.168.1.20:6379 has slots in migrating state 11254.
[WARNING] The following slots are open: 11254.
>>> Check slots coverage...
[OK] All 16384 slots covered.
*** Please fix your cluster problems before resharding

#解决:重新分配槽位slot
[root@redis-master1 ~ ]# redis-cli -h 192.168.1.100 -a 123456 --no-auth-warning --cluster fix 192.168.1.100:6379 --cluster-search-multiple-owners
[root@redis-master1 ~ ]# redis-cli -h 192.168.1.100 -a 123456 --no-auth-warning --cluster check 192.168.1.100:6379
........................
[OK] All nodes agree about slots configuration.
>>> Check for open slots...
>>> Check slots coverage...
[OK] All 16384 slots covered.
3.3.21 集群偏科
redis cluster 多个节点运行一段时间后,可能会出现倾斜现象,某个节点数据偏多,内存消耗更大,或者接受用户请求访问更多
发生倾斜的原因可能如下
- 节点和槽分配不均
- 不同槽对应键值数量差异较大
- 包含bigkey(value数值长度大的key),建议少用
- 内存相关配置不一致
- 热点数据不均衡 : 一致性不高时,可以使用本缓存和MQ
获取指定槽位中对应键key值的个数
[root@redis-master1 ~ ]# redis-cli -a 123456 cluster countkeysinslot 0
(integer) 2
[root@redis-master1 ~ ]# redis-cli -a 123456 cluster countkeysinslot 1
(integer) 0
[root@redis-master1 ~ ]# redis-cli -a 123456 cluster countkeysinslot 2
(integer) 0
[root@redis-master1 ~ ]# redis-cli -a 123456 cluster countkeysinslot 3
(integer) 1
获取bigkey,建议在slave节点执行
[root@redis-master1 ~ ]# redis-cli -a 123456 --bigkeys
Warning: Using a password with '-a' or '-u' option on the command line interface may not be safe.

# Scanning the entire keyspace to find biggest keys as well as
# average sizes per key type.  You can use -i 0.1 to sleep 0.1 sec
# per 100 SCAN commands (not usually needed).

[00.00%] Biggest string found so far 'key1725' with 9 bytes

-------- summary -------

Sampled 2970 keys in the keyspace!
Total key length in bytes is 20421 (avg len 6.88)

Biggest string found 'key1725' has 9 bytes

2970 strings with 26361 bytes (100.00% of keys, avg size 8.88)
0 lists with 0 items (00.00% of keys, avg size 0.00)
0 sets with 0 members (00.00% of keys, avg size 0.00)
0 hashs with 0 fields (00.00% of keys, avg size 0.00)
0 zsets with 0 members (00.00% of keys, avg size 0.00)
0 streams with 0 entries (00.00% of keys, avg size 0.00)
四、Redis数据库在企业的解决方案
基于LAMP架+Discuz+Redis的部署模式,可以缓解MySQL的部分的压力,但是如果访问量非常大,Redis缓存第一次没有缓存数据的话,会导致数据直接去访问MySQL数据库了,这种情况数据库的压力会非常大,这种现象叫做--缓存穿透,所以,后端可以使用分库分表或者读写分离的方式来实现流量的分担,从而减轻数据库的压力
4.1 基本环境要求
要求:将防火墙和selinux关闭
| IP地址 | 主机名 | 角色 |
|---|---|---|
| 192.168.1.101 | lamp | LAMP+discuz论坛 |
| 192.168.1.102 | redis | redis缓存服务器 |
注意:可以将数据库和apache分类,最好不是安装在同一台服务器上。
4.2 安装LAMP架构使用到的软件包
-rw-r--r--  1 root root  1071074 Oct 28 11:43 apr-1.6.2.tar.gz
-rw-r--r--  1 root root   565507 Oct 28 11:43 apr-util-1.6.0.tar.gz
-rw-r--r--  1 root root  9873874 Oct 28 11:44 httpd-2.4.51.tar.gz
-rw-r--r--  1 root root 51686763 Oct 28 20:21 mysql-5.7.19.tar.gz
-rw-r--r--  1 root root  2068775 Oct 28 11:51 pcre-8.41.tar.gz
-rw-r--r--  1 root root 19440059 Oct 28 20:45 php-7.1.10.tar.gz
4.3 安装http
1)安装之前请先安装make、gcc、openssl等编译工具和开发包
[root@lamp ~]# yum -y install make gcc gcc-c++ openssl openssl-devel expat-devel
2)编译安装依赖包apr-1.6.2.tar.gz
[root@lamp ~]# tar zxvf apr-1.6.2.tar.gz

[root@lamp ~]# cd apr-1.6.2

 [root@lamp apr-1.6.2]# ./configure --prefix=/usr/local/apr

[root@lamp apr-1.6.2]# make && make install
3)编译安装依赖包apr-util-1.5.4.tar.gz
[root@lamp ~]# tar zxvf apr-util-1.6.0.tar.gz

[root@lamp ~]# cd apr-util-1.6.0

[root@lamp apr-util-1.6.0]# ./configure --prefix=/usr/local/apr-util/ \
--with-apr=/usr/local/apr/bin/apr-1-config
[root@lamp apr-util-1.6.0]# make && make install
4)编译安装依赖包pcre-8.41.tar.gz
[root@lamp ~]# tar zxf pcre-8.41.tar.gz

[root@lamp ~]# cd pcre-8.41

[root@lamp pcre-8.41]# ./configure --prefix=/usr/local/pcre

[root@lamp pcre-8.41]# make –j 8 && make -j 8 install
5)编译安装Apache
[root@lamp ~]# tar zxvf httpd-2.4.51.tar.gz -C /usr/local/src/

[root@lamp ~]# cd /usr/local/src/httpd-2.4.51/

[root@lamp httpd-2.4.51]# ./configure --prefix=/usr/local/apache --enable-so --enable-rewrite --enable-ssl --with-apr=/usr/local/apr --with-apr-util=/usr/local/apr-util/ --with-pcre=/usr/local/pcre/

[root@lamp httpd-2.4.51]# make -j 8 && make -j 8 install
6)生成启动脚本
[root@lamp httpd-2.4.51]# cp /usr/local/apache/bin/apachectl /etc/init.d/
[root@lamp httpd-2.4.51]# chmod +x /etc/init.d/apachectl
vim /usr/lib/systemd/system/apache.service
[Unit]
Description=apache
After=network.target
[Service]
Type=forking
ExecStart=/etc/init.d/apachectl start
ExecReload=/etc/init.d/apachectl restart
ExecStop=/etc/init.d/apachectl stop
PrivateTmp=true
[Install]
WantedBy=multi-user.target
7)启动服务
[root@lamp httpd-2.4.51]# systemctl start apache
[root@lamp httpd-2.4.51]# systemctl enable apache
Created symlink from /etc/systemd/system/multi-user.target.wants/apache.service to /usr/lib/systemd/system/apache.service.
[root@lamp httpd-2.4.51]# ps -ef |grep httpd
root      38081      1  0 21:37 ?        00:00:00 /usr/local/apache/bin/httpd -k start
daemon    38082  38081  0 21:37 ?        00:00:00 /usr/local/apache/bin/httpd -k start
daemon    38083  38081  0 21:37 ?        00:00:00 /usr/local/apache/bin/httpd -k start
daemon    38084  38081  0 21:37 ?        00:00:00 /usr/local/apache/bin/httpd -k start
root      38167   1362  0 21:37 pts/0    00:00:00 grep --color=auto httpd
[root@lamp httpd-2.4.51]#
8)访问测试

4.4 安装mysql
1)安装依赖
[root@lamp ~]# yum install -y cmake make gcc gcc-c++ bison ncurses ncurses-devel
2)创建管理用户
[root@lamp ~]# groupadd mysql
[root@lamp ~]# useradd -M -s /sbin/nologin -r -g mysql mysql
3)解压mysql包
[root@lamp ~]# tar zxvf mysql-5.7.19.tar.gz -C /usr/local/src/
4)安装mysql
[root@lamp src]#cmake -DCMAKE_INSTALL_PREFIX=/var/lib/mysql \
-DMYSQL_DATADIR=/var/lib/mysql/data \
-DSYSCONFDIR=/etc \
-DWITH_MYISAM_STORAGE_ENGINE=1 \
-DWITH_INNOBASE_STORAGE_ENGINE=1 \
-DWITH_MEMORY_STORAGE_ENGINE=1 \
-DWITH_READLINE=1 \
-DMYSQL_UNIX_ADDR=/var/lib/mysql/mysql.sock \
-DMYSQL_TCP_PORT=3306 \
-DENABLED_LOCAL_INFILE=1 \
-DWITH_PARTITION_STORAGE_ENGINE=1 \
-DEXTRA_CHARSETS=all \
-DDEFAULT_CHARSET=utf8 \
-DDEFAULT_COLLATION=utf8_general_ci \
-DDOWNLOAD_BOOST=1 \
-DWITH_BOOST=/usr/local/src/mysql-5.7.19/boost/boost_1_59_0
[root@lamp mysql-5.7.19]# make -j 8 && make -j 8 install
5)修改文件权限
[root@lamp mysql-5.7.19]# chown -R mysql:mysql /var/lib/mysql
[root@lamp mysql-5.7.19]# mkdir /var/run/mysqld -p
[root@lamp mysql-5.7.19]# chown mysql:mysql /var/run/mysqld -R
6)生成my.cnf配置文件
[mysqld]

basedir=/var/lib/mysql

datadir=/var/lib/mysql/data

port=3306

socket=/var/lib/mysql/mysql.sock

symbolic-links=0

character-set-server=utf8

log-error=/var/log/mysqld.log

pid-file=/var/run/mysqld/mysqld.pid

[mysql]

socket=/var/lib/mysql/mysql.sock

[client]

socket=/var/lib/mysql/mysql.sock
7)添加环境变量
export MYSQL_HOME=/var/lib/mysql
export PATH=$PATH:$MYSQL_HOME/bin
使修改生效
source /etc/profile
8)生成配置脚本
[root@lamp ~]# cp /var/lib/mysql/support-files/mysql.server /etc/init.d/mysqld
[root@lamp ~]# chmod +x /etc/init.d/mysqld
9)初始化数据库
[root@lamp data]# touch /var/log/mysqld.log
[root@lamp data]# chown -R mysql.mysql /var/log/mysqld.log
[root@lamp data]# /var/lib/mysql/bin/mysqld --initialize-insecure --user=mysql --basedir=/var/lib/mysql --datadir=/var/lib/mysql/data --port=3306
[root@lamp data]# ls
auto.cnf  ib_buffer_pool  ibdata1  ib_logfile0  ib_logfile1  mysql  performance_schema  sys
[root@lamp data]#
10)启动mysql
[root@lamp data]# /etc/init.d/mysqld start
Starting MySQL. SUCCESS!
[root@lamp data]#
11)修改密码
[root@lamp data]# mysqladmin -u root password "123456"
mysqladmin: [Warning] Using a password on the command line interface can be insecure.
Warning: Since password will be sent to server in plain text, use ssl connection to ensure password safety.
[root@lamp data]# mysql -uroot -p
Enter password:
Welcome to the MySQL monitor.  Commands end with ; or \g.
Your MySQL connection id is 4
Server version: 5.7.19 Source distribution

Copyright (c) 2000, 2017, Oracle and/or its affiliates. All rights reserved.

Oracle is a registered trademark of Oracle Corporation and/or its
affiliates. Other names may be trademarks of their respective
owners.

Type 'help;' or '\h' for help. Type '\c' to clear the current input statement.

mysql>
4.5 安装php
1)安装依赖
[root@lamp ~]# yum -y install epel-release php-mcrypt libmcrypt libmcrypt-devel autoconf freetype gd libmcrypt libpng libpng-devel libjpeg libxml2 libxml2-devel zlib curl curl-devel re2c
2)解压php并检查环境安装
[root@lamp php-7.1.10]# ./configure --prefix=/usr/local/php/ --with-apxs2=/usr/local/apache/bin/apxs --enable-mbstring --with-curl --with-gd --enable-fpm --enable-mysqlnd  --with-pdo-mysql=mysqlnd --with-config-file-path=/usr/local/php/etc/ --with-mysqli=mysqlnd --with-mysql-sock=/var/lib/mysql/mysql.sock --without-pear
[root@lamp php-7.1.10]# make -j 8 && make -j 8 install
[root@lamp php-7.1.10]# cp php.ini-production /usr/local/php/etc/php.ini
[root@lamp php-7.1.10]# vim /usr/local/apache/conf/httpd.conf
#apache中添加如下代码:
Addtype application/x-httpd-php .php .phtml
[root@lamp php-7.1.10]# cd /usr/local/apache/htdocs/
[root@lamp htdocs]# vim index.php
<?php
        phpinfo();
?>
[root@lamp htdocs]# systemctl restart apache
[root@lamp htdocs]#
3)测试
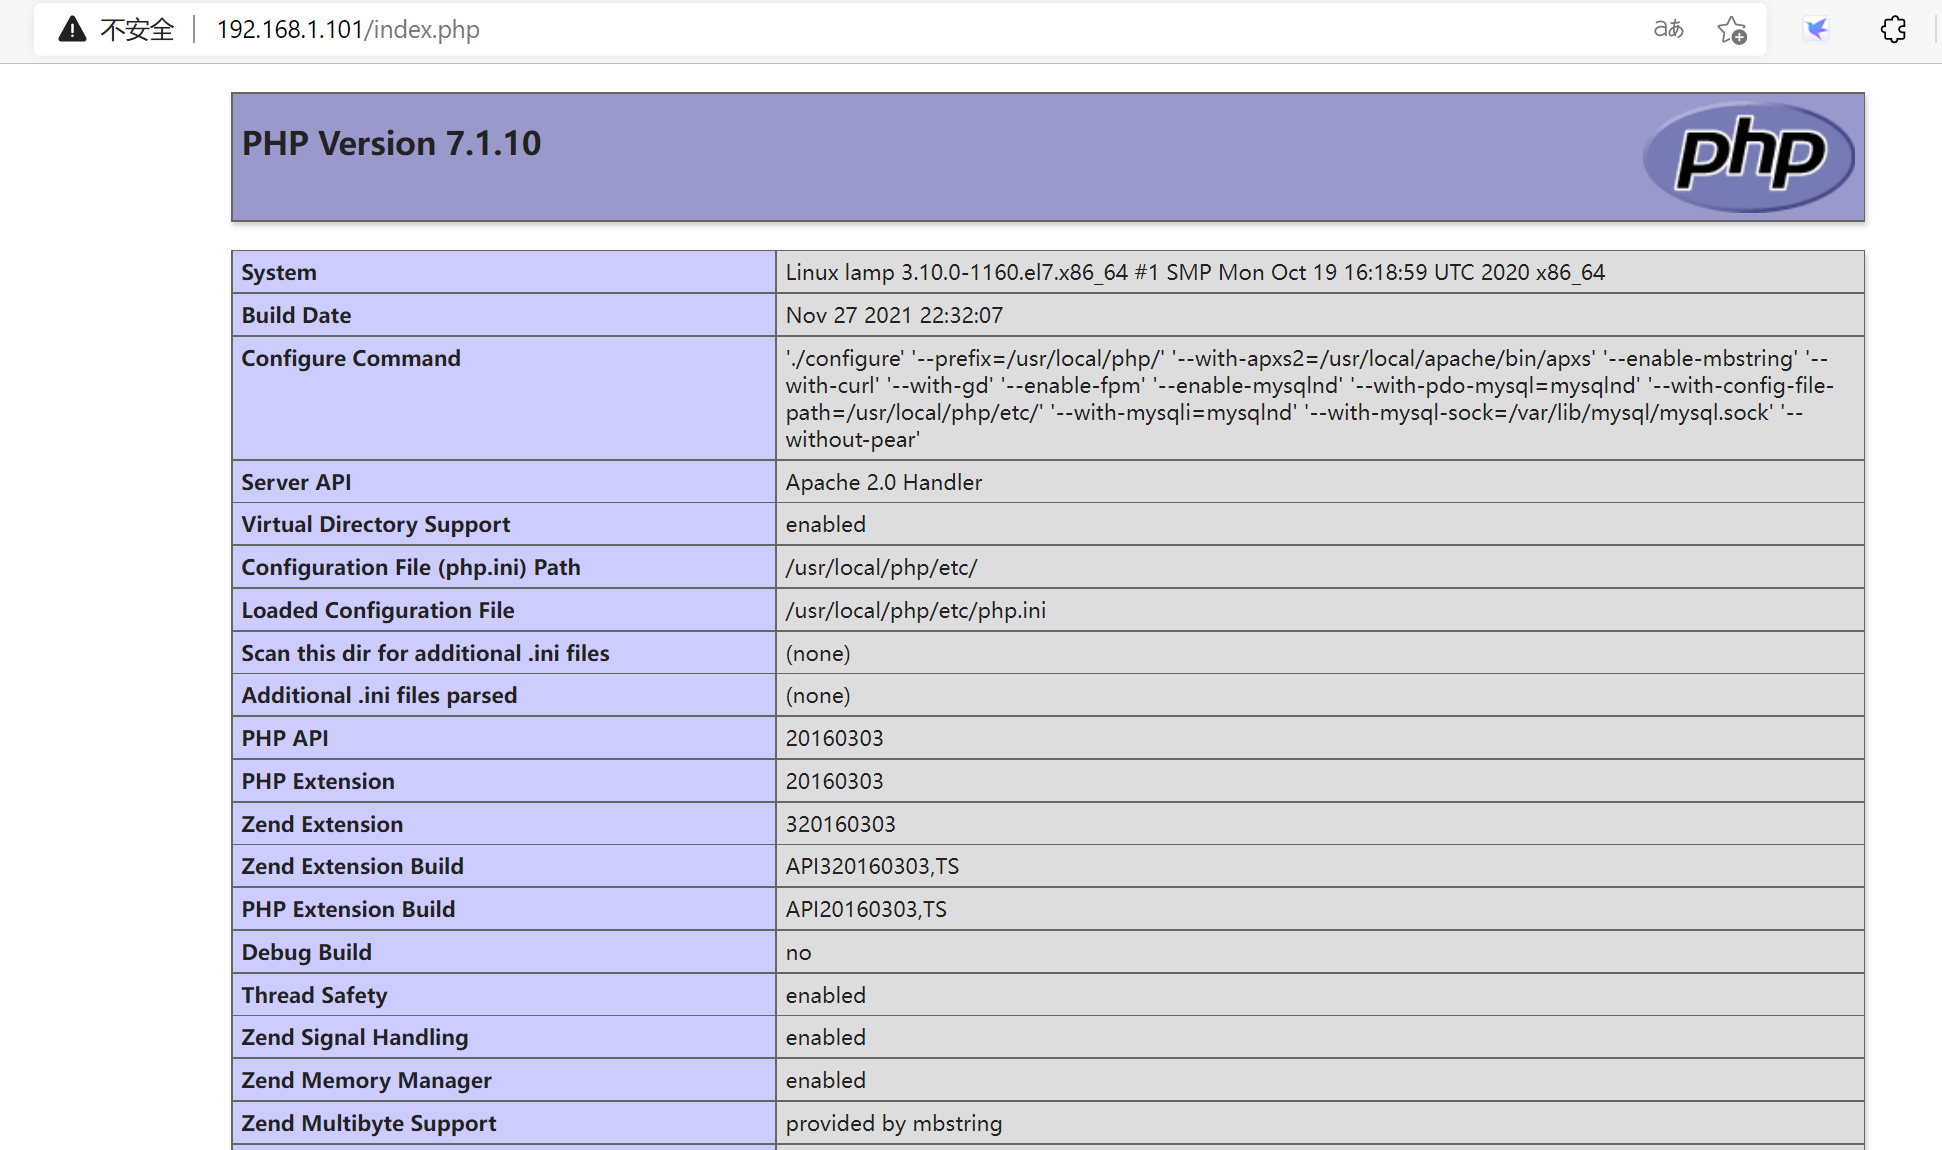
192.168.1.101/index.php
4.6 安装redis
1)安装依赖
[root@redis ~]# yum -y install gcc
2)安装redis
[root@redis ~]# tar zxvf redis-6.0.16.tar.gz -C /usr/local/src/
[root@redis redis-6.0.16]# make PREFIX=/usr/local/redis install
3)配置redis

4)启动redis
[root@server3 redis]# /usr/local/redis/bin/redis-server /usr/local/redis/redis.conf
[root@server3 redis]# netstat -antup |grep 6379
tcp        0      0 192.168.1.14:6379       0.0.0.0:*               LISTEN      6408/redis-server 1
[root@server3 redis]#
4.7 在LAMP服务器上部署discuz论坛
1)下载Discuz
https://www.discuz.net/thread-3847642-1-1.html
2)上传到apache,解压
[root@lamp htdocs]# unzip Discuz_X3.4_SC_UTF8_20211124.zip
3)给upload授权,需要写的权限
[root@lamp htdocs]# chmod 777 upload/* -R
4)访问discuz
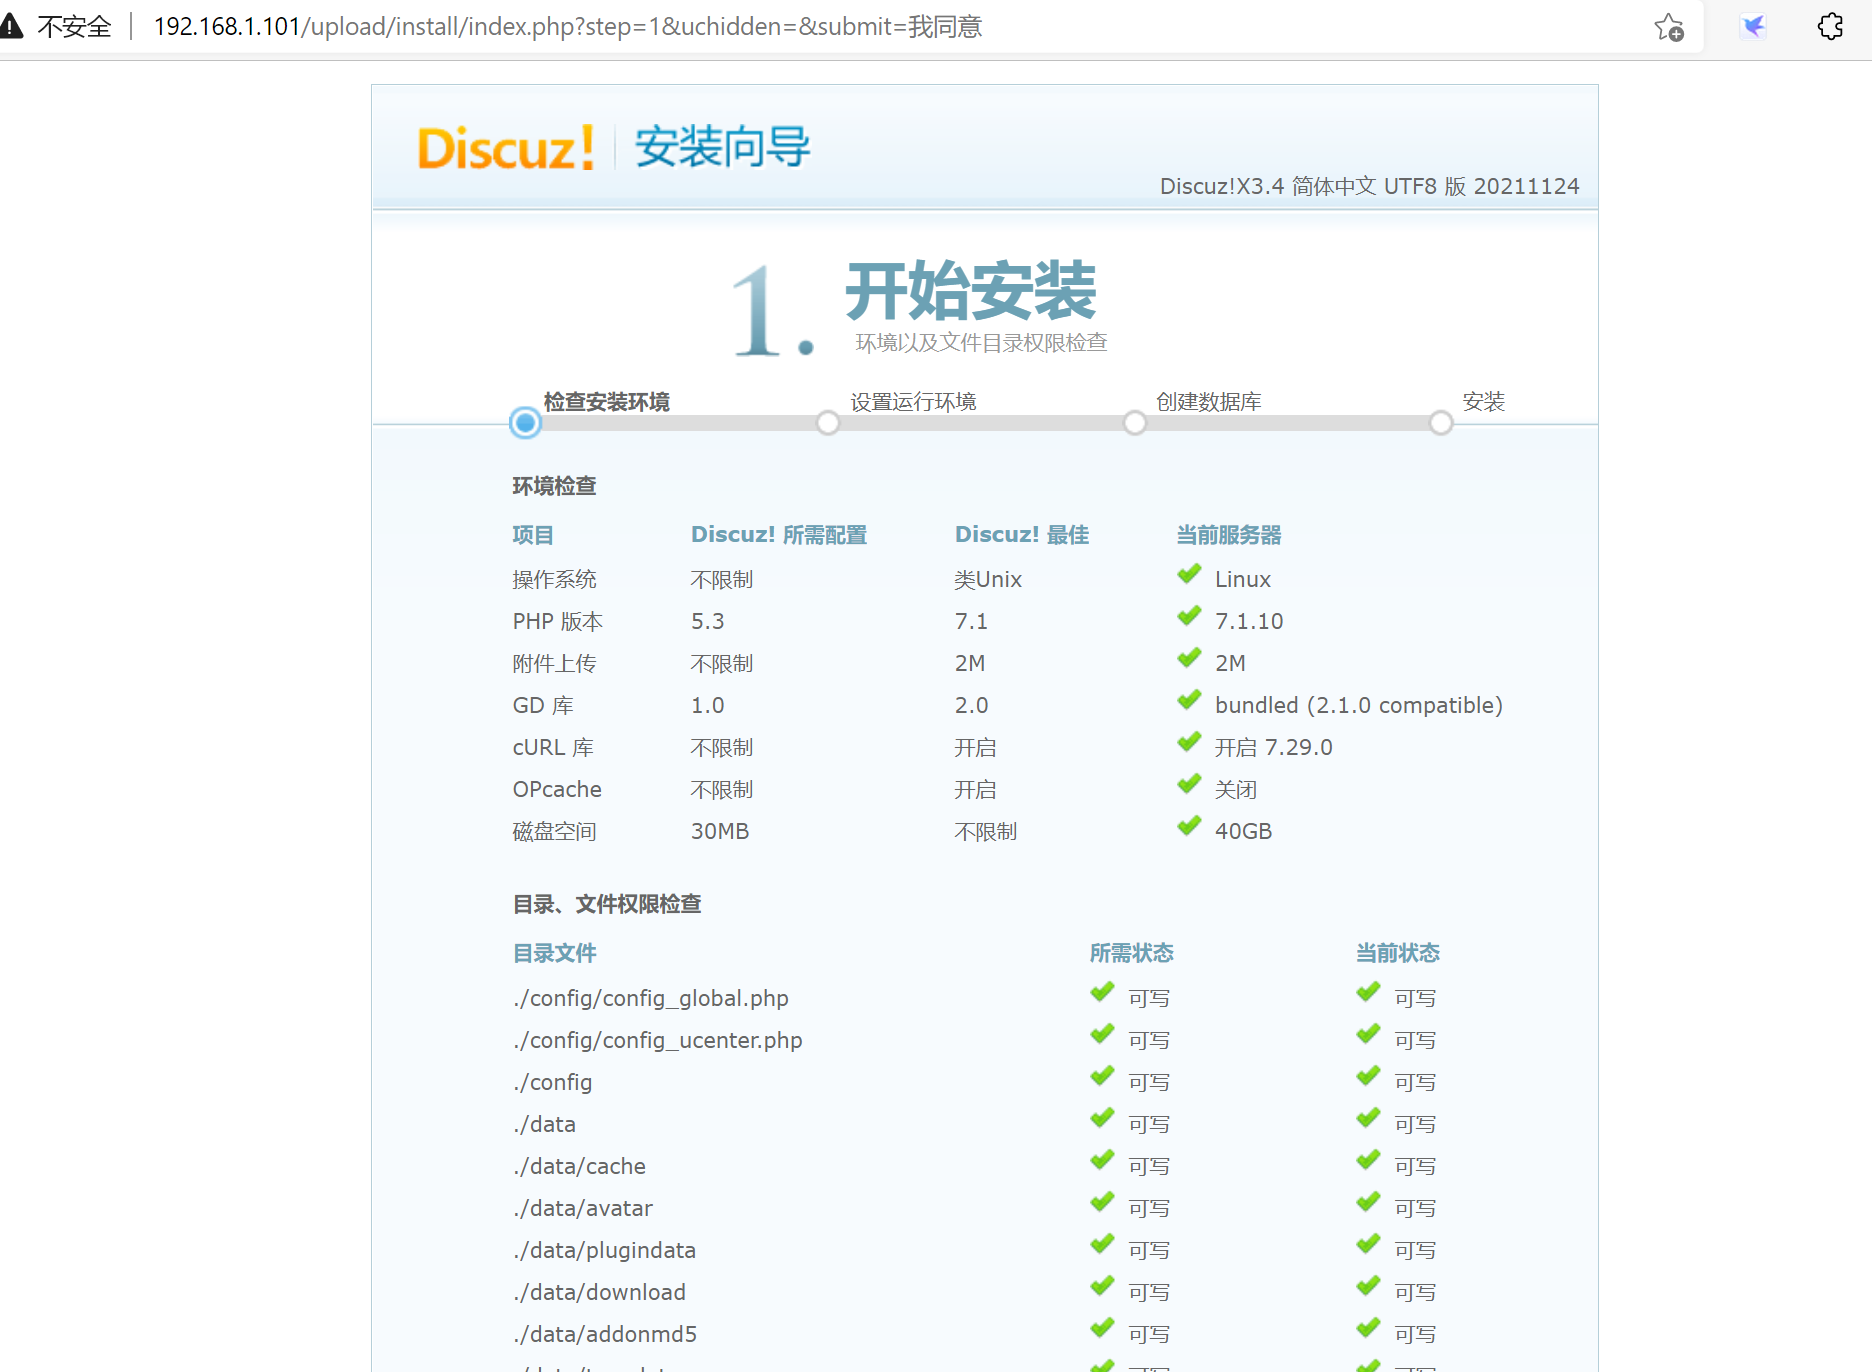
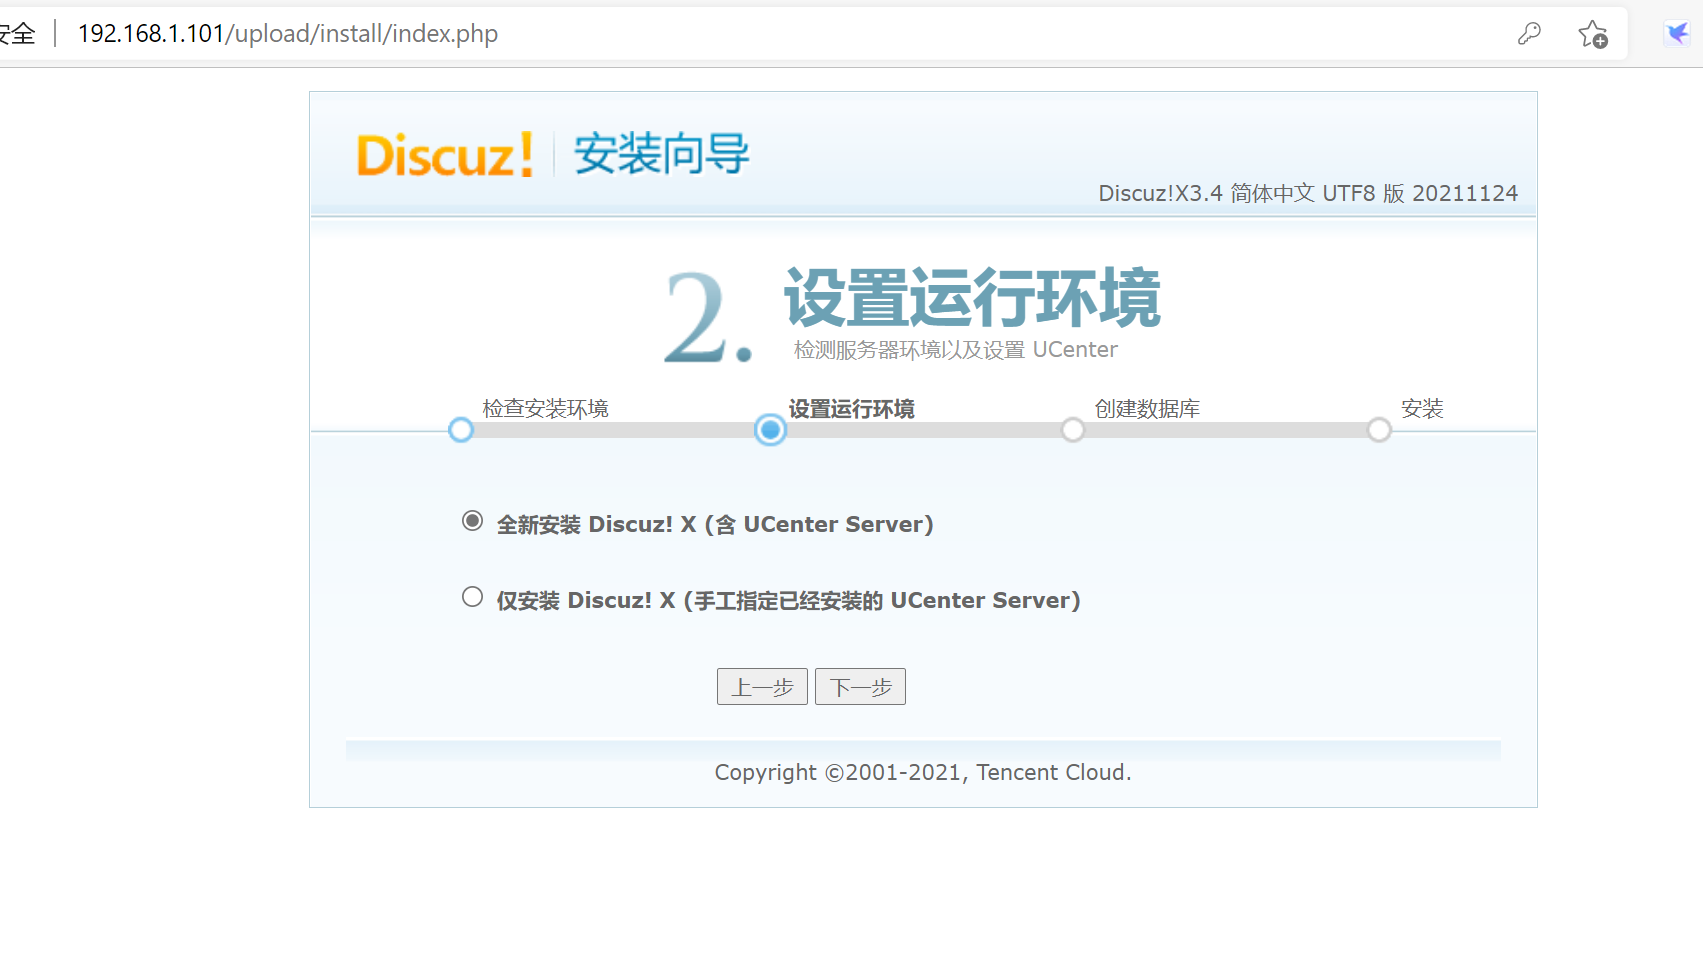
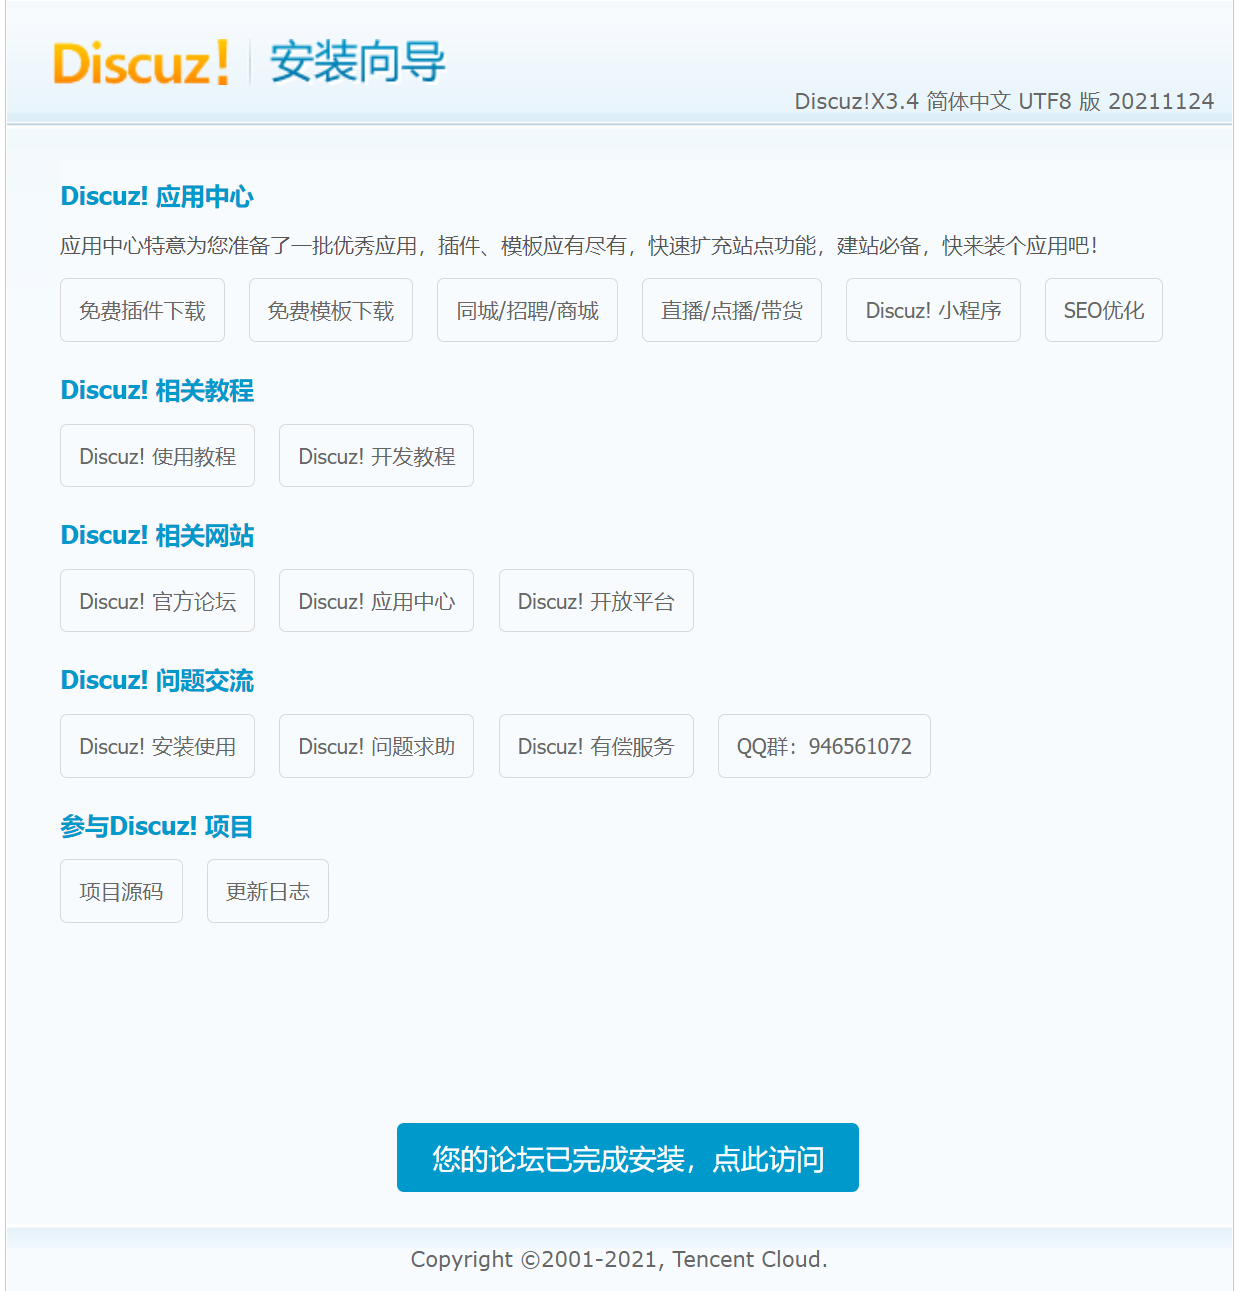
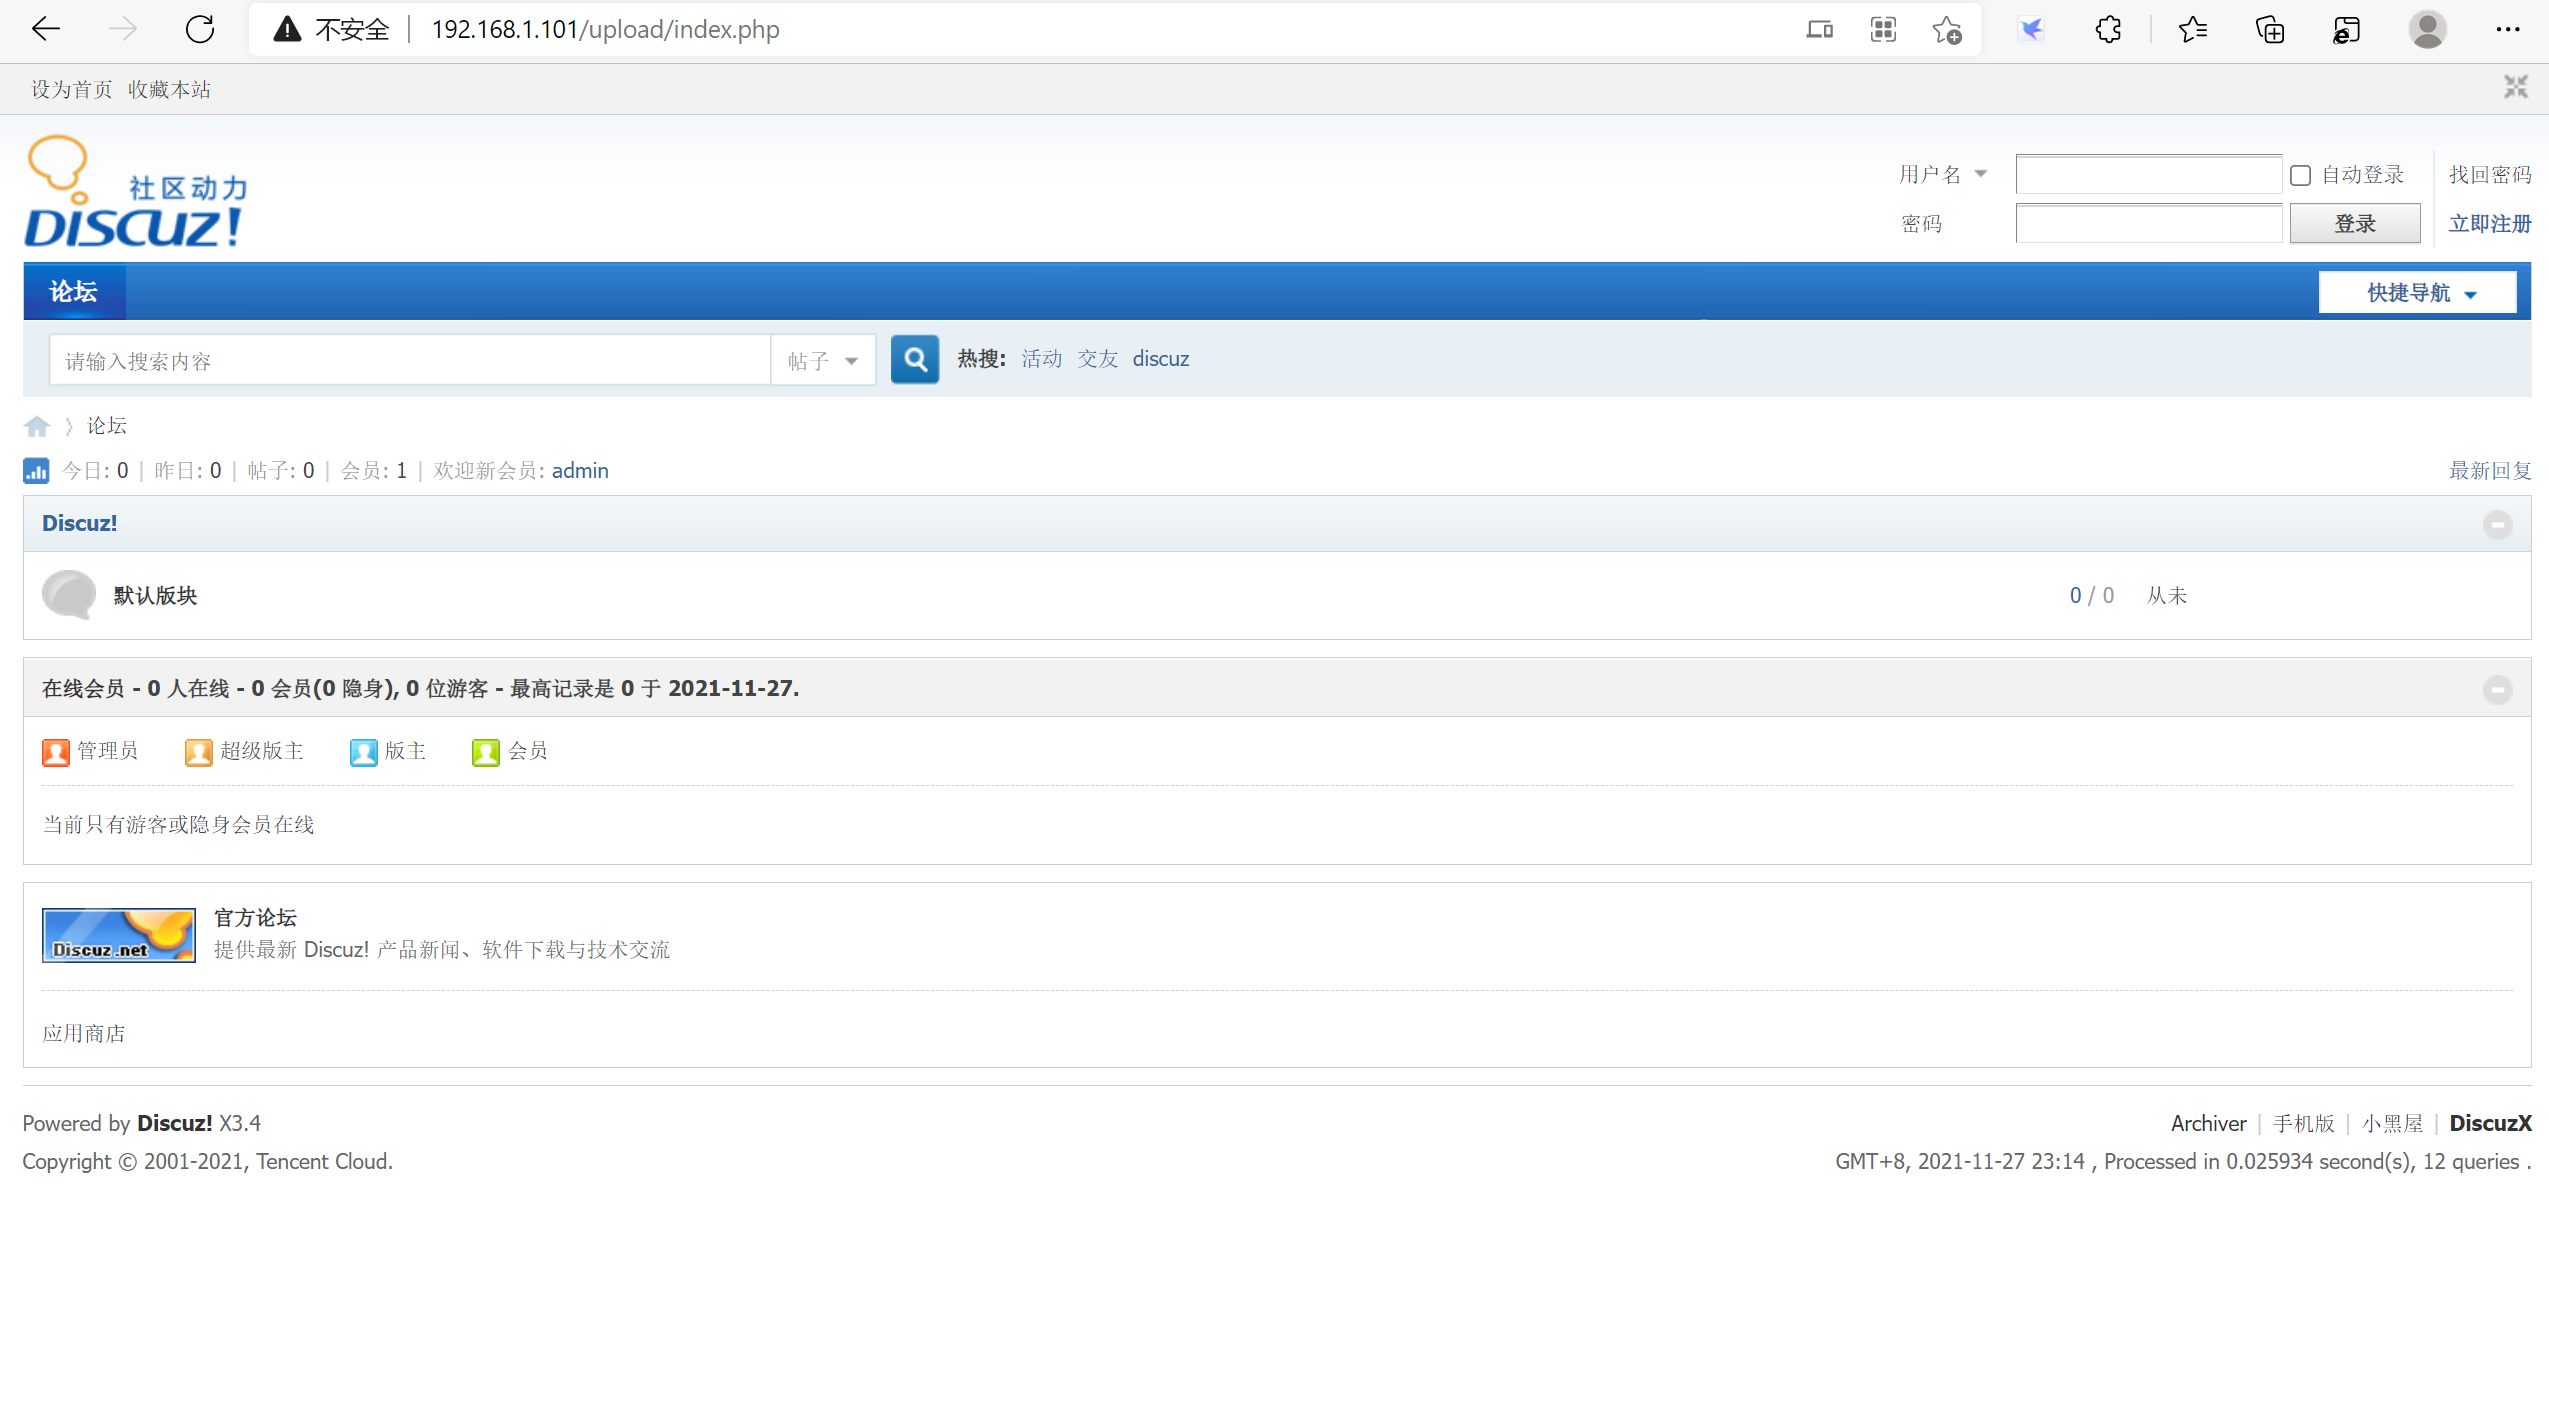
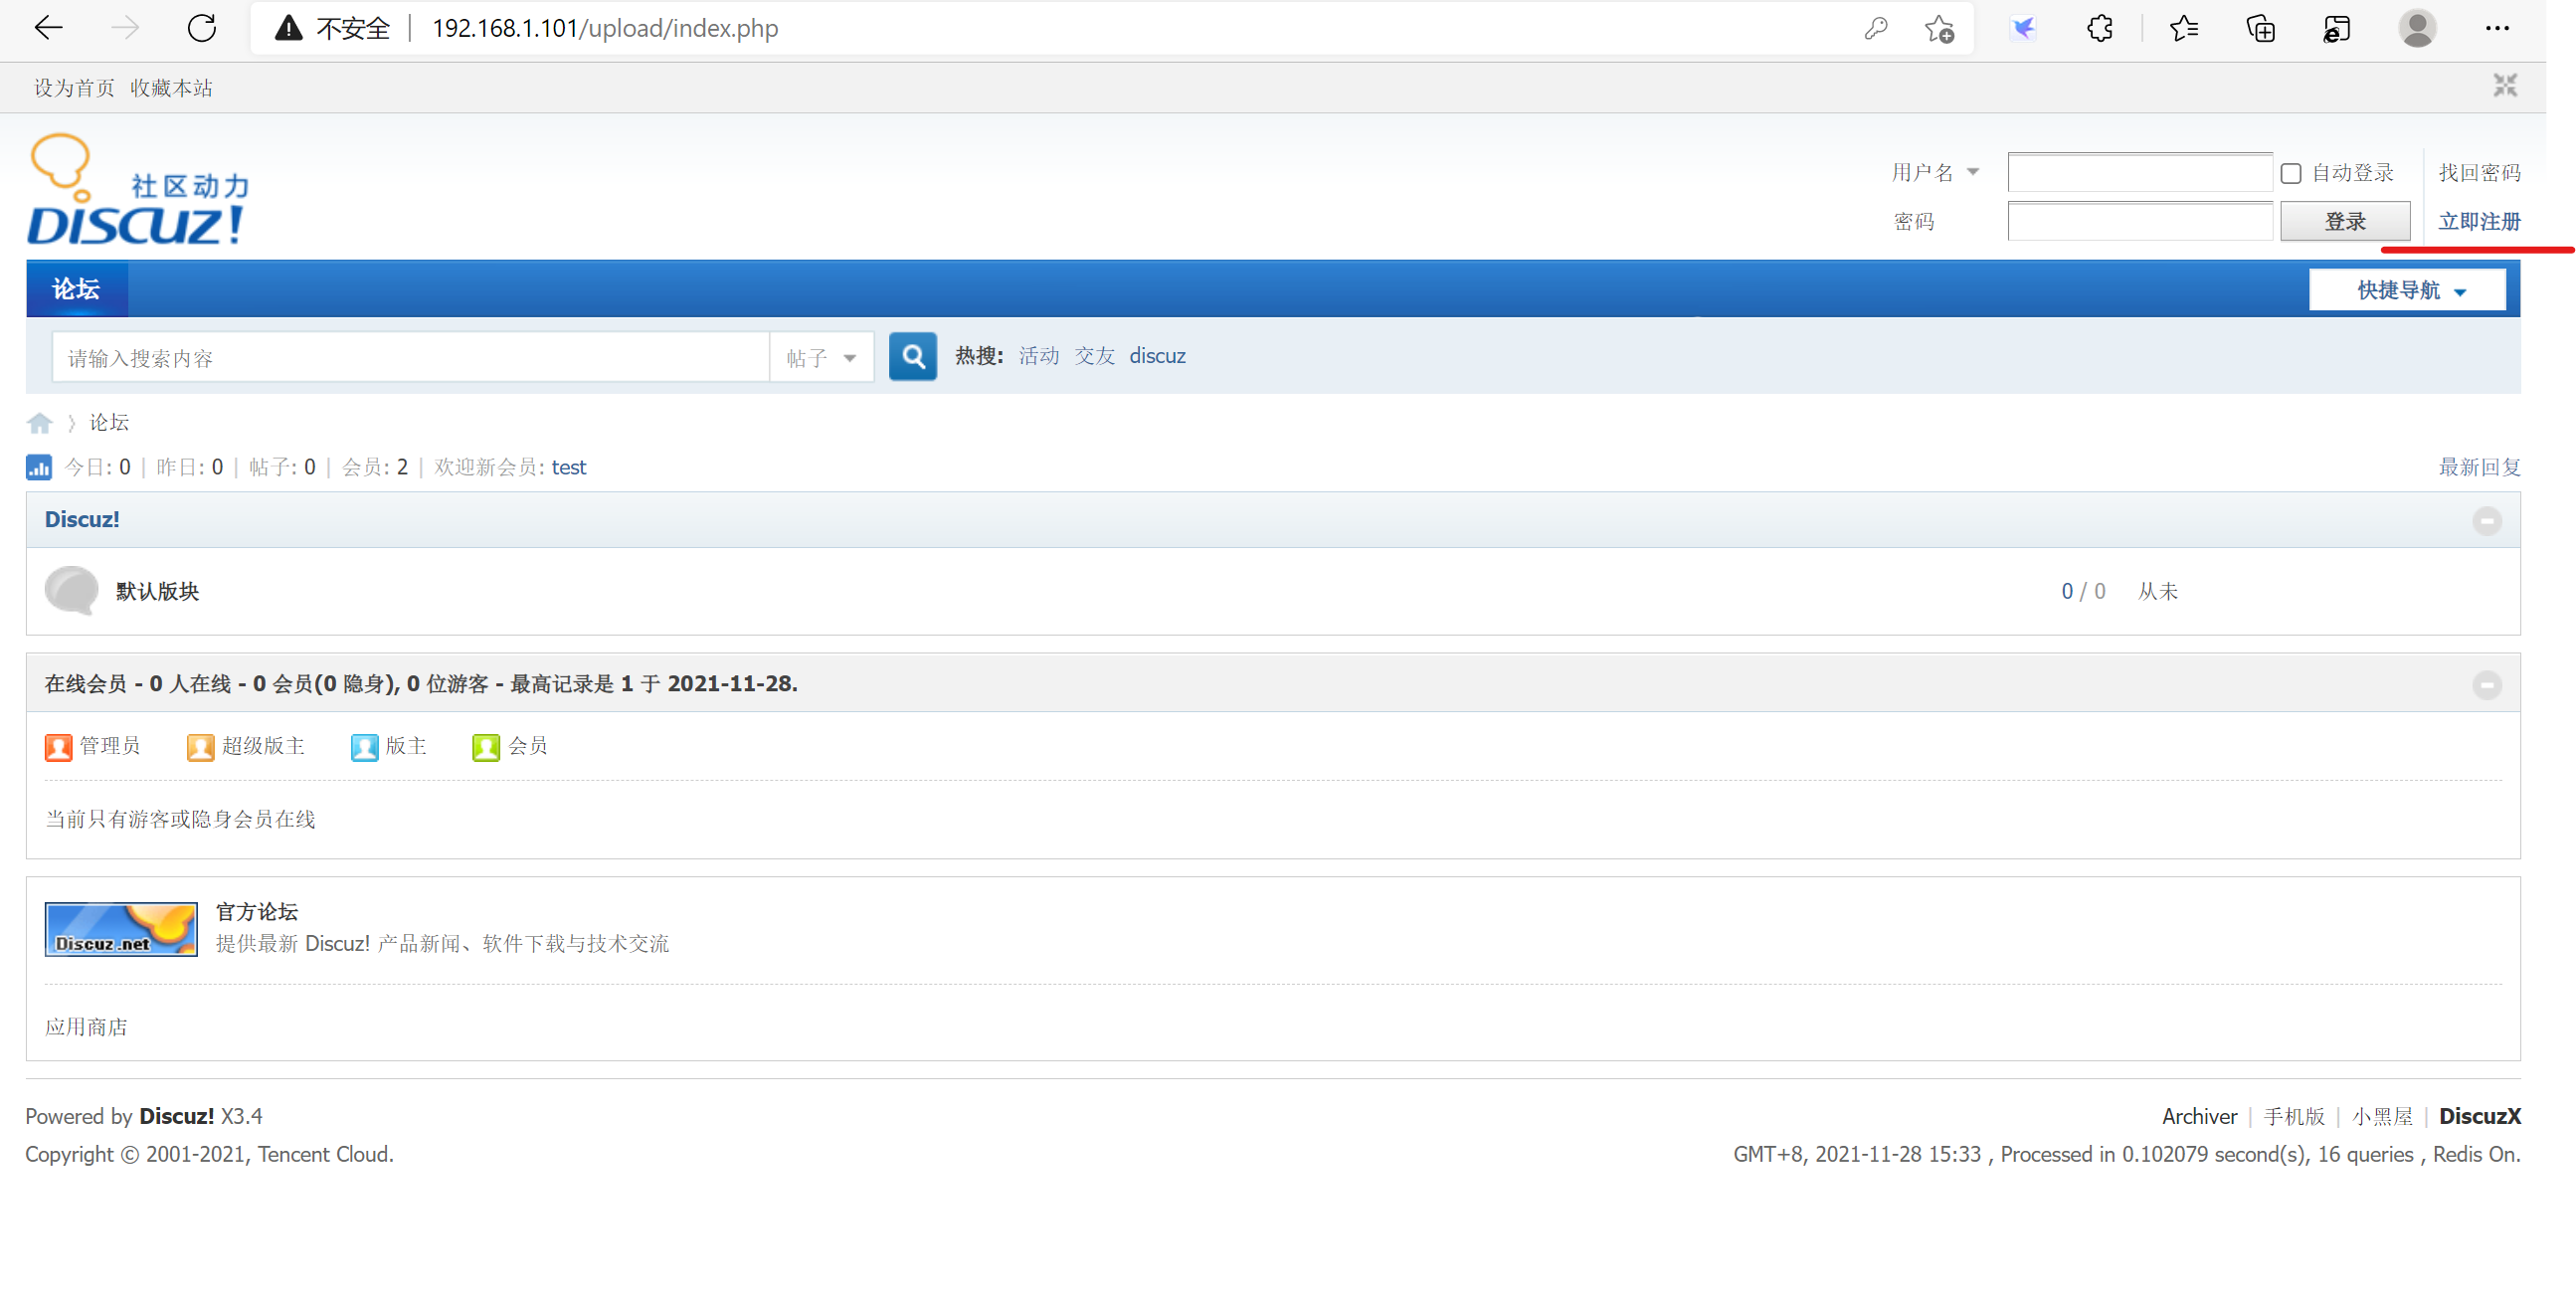
http://192.168.1.101/upload/install/index.php


4.8 安装php-redis
1)上传插件解压
[root@lamp ~]# tar zxvf phpredis-3.1.2.tar.gz -C /usr/local/src/
2)初始化php
[root@lamp ~]#yum -y install php-cli php-devel
[root@lamp phpredis-3.1.2]# phpize
Configuring for:
PHP Api Version:         20100412
Zend Module Api No:      20100525
Zend Extension Api No:   220100525
3)检查配置环境
[root@lamp phpredis-3.1.2]# ./configure --with-php-config=/usr/local/php/bin/php-config --enable-redis
4)编译安装
[root@lamp phpredis-3.1.2]# make -j 8 && make -j 8 install
Installing shared extensions:     /usr/local/php/lib/php/extensions/no-debug-zts-20160303/
[root@lamp phpredis-3.1.2]#
5)在php配置文件中添加redis模块
[root@lamp etc]# pwd
/usr/local/php/etc
新建php.ini文件,并在php.ini文件的末尾加入:
[redis]
extension_dir=/usr/local/php/lib/php/extensions/no-debug-non-zts-20160303
extension=redis.so
6)重启服务器,测试是否已经加载到了redis模块

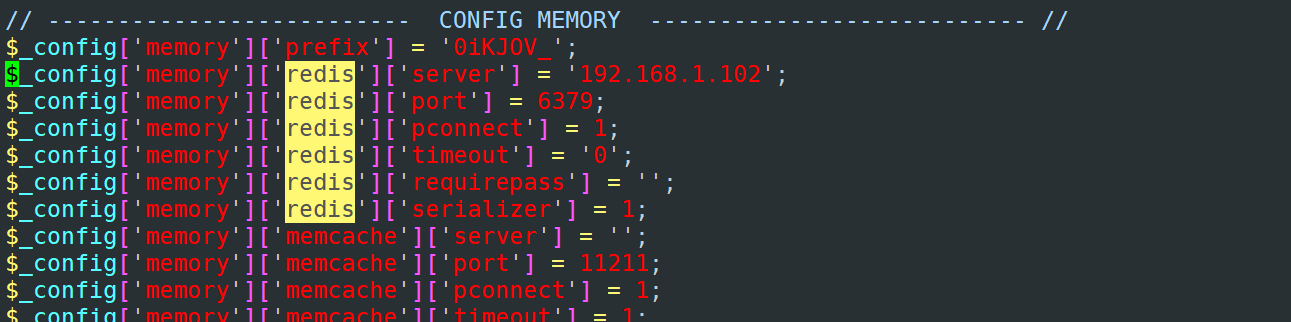
4.9 在discuz中,将redis地址修改成192.168.1.102
[root@lamp config]# vim /usr/local/apache/htdocs/upload/config/config_global.php
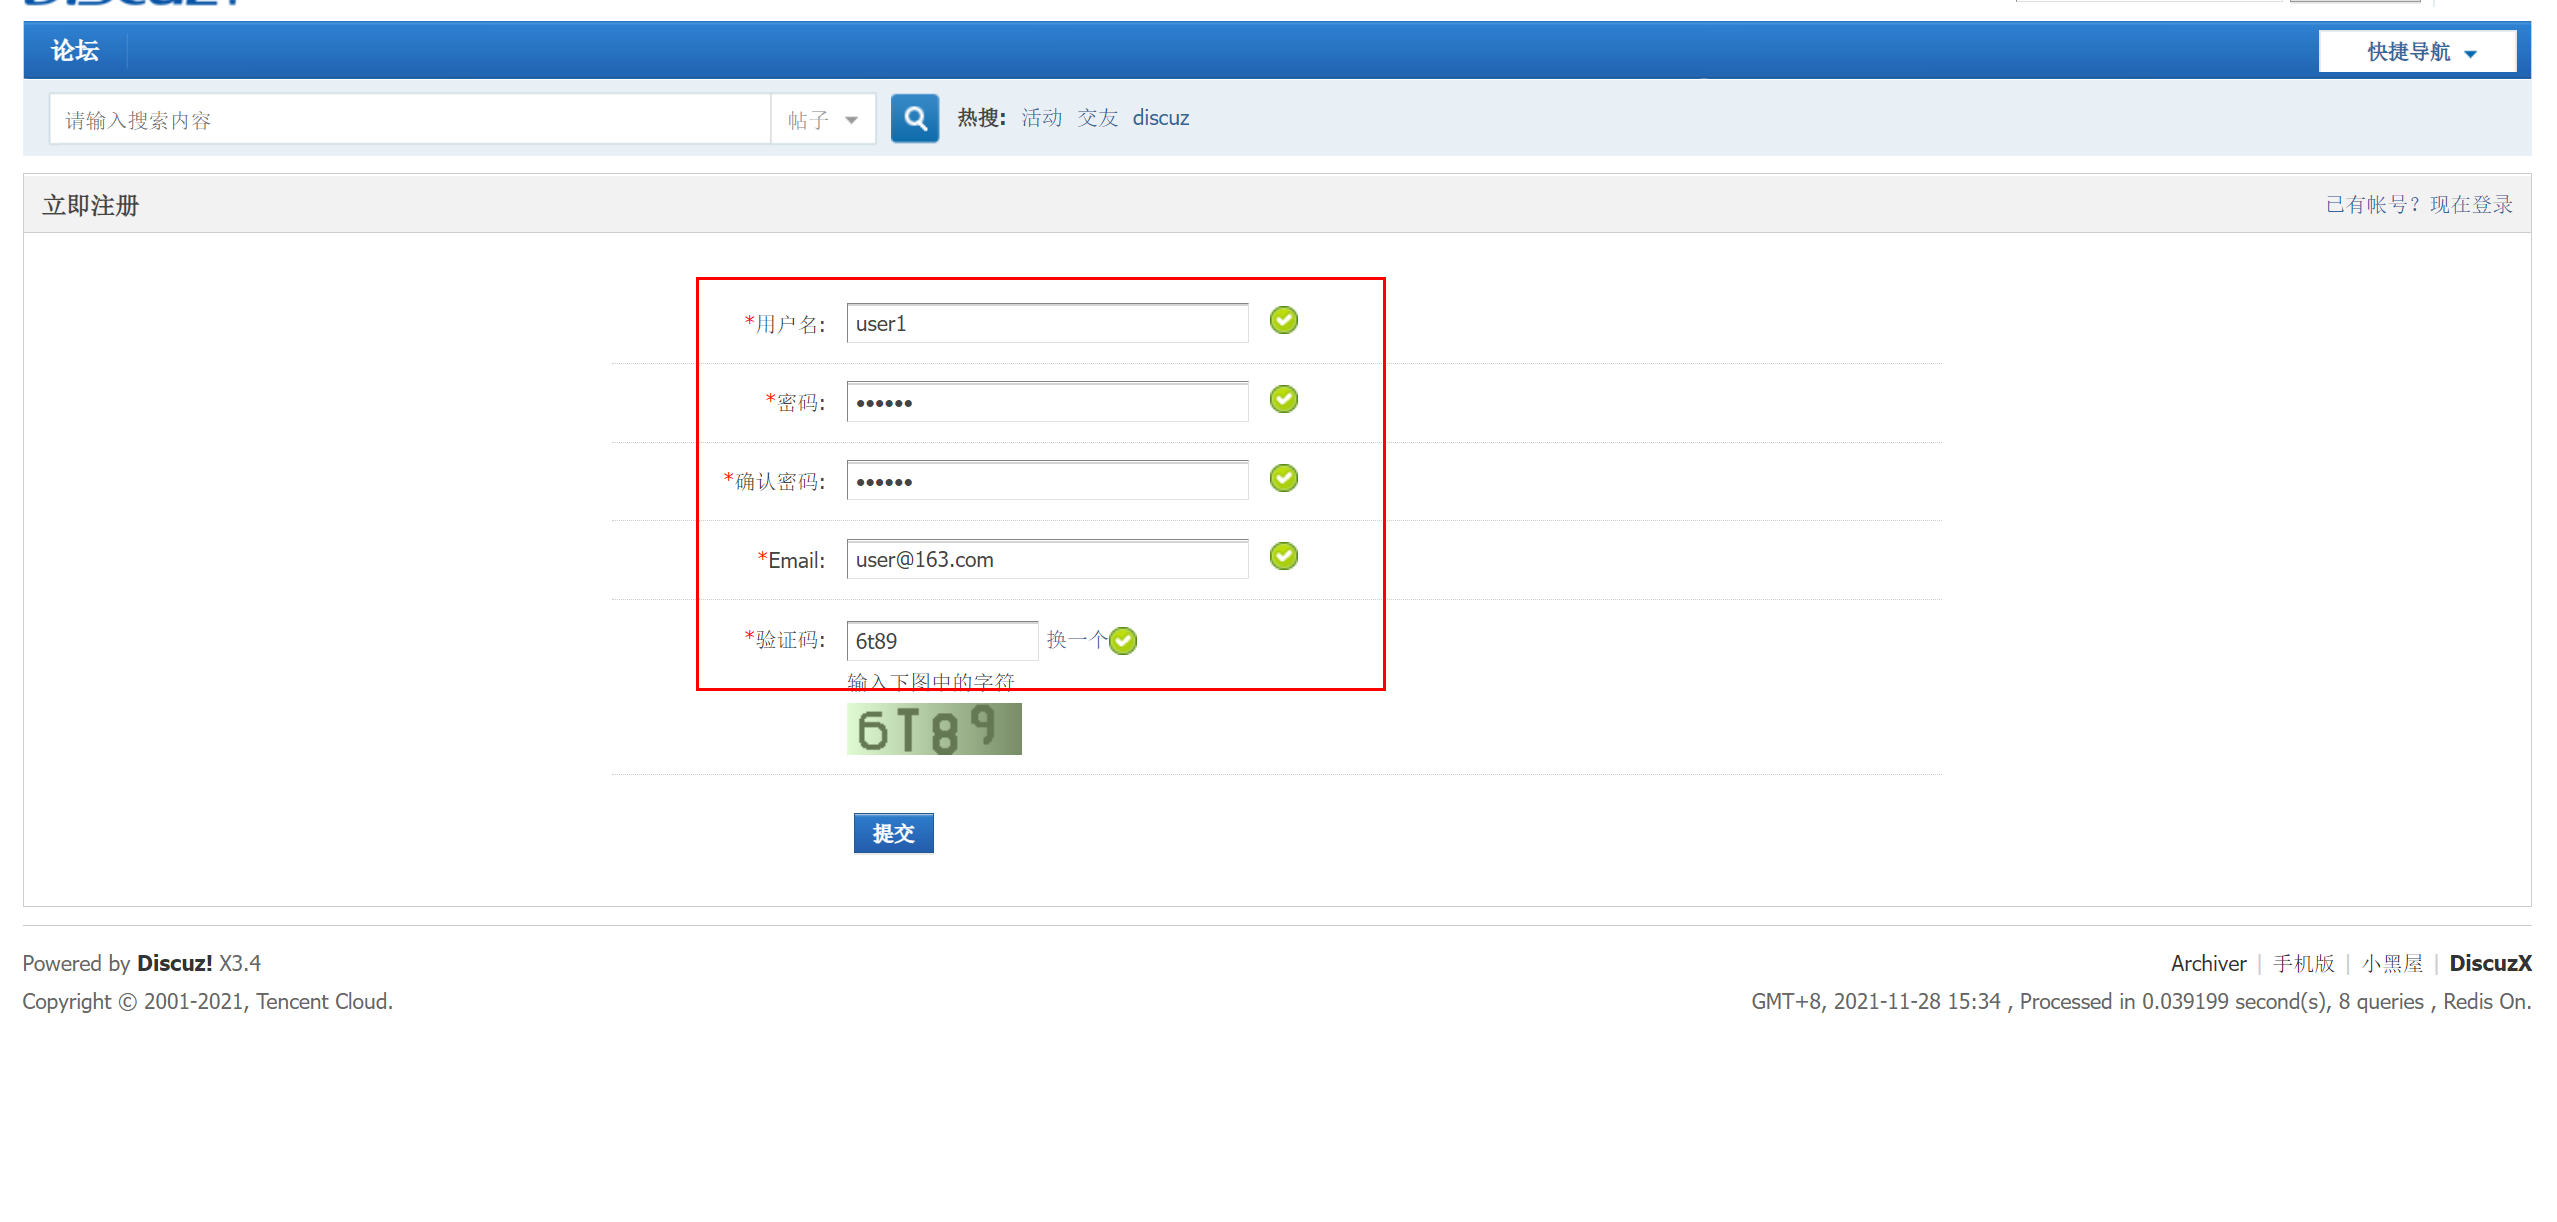
4.10 测试
新建用户,查看redis中是否有值
4.11 转到redis服务器,查看是否有键值信息
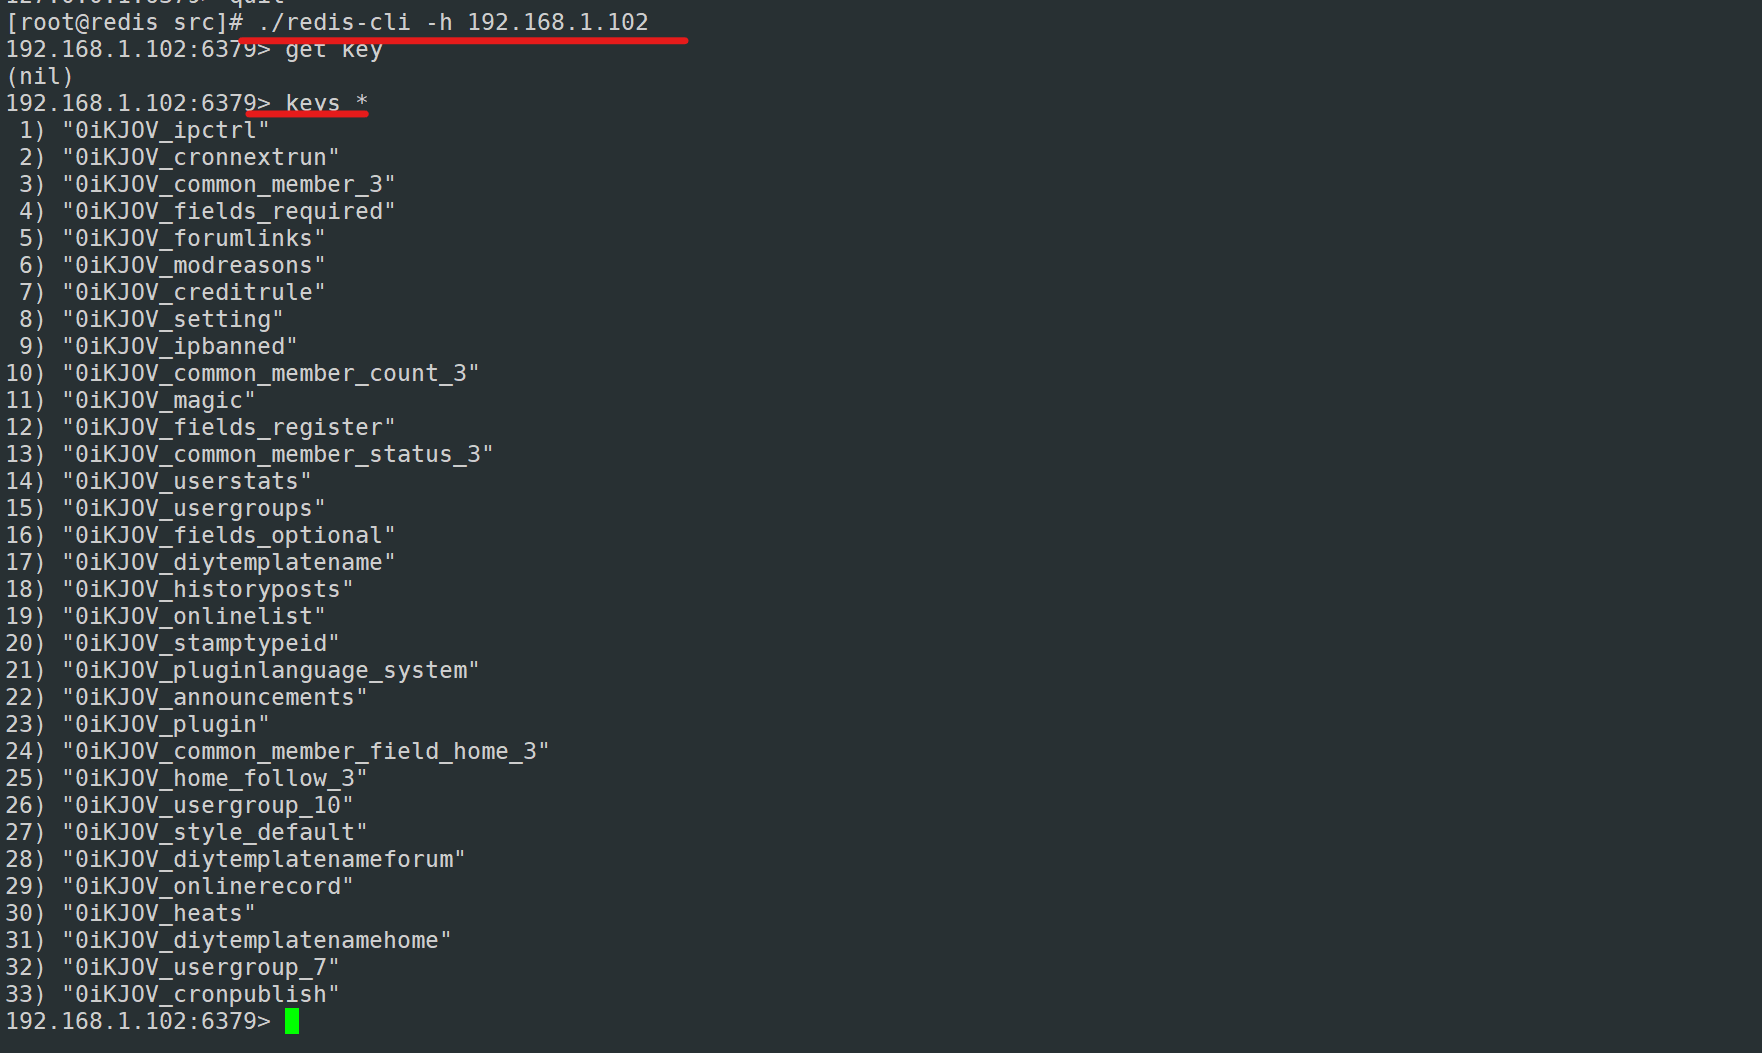
如有这类信息,说明redis缓存到了账号的信息,第一次注册,数据会被写到MySQL和redis中。
4.12测试
1)将数据库的用户表(pre_common_member;)中的user1用户删除,看是否可以正常登录
mysql> select username,password from pre_common_member;
+----------+----------------------------------+
| username | password                         |
+----------+----------------------------------+
| admin    | e0e04b48e9490892b5b6c4ccea1f3b7a |
| test     | e10424a2c788d881757f7233e07e3160 |
| user1    | 1f1ad3e594ac6c0579f1b91d3dadd407 |
+----------+----------------------------------+
3 rows in set (0.00 sec)

mysql>
mysql> delete from pre_common_member where username='user1';  ##删除用户
Query OK, 1 row affected (0.00 sec)
mysql> select username,password from pre_common_member;
+----------+----------------------------------+
| username | password                         |
+----------+----------------------------------+
| admin    | e0e04b48e9490892b5b6c4ccea1f3b7a |
| test     | e10424a2c788d881757f7233e07e3160 |
+----------+----------------------------------+
2 rows in set (0.00 sec)

mysql>
2)登录测试


可以正常登录,说明此时使用的是redis服务器的数据。