

Linux 网络服务之NFS服务
Linux 网络服务之NFS服务
一、安装启动
# Centos6 安装启动
[root@centos6 ~]# yum install nfs-utils rpcbind -y
[root@centos6 ~]# service rpcbind start && service nfs start
# 查看状态
[root@centos6 ~]# service nfs status
# Centos7 安装启动
[root@nfs-server ~]# yum install nfs-utils -y
[root@nfs-server ~]# systemctl enable --now nfs
# Centos8 安装启动
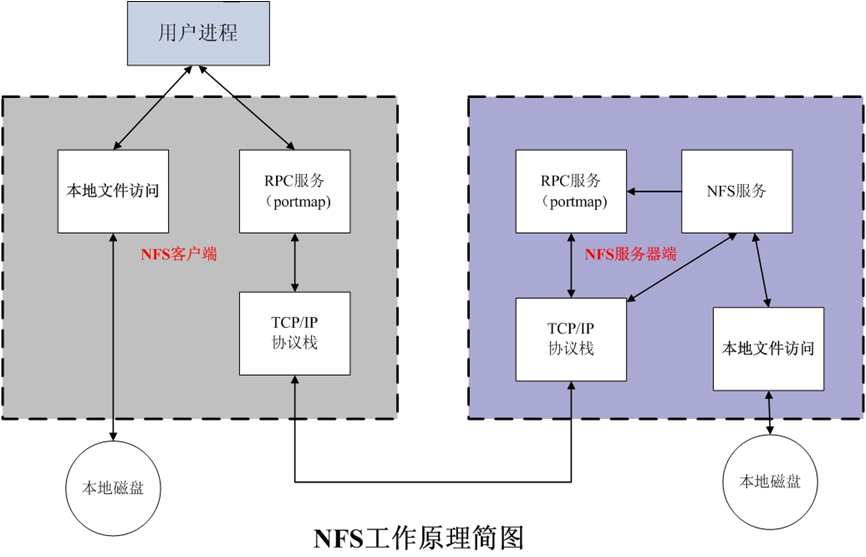
[root@nfs-server ~]# systemctl enable --now nfs-server1、NFS工作原理
1、首先 server 启动 RPC 服务,并开启 111 端口
2、接着 server 启动 NFS 服务,并向 RPC 注册端口信息
3、client 启动 RPC(portmap服务),向 server 的 RPC (portmap) 服务发送请求,请求 server 的 NFS 端口
4、server 的 RPC(portmap) 服务返回 NFS 端口信息给 client
5、client 通过获取的 NFS 端口来建立和 server 的 NFS 连接并进行数据的传输
NFS优势:节省本地存储空间,将常用的数据,如:/home目录,存放在NFS服务器上且可以通过网络访问,本地终端将可减少自身存储空间的使用。
2、NFS的特点
NFS 优点:
1)将常用的数据放在一台可以通过网络访问的服务器上,以此来节省 client 本地存储空间
2)部署简单快捷,上手容易
3)维护简单
NFS 缺点:
1)容易发生单点故障,一旦 server 宕机,那么所有的 client 就访问不到数据了
2)因为后端只有一台 server,在高并发情况下 server 端容易出现性能瓶颈
3)NFS 数据是明文传输,而且不会对数据完整性做验证,所以安全性较差(建议在局域网内使用)3、NFS服务主要进程
 rpc.nfsd 最主要的NFS进程,管理客户端是否可登录
 rpc.mountd 挂载和卸载NFS文件系统,包括权限管理
 rpc.lockd 非必要,管理文件锁,避免同时写出错
 rpc.statd 非必要,检查文件一致性,可修复文件
4、NFS配置文件
/etc/exports
/etc/exports.d/*.exports
5、NFS 的管理文件
NFS 文件系统维护指令:/usr/sbin/exportfs
维护 NFS 共享资源的命令,可以对共享资源进行更新、删除等共享资源的登录文件:/var/lib/nfs/*tab
在 NFS server的登录文件都放置到 /var/lib/nfs/ 目录里面,在该目录下有两个比较重要的登录文件,一个是 etab ,主要记录了 NFS 所共享出来的目录的完整权限设定值;另一个 xtab 则记录曾经连接到此 NFS 服务器的相关客户端数据3.客户端查询服务器分享资源的令:/usr/sbin/showmount
showmount 则主要用在 Client 端, 可以用来查看 NFS server 共享出来的目录资源二、NFS工具
# 查看注册在指定主机的RPC程序
[root@nfs-client ~]# rpcinfo -p
# 查看RPC注册程序
[root@nfs-client ~]# rpcinfo -s
# 查看远程主机
[root@nfs-client ~]# rpcinfo -p 10.0.0.8
[root@nfs-client ~]# rpcinfo -s 10.0.0.81、exportfs
-v  #查看本机所有NFS共享
-r  #重读配置文件,并共享目录
-au  #停止本机所有共享
-a  #输出本机所有共享
2、showmount
# 查看远程主机的NFS共享
[root@client/var/www/html]$ showmount -e 10.0.0.8
Export list for 10.0.0.8:
/data 10.0.0.0/24
3、mount.nfs
NFS相关的挂载选项:man 5 nfs
fg #(默认)前台挂载
bg #后台挂载
hard #(默认)持续请求
soft #非持续请求
intr #和hard配合,请求可中断
rsize #和wsize 一次读和写数据最大字节数,rsize=32768
_netdev #无网络服务时不挂载NFS资源
vers #指定版本,客户端centos8默认4.2 ,centos7默认4.1 centos6默认4.0
# 开机挂载,(_netdev)#无网络服务时不挂载NFS资源 /etc/fstab
vim /etc/fstab
192.168.2.11:/public /mnt/nfs nfs defaults,_netdev 0 0三、NFS共享配置文件
vim /etc/exports
/data 10.0.0.0/24(rw)
默认选项:(ro,sync,root_squash,no_all_squash)
ro,rw 只读和读写
async 异步,数据变化后不立即写磁盘,先写入到缓冲区中,过一段时间再写入磁盘,性能高,安全性低
sync(1.0.0后为默认)同步,数据在请求时立即写入共享存储磁盘,性能低,安全性高
root_squash (默认)远程root映射为nfsnobody,UID为65534,CentOS8 为nobody,CentOS 7以前的版本为nfsnobody
no_root_squash 远程root映射成NFS服务器的root用户
all_squash 所有远程用户(包括root)都变成nfsnobody,CentOS8 为nobody
no_all_squash (默认)保留共享文件的UID和GID
<p>anonuid和anongid 指明匿名用户映射为特定用户UID和组GID,而非nobody,可配合all_squash使用四、基本用法
# 关闭防火墙
[root@nfs-server ~]# systemctl stop firewalld
[root@nfs-server ~]# setenforce 0
</p>
<h1 id="在客户端查看远程主机的nfs共享列表">在客户端查看远程主机的nfs共享列表</h1>
<p>[root@nfs-client ~]# showmount -e
</p>
<h1 id="服务端设置挂载的目录">服务端设置挂载的目录</h1>
<p>[root@server~]$ vim /etc/exports
/data 10.0.0.0/24(rw)
</p>
<h1 id="客户端挂载">客户端挂载</h1>
<p>[root@client~]$ mount 10.0.0.8:/data /data
[root@client~]$[root@myx02~]$ df -h | grep /data
10.0.0.8:/data 37G 10G 28G 27% /data1、匿名用户映射为特定用户UID和组GID
# anonuid和anongid 指明匿名用户映射为特定用户UID和组GID,而非nobody,可配合all_squash使用
[root@nfs-server ~]$ groupadd -g 66 nfspro
[root@nfs-server ~]$ useradd -u 66 -g nfspro nfspro
[root@nfs-server ~]$ id nfspro
uid=66(nfspro) gid=66(nfspro) 组=66(nfspro)
[root@nfs-server ~]$ vim /etc/exports
/data/test1 10.0.0.0/24(rw,no_root_squash,all_squash,anonuid=66,anongid=66)
[root@server~]$ mkdir -p /data/web1
[root@server~]$ chmod 777 /data/web1
[root@server~]$ exportfs -v
/data 10.0.0.0/24(sync,wdelay,hide,no_subtree_check,sec=sys,rw,secure,root_squash,no_all_squash)</p>
<h1 id="重启服务">重启服务</h1>
<p>[root@server~]$ exportfs -r
</p>
<h1 id="Client">Client</h1><h1 id="查看Server 提供的挂载目录">查看Server 提供的挂载目录</h1>
<p>[root@client~]$ showmount -e 10.0.0.8
Export list for 10.0.0.8:
/data 10.0.0.0/24</p>
<h1 id="将 服务端的/data目录挂载到本地的/var/www/html">将 服务端的/data目录挂载到本地的/var/www/html</h1>
<p>[root@client~]$ mount -t nfs 10.0.0.8:/data/web1 /var/www/html
[root@client~]$ df -h | grep /var/www/html
10.0.0.8:/data/web1 37G 10G 28G 27% /var/www/html
</p>
<h1 id="Server端上传一个网页">Server端上传一个网页</h1>
<p>[root@server/data/web1]$ ls
index.html</p>
<h1 id="Client查看">Client查看</h1>
<p>[root@client/var/www/html]$ ls
index.html
[root@client/var/www/html]$ cat index.html
hello world!
</p>
<h1 id="客户端创建一个同样的用户和组">客户端创建一个同样的用户和组</h1>
<p>[root@client~]$ groupadd -g 66 nfspro
[root@client~]$ useradd -u 66 -g nfspro nfspro
[root@client~]$ id nfspro
uid=66(nfspro) gid=66(nfspro) 组=66(nfspro)
[root@client/var/www/html]$ touch test</p>
<h1 id="查看用户和组映射成了 nfspro nfspro">查看用户和组映射成了 nfspro nfspro</h1>
<p>[root@client/var/www/html]$ ll
总用量 4
-rw-r--r-- 1 root root 13 11月 6 19:32 index.html
-rw-r--r-- 1 nfspro nfspro 0 11月 6 19:50 test2、设置自动挂载-autofs
# 安装、启动
[root@server~]$ yum install -y autofs
[root@server~]$ systemctl start autofs</p>
<h1 id="查看目录下是空的">查看目录下是空的</h1>
<p>[root@server~]$ ll /misc/
总用量 0</p>
<h1 id="再次执行">再次执行</h1>
<p>[root@server~]$ cd /misc/cd</p>
<h1 id="自动将目录进行了挂载">自动将目录进行了挂载</h1>
<p>[root@server~]$ df -h | grep /misc/cd
/dev/sr0 4.4G 4.4G 0 100% /misc/cd
[root@nfs-server ~]# rpm -ql autofs # 包
[root@nfs-server ~]# rpm -qc autofs # 配置文件3、相对路径挂载
autofs主配置文件/etc/atuo.master格式
挂载点的dirname 指定目录的配置文件路径,如:/etc/test.auto指定子配置文件格式/etc/test.auto
挂载点的basename 挂载选项 选项设备[root@centos8 ~ ]# cat /etc/auto.master
/misc /etc/auto.misc
[root@centos8 ~ ]# cat /etc/auto.misc
cd -fstype=iso9660,ro,nosuid,nodev :/dev/cdrom
#特殊写法: 挂载点dataname和挂载目录dataname相同,即: mount 10.0.0.18:/data/www /misc/www</p>
<ul>
<li>-fstype=nfs 10.0.0.18:/data/&4、绝对路径挂载法
直接匹配全部的绝对路径名称,都写入到指定的配置文件里,不会影响本地目录结构
autofs主配置文件/etc/auto.master格式
/- 指定目录的配置文件路径(使用 /- 表示使用绝对目录)指定子配置文件格式/etc/test.auto
挂载点绝对路径 挂载选项 选项设备五、案例
1.自动挂载:
#服务端和客户端安装nfs-utils工具包
[root@server~]$ yum install -y nfs-utils autofs
[root@client~]$ yum install -y nfs-utils autofs
[root@server~]$ mkdir /nfs
[root@server~]$ cp /etc/passwd /nfs/
#centos6系统nfs服务叫做nfs.service
#centos7系统上nfs.service 和 nfs-server.service同一个服务
#centos8只有nfs-server.service服务
[root@server~]$ systemctl start nfs
#centos7系统可以解决服务之间依赖关系,并且nfs服务启动会自动启动rpcbind.service
[root@server~]$ systemctl status rpcbind
[root@server~]$ vim /etc/exports
/nfs *(rw) # * 表示所有网段
[root@server~]$ exportfs -r
[root@server~]$ exportfs -v
/nfs <world>(sync,wdelay,hide,no_subtree_check,sec=sys,rw,root_squash,no_all_squash)
[root@server~]$ systemctl restart nfs
[root@server~]$ showmount -e 10.0.0.8
Export list for 10.0.0.8:
/nfs *
[root@client~]$ showmount -e 10.0.0.9
Export list for 10.0.0.9:
/data (everyone)
#编写autofs主配置文件
[root@client~]$ vim /etc/auto.master
/opt /etc/auto.master.d/auto.nfs
#编写子配置文件
[root@client~]$ vim /etc/auto.master.d/auto.nfs
nfs -fstype=nfs 10.0.0.8:/nfs
#如果修改主配置文件需要重启服务
[root@client~]$ systemctl restart autofs
#一旦重启atuofs服务,挂载dirname目录属于autofs服务管理,源数据不存在
[root@client~]$ ll /opt/
总用量 0
#cd进入指定挂载点,autofs就会自动挂载
[root@client ~]# ls /opt/
[root@client~]$ cd /opt/nfs
[root@client/opt/nfs]$ ll
总用量 4
-rw-r--r-- 1 root root 1485 11月 6 20:12 passwd</li>
</ul>
<h1 id="只要切换到这个目录下面,目录就会自动挂载">只要切换到这个目录下面,目录就会自动挂载</h1>
<p>[root@client/opt/nfs]$ df -h | grep nfs
10.0.0.8:/nfs 37G 10G 28G 27% /opt/nfs2.搭建Discuz论坛
NFS-Server
[root@nfs-server~]$ yum -y install nfs-utils
[root@nfs-server~]$ mkdir /data/Discuz -p
[root@nfs-server~]$ cd /data/Discuz/
[root@nfs-server/data]$ if [ -f /usr/bin/curl ];then curl -sSLO https://www.discuz.vip/install/X3.4.sh;else wget -O X3.4.sh https://www.discuz.vip/install/X3.4.sh;fi;bash X3.4.sh
.
y
[root@nfs-server~]$ vim /etc/exports
/data/Discuz 10.0.0.0/24(rw)Web
[root@web~]$ yum install php php-mysql php-gd php-mbstring httpd -y
[root@web~]$ mount 10.0.0.8:/data/Discuz /var/www/html/
[root@web~]$ df -h | grep /var/www/html
10.0.0.8:/data/Discuz 37G 10G 28G 27% /var/www/html
[root@web~]$ yum install php php-mysql php-gd php-mbstring httpd -y
[root@web~]$ systemctl restart httpdMysql-Server
# 设置MySQL账户密码
mysql> grant all privileges on db.* to root@'localhost' identified by '123456' with grant option;
</p>
<h1 id="创建数据库">创建数据库</h1>
<p>mysql> create database ultrax;
</p>
<h1 id="查看">查看</h1>
<p>mysql> show databases;
+--------------------+
| Database |
+--------------------+
| information_schema |
| mysql |
| performance_schema |
| sys |
| ultrax |
+--------------------+
5 rows in set (0.01 sec)
</p>
<h1 id="将允许连接的主机添加到 MySQL 的访问控制列表中">将允许连接的主机添加到 MySQL 的访问控制列表中</h1>
<p>mysql> GRANT ALL PRIVILEGES ON <em>.</em> TO 'root'@'10.0.0.9' IDENTIFIED BY '123456' WITH GRANT OPTION;
</p>
<h1 id="刷新 MySQL 的权限">刷新 MySQL 的权限</h1>
<p>mysql> FLUSH PRIVILEGES;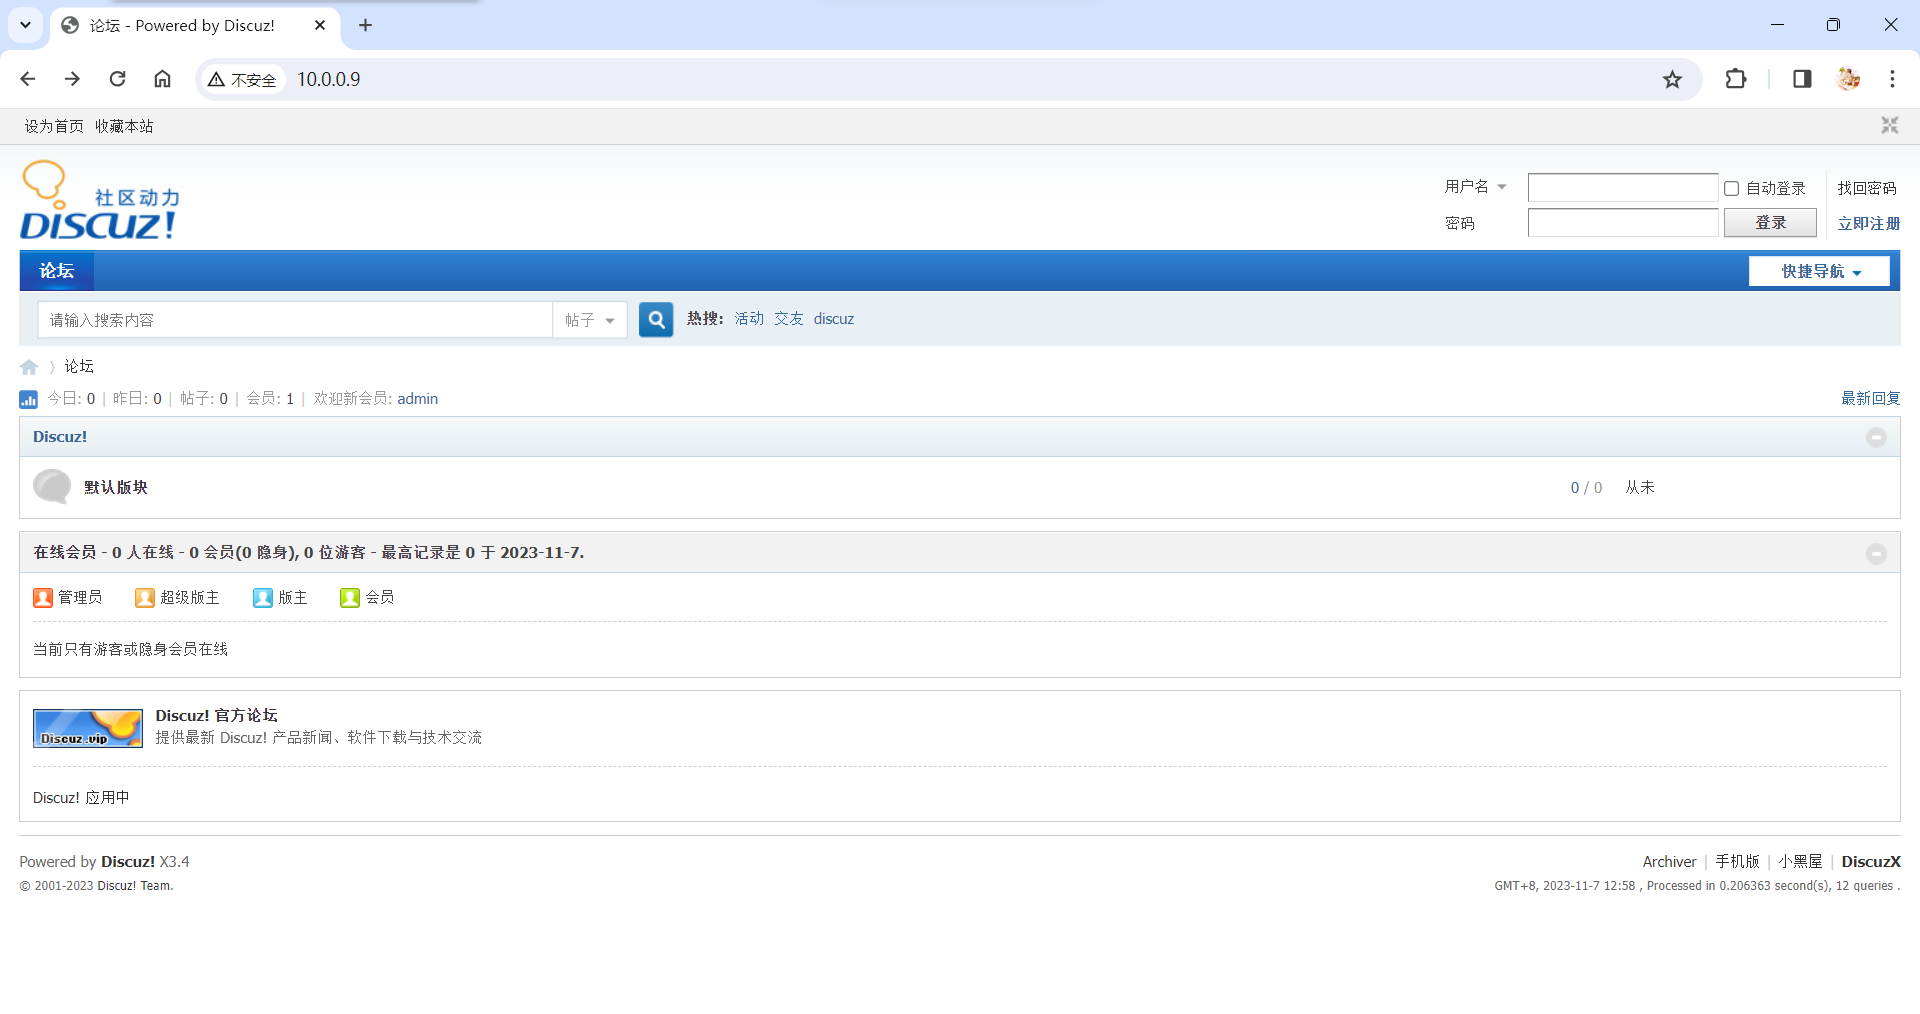


评论
匿名评论
隐私政策
你无需删除空行,直接评论以获取最佳展示效果